Zum Hauptinhalt wechseln
Gemeinsam reparieren - Jetzt registrieren

GravityLight LED Replacement

Was du brauchst

  1. GravityLight LED Replacement, Removing the Front Panel: Schritt 1, Bild 1 von 2 GravityLight LED Replacement, Removing the Front Panel: Schritt 1, Bild 2 von 2
    • Flip the GravityLight on its back and place it on a sturdy surface.

    • Unscrew the three 2cm Phillips #00 screws on the back of the GravityLight’s body.

    Frag FixBot

    Kommentar hinzufügen

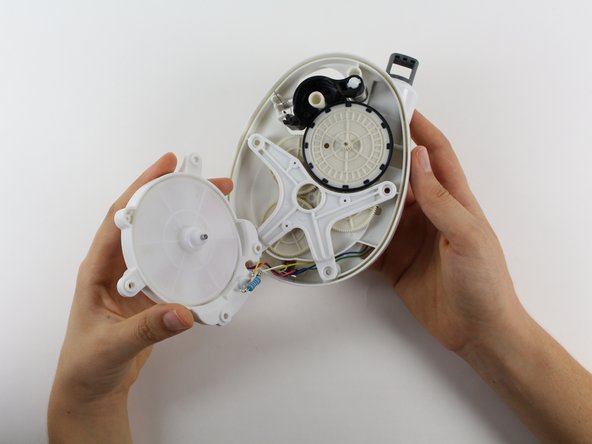
  2. GravityLight LED Replacement, Opening the Device Housing: Schritt 2, Bild 1 von 1
    • Some of the internal pieces may loosen or fall out during disassembly.

    • Firmly grasp both parts of the GravityLight body and pull them apart.

    Frag FixBot

    Kommentar hinzufügen

  3. GravityLight LED Replacement, Removing the Back Panel Screws: Schritt 3, Bild 1 von 1
    • Place the back panel, the larger of the two pieces, on a sturdy surface with its back down.

    • Unscrew the two 2cm Phillips 00 screws on the inside of the back panel.

    Frag FixBot

    Kommentar hinzufügen

  4. GravityLight LED Replacement, Removing the LED Housing: Schritt 4, Bild 1 von 2 GravityLight LED Replacement, Removing the LED Housing: Schritt 4, Bild 2 von 2
    • Hold the LED housing in your hand, but do not separate it too far otherwise you will tear the wires.

    • Lift the LED housing away from the back panel.

    Frag FixBot

    Kommentar hinzufügen

  5. GravityLight LED Replacement, Remove the White Gear from the LED Housing: Schritt 5, Bild 1 von 2 GravityLight LED Replacement, Remove the White Gear from the LED Housing: Schritt 5, Bild 2 von 2
    • Grab the outside of the large, white gear in the LED housing and pull the gear out of the housing.

    Frag FixBot

    Kommentar hinzufügen

  6. GravityLight LED Replacement, Position the LED Housing: Schritt 6, Bild 1 von 1
    • Set the LED housing flat on a sturdy surface so that the back of the LED and the wires are exposed.

    Frag FixBot

    Kommentar hinzufügen

  7. GravityLight LED Replacement, Cut the Wires: Schritt 7, Bild 1 von 1
    • Place the GravityLight's back panel aside.

    • Use the Flush Wire Cutter to cut both the purple wire and the red wire that connect to the LED.

    Frag FixBot

    Kommentar hinzufügen

  8. GravityLight LED Replacement, Bend the LED Leads: Schritt 8, Bild 1 von 1
    In diesem Schritt verwendetes Werkzeug:
    Tweezers
    $4.99
    • Take tweezers and bend the leads (the silver wires coming out of the bulb) so that the leads are straight.

    • The straight leads will make the LED easier to take out.

    Frag FixBot

    Kommentar hinzufügen

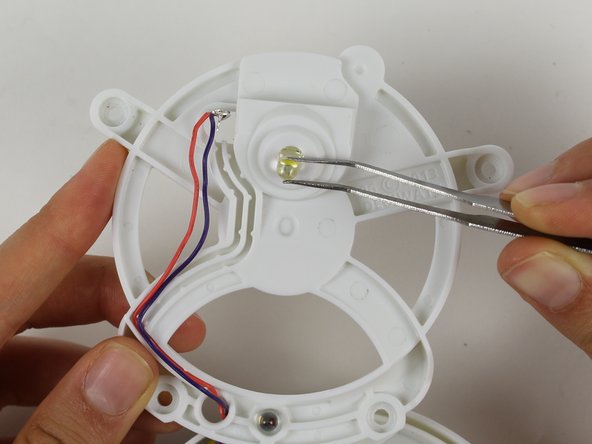
  9. GravityLight LED Replacement, Remove the LED: Schritt 9, Bild 1 von 1
    • Flip the LED housing over.

    • Pull the LED out with tweezers.

    Frag FixBot

    Kommentar hinzufügen

  10. GravityLight LED Replacement, Soldering the New LED: Schritt 10, Bild 1 von 1
    • For reassembly: Flip the LED housing back over.

    • Put the new LED in its spot. Solder the red wire and the purple wire back onto the new leads.

    • Make sure that you pair each wire to the correct lead. If the LED still does not light, switch the wires on the leads.

    • For information on how to solder look here: Wie man Lötverbindungen herstellt und entlötet

    Frag FixBot

    Kommentar hinzufügen

Abschluss

To reassemble your device, follow these instructions in reverse order.

Rückgängig: Ich habe diese Anleitung nicht absolviert.

Team

Cal Poly, Team 12-2, Forte Fall 2014 Mitglied von Cal Poly, Team 12-2, Forte Fall 2014

CPSU-FORTE-F14S12G2

5 Mitglieder

7 Anleitungen geschrieben

0 Kommentare zur Anleitung

Kommentar hinzufügen

Seitenaufrufe:

Letzte 24 Stunden: 1

Letzte 7 Tage: 4

Letzte 30 Tage: 27

Insgesamt: 1,006