Einleitung
Läuft der Akku deines Lenovo ThinkPad X1 Carbon 7. Generation (Modellnummer: 20R1000RUS) nicht mehr so wie Du möchtest? Nutze diese Anleitung um den Akku zu tauschen und wieder mehr Laufleistung zu erhalten.
Mit den Akku kannst Du dein Gerät ohne Stromkabel nutzen. Siehe auch die Troubleshooting-Seite, um festzustellen, ob dein Akku an Leistung verloren hat oder folgenden Beitrag, wenn der Akku aufgebläht is.
Lies folgenden Beitrag nach der Installation um den Akku zu kalibrieren
Was du brauchst
-
-
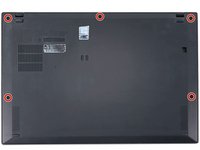
Löse die 5 unverlierbaren Schrauben, die die Bodenplatte halten, mit einem #1 Kreuzschlitzschraubendreher.
-
-
-
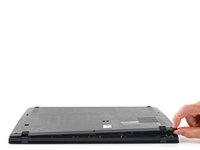
Setze ein Plektrum in einem 45° Winkel zwischen die Bodenplatte und den Rahmen ein, nahe der mittleren Schraube.
-
Heble das Plektrum nach unten, damit sich die Clips lösen, die die Bodenplatte halten.
-
-
-
-
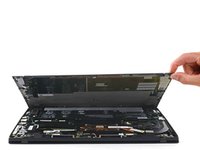
Benutze ein Öffnungswerkzeug, um den Akkustecker vorsichtig aus der Halterung auf der Platine zu lösen.
There is a tab on the side toward the wires. Be sure to lift from the top edge in the picture, and slide the bottom edge (the side with the wires) in first when reconnecting the battery.
-


Um Das Gerät wieder zusammenzubauen, folge dieser Anleitung in der umgekehrten Reihenfolge.
Um Das Gerät wieder zusammenzubauen, folge dieser Anleitung in der umgekehrten Reihenfolge.
Rückgängig: Ich habe diese Anleitung nicht absolviert.
20 weitere Personen haben diese Anleitung absolviert.
Besonderer Dank geht an diese Übersetzer:innen:
100%


Diese Übersetzer:innen helfen uns, die Welt zu reparieren! Wie kann ich mithelfen?
Hier starten ›
Team

Cal Poly, Team S19-G2, White Winter 2020 Mitglied von Cal Poly, Team S19-G2, White Winter 2020
CPSU-WHITE-W20S19G2
4 Mitglieder
20 Anleitungen geschrieben
10 Kommentare
Thank you for the post! My laptop battery is totally dead, not charging at all at 0%, so I cannot disable the built-in battery. Since it immediately dies if unplugged, the built-in battery is automatically enabled while it’s turned on and plugged. Can I just let it unplugged and proceed?
You should still be able to access BIOS with the laptop plugged into its charger to disable the battery before unplugging it and removing it. However, if that does not work, just be careful not to bridge any of the pins the battery connects to on the motherboard and everything should still be fine.
The X1 g.7 has a known bug where internal battery stops working (won’t charge, or says battery not detected in windows). I have personally solved this problem on 4-5 laptops by disconnecting the battery (follow this guide until step 4) and then plugging it back in after ten seconds. In 90% of the cases this has solved the problem without battery replacement.
Yeah it's a hardware connection issue at least in my case. A light kick to the back of the laptop also works usually.
Thanks! This has been very helpful. Just followed the steps until removing the battery connector and putting it back. Issue sorted!
kj_only1 -
Just personally came across this issue on my son's laptop - your comment was a lifesaver
Opened up the X1 using the iFixit instructions and noted that the battery connector was not seated properly
I completely disconnected the connector, waited and then seated it back fully
Everything works now
We don't know how that connected would come loose like that though...not sure if it's going to happen again as the laptop gets jostled around in his backpack around campus
pinkoos -
After replacing battery in X1 Gen 7 battery indicator shows 100% (laptop plugged-in) and Lenovo recalibration function stays forever in Step 2 (drain battery down). If I unplug laptop, it immediately goes dark as if it has no battery and won’t boot. Plugging it in again and powering up everything works fine. In short, works when plugged in and doesn’t work when unplugged despite diagnostic saying battery is good. Any suggestions? Thanks.
You are my hero! I could not figure out how to disconnect the motherboard connector of the battery. After your instruction I could. Saved me $50 easily!!
I am trying to replace the keyboard which unlike some other x390 cannot be removed from the front. Do you have a video that explains this step by step like removing the battery, motherboard and then the keyboard?
Excellent guide, this made it easy.
The only thing I struggled with a bit was to reconnect the battery cable. You have to do exactly the reverse of step 5: first fasten the part of the battery cable connector that has the cables connected to it (= the part the closest to the battery), so the black cable connector is tilted slightly. Then gently push the other (titled) part down until it clicks. Ensure the connector is fixed before re-assembling the back cover.