Einleitung
Das Festplattenkabel enthält den IR-Sensor/ die Ruhezustandsanzeige.
Was du brauchst
-
-
Entferne die folgenden zehn Schrauben, mit denen das untere Gehäuse am oberen Gehäuse befestigt ist:
-
Sieben 3 mm Kreuzschlitzschrauben
-
Drei 13,5 mm Kreuzschlitzschrauben
-
-
-
Hebe das untere Gehäuse mit beiden Händen in der Nähe der Lüftungsöffnung an, damit sich die beiden Clips lösen, mit denen die beiden Gehäuseteile verbunden sind.
-
Entferne das untere Gehäuse und lege es zur Seite.
-
-
In diesem Schritt verwendetes Werkzeug:P6 Pentalobe Screwdriver 2009 15" MacBook Pro Battery$5.49
-
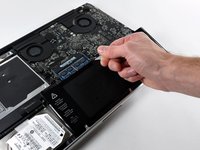
Entferne die beiden 5-Punkt Pentalobe Schrauben an der Oberkante des Akkus.
Question: why do you remove the battery? According to Apple's official manual, this is not required (not for the mid-2009 and not for the mid-2010 15-inch MacBook Pro) - see pages 37 ff:
Zitat von alexkli:
Question: why do you remove the battery? According to Apple's official manual, this is not required (not for the mid-2009 and not for the mid-2010 15-inch MacBook Pro) - see pages 37 ff:
I'm interested by your experience.
Did you have removed the optical drive without removing the battery ?
I'm just in this step now and if it is possible I would proceed like you because removing the battery void the warranty (and there is a sticker).
Thanks in advance.
Looks like my note to step 3 appears on all repair guides that have the same step. I meant that in the context of the hard drive replacement only.
Did you have removed the optical drive without removing the battery ?
I haven't yet done anything, waiting for my MacBook Pro 15 inch mid-2010 to arrive.
I missed the notes and went ahead and purchased the 5 point driver for the battery before I realized it was not necessary.
I've edited the repair guide to remove the section on the battery, but I don't have the points to approve the changes.
Please note - the step about removing the battery is part of a pre-requisite guide, that is used for many of the guides, most that do require removal of the battery. Also, working inside a disassembled laptop with the battery still connected risks damaging/shorting out very expensive parts.
Absolutely. To be clear -- ALL of the above discussion is ONLY in reference to replacing the hard drive.
I replaced a hard drive in a MacBook Pro of an earlier model than this without removing the battery. The hard drive wasn't right. It only worked at about half speed, and I had to replace it once more. The second time I removed the battery and all went well. The recommendation by the iFixit staff to remove the battery before working on electronic equipment is a good one.
What is the size of those screws... I have rounded off the socket on mine and would like to replace them.
I measured the screw size, using a micrometer, its about 1.523mm in diameter and 3.186mm in length. Not sure what screw size that is. They are not easily available I guess, unless someone is selling used ones on ebay
In my case the three pentalobe screws were 3 point.
-
-
-
Biege die Ausbuchtung am Aufkleber "Warning: Do not remove the battery" mit der Spudgerspitze hoch, um die dritte Pentalobe Schraube darunter zu entfernen.
-
-
-
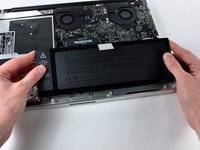
Hebe den Akku an seiner Plastiklasche hoch und schiebe ihn von der langen Kante des oberen Gehäuses weg.
My T6 (appears to be same screw driver you have - $6 on amazon for 20piece set) did NOT fit int he battery screws...not sure if I had the wrong screws or what, but I went ahead w/o battery steps and it was pretty easy.
I also noticed that the new SDD (from crucial) didn't have the 4 screws, so I had to move those off the old HD and onto the new one.
Just had the same issue: T6 does not fit the battery screws ;-( ... but with a little bit more preassure it was possible to remove the screws.
-
-
-
-
Kippe den Akku soweit nach hinten, dass du an den Akkukabelstecker herankommst.
-
Ziehe den Akkukabelstecker aus seinem Anschluss auf dem Logic Board und entferne den Akku aus dem oberen Gehäuse.
-
Wenn du einen neuen Akku einbaust, solltest du ihn nach dem Einbau kalibrieren.
-
-
-
Entferne die beiden Kreuzschlitzschrauben, mit denen die Festplattenhalterung am oberen Gehäuse befestigt ist.
-
Hebe die Halterung aus dem oberen Gehäuse heraus.
-
-
-
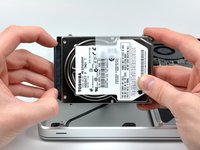
Hebe die Festplatte an ihrer Zuglasche aus dem Rahmen heraus, achte dabei auf das Kabel, mit dem sie an den Computer angeschlossen ist.
-
-
-
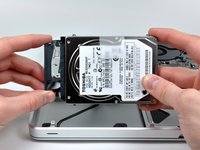
Löse das Festplattenkabel, indem du die Festplatte gerade vom Stecker abziehst. Halte den Stecker fest. Wenn du am Stecker ziehst, kann er zu weit herauskommen und dabei das Festplattenkabel zerreißen.
-
-
-
Entferne die folgenden vier Schrauben, mit denen das Kabel der Festplatte und des IR-Sensors am oberen Gehäuse befestigt ist:
-
Zwei 1,5 mm Kreuzschlitzschrauben
-
Zwei 4 mm Kreuzschlitzschrauben
-
-
-
Schiebe die Festplatte und die Halterung des IR-Sensors von der Kante des oberen Gehäuses weg.
-
-
-
Benutze das flache Ende eines Spudgers, um den Festplatten-Kabelstecker vom Logic Board zu hebeln.
-
-
-
Löse das Kabel der Festplatte und des IR-Sensors vorsichtig vom rechten Lautsprecher/oberen Gehäuse ab und entferne sie von deinem Computer.
-
-
-
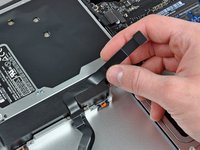
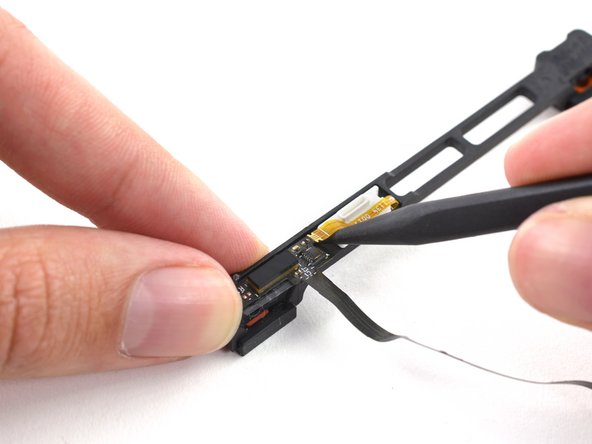
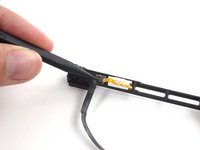
Benutze die Spitze eines Spudgers, um den ZIF-Stecker auf dem Festplattenkabel hochzuklappen.
-
Ziehe das Kabel der Sensor-Halterung vorsichtig aus dem ZIF-Stecker.
-
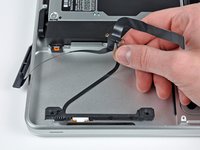
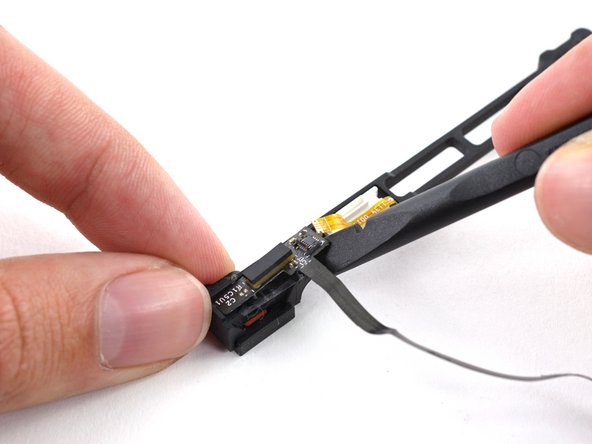
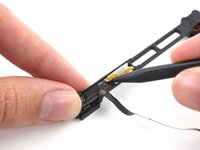
Benutze das flache Ende eines Spudgers, um das Festplattenkabel von der Sensor-Halterung abzuhebeln.
-


Um dein Gerät wieder zusammenzubauen, folge den Schritten dieser Anleitung in umgekehrter Reihenfolge.
Um dein Gerät wieder zusammenzubauen, folge den Schritten dieser Anleitung in umgekehrter Reihenfolge.
Rückgängig: Ich habe diese Anleitung nicht absolviert.
48 weitere Personen haben diese Anleitung absolviert.
Besonderer Dank geht an diese Übersetzer:innen:
100%

Annika Faelker hilft uns, die Welt in Ordnung zu bringen! Wie kann ich mithelfen?
Hier starten ›

3 Kommentare
I found that the smaller cable branch to the IR sensor was glued down to the case. The new part (purchased from ifixit.com) didn't have a sticky backing so I carefully removed some of the sticky material from the original cable and stuck it to the new cable. This kept the cable in place when I replaced the hard drive. I could see how one might accidentally bend or fold the cable in a way that could damage it when placing the hard drive.
This guide made it really easy. It fixed my problem. Thanks!
I want to buy a hard drive cable but I live in Mozambique, how can I get it, because my country is not included?
May be helpful to have more distinct colors to identify the different screws.
Victor Caamano - Antwort