Einleitung
Diese Anleitung kann auch bei anderen Melitta-Modellen und bei Kaffeevollautomaten von Nivona, Siemens und Miele helfen – die Modelle sind ähnlich aufgebaut.
Wenn die Mahlsteine abgenutzt sind, werden die Kaffeebohnen nicht mehr geschnitten, sondern gequetscht. Das Kaffeemehl wird ungleichmäßig und das Aroma leidet. Hier wird gezeigt, wie du die Mahlsteine austauschen kannst.
Was du brauchst
-
-
Entferne den Wassertank und die Abtropfschale.
-
Nimm den Seitendeckel ab und hole die Brühgruppe heraus.
-
Entferne alle Kaffeebohnen.
-
-
-
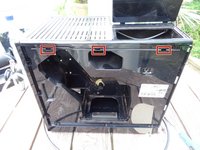
Entferne sechs Torx T10 Schrauben auf der Rückseite.
-
Hebele die Rückseite ab. Sie klemmt oft sehr fest und du musst recht viel Kraft aufwenden. Benutze unbedingt Hebelwerkzeug aus Kunststoff, um Schäden zu vermeiden.
-
-
-
Drücke mit einem Flachschraubendreher oder einem Metallspatel gefühlvoll in die Schlitze in den beiden Seitenteilen, um die Rasten der Oberseite zu lösen. Diese sitzen sehr fest und du musst recht kräftig drücken.
-
Zwischen Oberseite und Seitenteilen sollte nun ein Spalt entstanden sein. Heble die Oberseite mit einem Plastikwerkzeug ab. Sie klemmt oft und du musst recht viel Kraft aufwenden
-
-
-
Setze ein Kunstoffwerkzeug in den Spalt zwischen Vorderseite und linkem Seitenteil ein und vergrößere ihn. Schiebe dann das Seitenteil nach hinten. Das Seitenteil klemmt oft sehr stark und du musst viel Kraft aufwenden.
-
Ziehe den Schlauch vom Wasserbehälter zur Pumpe ab.
-
Nimm das Seitenteil ab.
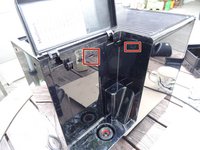
Hi, I have a Melitta Caffeo Solo E950 and had a problem with the switch (it said that the drainage tray was always in while I removed it).
I was able to access the switch right after the step 4 behind the side panel.
Paul
Do you mean this one: Melitta Caffeo Solo Mikroschalter an der Tropfschale tauschen?
VauWeh -
-
-
-
Setze ein Kunstoffwerkzeug in den Spalt zwischen Vorderseite und rechtem Seitenteil ein und vergrößere ihn. Schiebe dann das Seitenteil nach hinten. Das Seitenteil klemmt oft sehr stark und du musst viel Kraft aufwenden.
-
Nimm das Seitenteil ab.
-
-
-
-
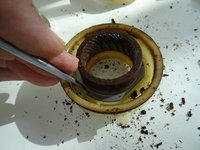
Das Mahlwerk liegt rechts hinten an der Maschine. Der Einsteller und der äußere Ring kann abgeclipst werden, notwendig ist das aber nur, wenn das Mahlwerk komplett getauscht werden muss. Sei vorsichtig und hebe ihn mit dosierter Kraft ab.
-
Die folgenden Bilder stammen von einer Jura und es gibt leichte Unterschiede. Da die Mühle aber gleich ist, ist die Reparatur grundsätzlich auch gleich.
You mention a small spring-loaded ball that is “beyond the white ring with the holes”. Do you have a picture of where the spring/ball goes? I was disassembling this area and a tiny spring and ball rolled out of somewhere and I haven’t a clue where from. I could send a picture of the pieces if needed. Note that the spring and ball are like half the size of the springs/balls that go in the grinding mill.
I lost the spring and ball can the machine work without it?
@elrimitchell Yes and no. I think, the grinder will work for some (short) time. But it will not keep its settings and perhaps be damaged. Can't you buy the parts, (shop above), they cost less than 2€.
VauWeh -
-
-
-
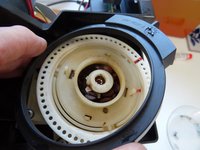
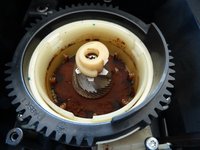
Die Mühle liegt offen. Fotografiere die Einstellung, ziehe dann die Achse mit dem Zahnrad des Einstellers mit etwas Kraft nach oben.
-
Auf dem Mahlring befindet sich je nach Modell noch eine Silikondichtung. Zieh sie einfach nach oben ab.
-
Beachte die Werksmarkierungen, hier grün. Das muss zum Schluss wieder so eingestellt werden. Drehe den schwarzen Zahnkranz etwa 90 Grad gegen die Uhr. Damit ist der komplette Mahlring mit Einsatz frei und kann nach oben gezogen werden.
-
-
-
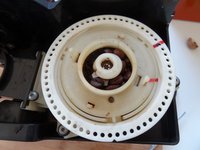
Der Mahlkegel ist mit einer langen Torx T20 Schraube befestigt. Der Schraubenkopf ist oft mit Resten von Kaffeebohnen bedeckt. Lege den Kopf frei und drehe die Schraube gegen den Uhrzeigersinn heraus.
-
Nun kann der Bohneneinzug (die kleine weiße Schnecke) entfernt werden. Vorsichtig lässt sich nun auch der Mahlwerkskegel samt Antrieb hochheben.
-
-
-
Meistens ist die Mühle zugeklebt. Alles muss wieder schön sauber werden, dadurch wird das Aroma des Kaffees wieder gut.
-
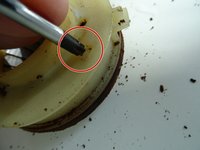
Der Filzring um den Antrieb kann mit einer Nadel vorsichtig angehoben und dann mit einem feuchten Tuch gesäubert werden. Wasche ihn nicht, er quillt sonst auf. Drehe ihn beim ersten Mal einfach um, so dass die saubere Seite nach oben zeigt.
-
Das Innere der Mühle kann mit Pinsel und feuchtem Tuch gereinigt werden, der Mitnehmer mit Spülbürste und warmem Wasser. Ordentlich abtrocknen lassen!
What is your process for cleaning the felt ring once removed from the drive access?
I use a damp rag with a little dishwashing liquid. Another option is to simply turn the ring upside down.
VauWeh -
Cleaning the felt ring ruined it.
Do you know any vendor in the US that sells the felt washer?
Jan Don -
As I´m german, sorry no. Perhaps they do: https://www.jura-parts.com . And have a look for Capressa Infinity grinders, it´s the same. Or make one DIY using a piece of felt.
VauWeh -
the water expanded the felt ring and it did not shrink back once dry.
Can you recommend a parts place in the US to get this felt washer? The link you sent does not show that it would fit the
Jura ENA4.
-Roger
In this case things are different. Did you really replace the grindstones? Or only clean the device? When my informations are right the ENA 4 is equipped with a "Aroma +" grinder, which means special grindstones, not the normal ones. As far as I know Jura does not sell them separately, only the complete grinder. I think, the felt ring will fit, but I don't know where to buy in the US. I think, the grinder also will work without the ring or cut one of a piece of felt. Good luck!
VauWeh -
If you can't find the felt ring, you have a few options, make one, beg the German jura parts seller to sell you one, or search aliexpress for felt ring, felt washer, felt gasket.
Hello. The piece where the springs and ball bearings are housed: where can I buy a replacement, please if you know.
Thanks
Same thing happened with my felt ring. It expanded and never retracted after washing. Did anyone figure out where to buy it in the US?
The Capresso Infinity grinder should be the same, so look for someone who supplies its parts.
VauWeh -
Make one, lots of materials at your local hobby store or online. https://www.aliexpress.us/item/325680549...
If you can't find it a wool washer from Michael's or Joann etc will work. You can also get them online at aliexpress and ebay.
-
-
-
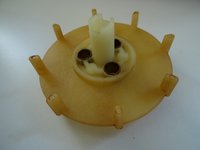
Die beiden kleinen Klinken hineindrücken, dann abwechselnd links und rechts drücken, dann kommt der Deckel heraus
-
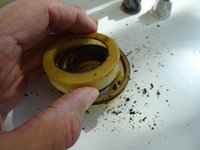
Zwei Klammern halten den Ring, einfach wegdrücken, dann ist er frei.
-
Alles wird gereinigt, dann der neue Ring eingedrückt und der Deckel wieder eingeclipst. Damit ist der Mahlring getauscht.
-
-
-
Zuerst den gereinigten Mitnehmer einlegen, dann die drei Hülsen, Federn und Kugeln. Nun den Mahlkegel auf die drei Kugeln passen.
-
Dann die Einzugsschnecke einpassen, Zentralschrauben eindrehen. Beim Eindrehen den Kegel nach unten drücken und darauf achten, dass alles ineinandergreift.
Everything is in right place
I push as hard as I can. But it seem the that the screw is turning in the void. I remove all the part to see if the hole was strip , the screw seem to enter firmly
In this case I fear, you have to buy a new grinder. Replacing it is straightforward.
VauWeh -
i find a bit longer screw and it work but now the black ring is spinning in the void. the black outer ring and the white outer ring are suppose to be turning together ?
I have one more spring and ball, that are half a diametr of the rest. Can’t figure out where do they go?
Might be the ball and spring beyond the big black gear, makes the “click", when turning it.
VauWeh -
Thanks. I followed the steps on the Nivona grinder and replaced the springs and the balls in the exact order. Now the grinder can only grind finely and this is too find for my brewer and hence my espresso machine is clogged. Can anyone see what when wrong after the reassembly?
I think the parts don't fit together properly. First: There are three holes on the bottom of the cone that the balls must fit into. Second: at the bottom of the helix are two tabs that must fit into corresponding grooves.
VauWeh -
How tight should you screw this screw in? Until it can no longer turn the screw driver?
Short answer: yes, not to hard. The screw ist spring loaded and cannot move easily. Be sure that the helix fits.
VauWeh -
hello, changed the burrs and the coffee was too fine, clogging the machine. Haven't read correctly your tuto !!
The adjustment oft the new grinder burrs must not necessarily be the same as the old ones. You can approximately find the mean position, which was marked before, by turning the outer ring as far as possible clockwise, then turning it fourteen clicks backwards.
So you should not reallign the green mark , but use the 14 clicks from the grinder full closed for medium.
En remontant les meules, on serre jusqu’à toucher les 2 cônes en tournant dans le sens des aiguilles, puis 14 clics dans le sens inverse pour avoir le réglage medium. Surtout si on a serré la vis centrale différemment du montage initial.
-
-
-
Mahlring einlegen. Das schwarze Zahnrad wird wieder soweit nach rechts gedreht, bis die drei Markierungen fluchten. Dann die Antriebswelle des Einstellers wieder so einsetzen, wie es ursprünglich war
-
Dann die restlichen Teile in umgekehrter Reihenfolge montieren.
-
Du kannst den Mahlgrad schön einstellen, indem du eine leere Klopapierrolle senkrecht auf die offene Mühle stellt und dort ein paar Kaffeebohnen einfüllst. Stecke den Stecker ein (Vorsicht!), wähle eine Tasse Kaffee und beobachte direkt, wie das Kaffeemehl aus der Mühle herauskommt.
i turn the black gear but the white one doesnt turn any more , they are suppose to turn together?
By turning the the black gear the grinder ring moves a little bit up and down and changes the grinder setting. The white ring holding the grinder ring indeed does not move. Or do you mean the big white gear beyond the black one? If the black and the white gears are not connected, press firmly the black gear down, until it clicks in.
VauWeh -
i remove a part the black and the white ring, it seem that there was black pin on the black ring that was maybe glue to the white ring ? but it seem broken or unglue , it whitish on the tip like if it was broke
unless i see nothing that make those 2 ring jam together. maybe i should try to reglue with a dot of epoxy ?
Thanks ! Alot!
Super Anleitung. Die neue Mahlsteinen war deutlich anders als die alten. Ich habe die Einstellring so weit wie möglich nach rechst gedreht, dann 14 Zähnen nach links, wie beschrieben. Die Maschine malt jetzt perfect. Danke.
if you move the ring fourteen clicks back, it means maximum opening or closing of the setting. Hope you understand what I mean. With these fourteen clicks, how to set this adjustment stick
First turn the ring clockwise so that the grindstones sit tightly on each other. Then open it by turning the ring counterclockwise for fourteen clicks. This is a medium setting. You can do a fine adjusting later. Watch the grinder in action using the toilet-paper-roll method. Good luck!
VauWeh -
Ok. Thank you very much.
I am looking to do the same replacement. The instructions looks great but I cannot find anywhere where to buy the two pieces grinder compatible for a ena micro 1. Any suggestions where I could buy that?
This is indeed difficult. The grinder of the ENA Micro 1 is special. So far I have unfortunately only found the complete grinder, very expensive. (~ 150€). A reason not to buy this model, but that's no use to you anymore.
VauWeh -
or a cheaper used one (~70€): https://www.jura-ersatzteile-shop.de/mah...
VauWeh -
you can get that on eBay and aliexpress/alibaba. if you like take out the burrs and and measure them and I can tell you if they are the common ones being sold everywhere.
If you mark and line up all the rings as well as the spot on the “coarse -fine” adjuster and return them to the exact position at the end, do you have to bother about turning the clicks counterclockwise at the end.
Well, try it. Normally, everything should work fine and you can check the result on the grind. But the method with the 14 clicks is really simple.
VauWeh -
Great video. Ma problem is, there were only one mark on the rings, and I didn't mark the rings. Will the 14 clicks be enough initial adjustmet? Why is part of the black ring raised, and where does it go in relationship to the coffee shute? Thanks for any help
Did you remove the black ring? If the (green?) mark on the outer white ring is on 12, the middle of the raised part is on 8, as far as I remember. It serves as stop, there is a counterpart in the bean reservoir. Not really important and not in every model. And yes, the 14 clicks work fine. Try the grinder open, putting an empty toilet paper filled with some beans on it.
VauWeh -
Thanks for the instructions. It all worked out, but for me it was easier to remove the whole grinder housing (3 screws) in order to remove the top part (step 7).
Also, before removing the grinder cone and the 3 springs and the 3 balls, a smaller spring and a smaller ball fell off somewhere and I could not figure out where to put them. Again all 3 springs and balls are as you describe but the extra smaller one I left out while re-assembling.
At the end it is a success, but was curious if you knew where these extra parts are from
Sounds like the that's what makes the clicking sound when you adjust the grinder from course to fine.
If you remove the top, black ring with the gear teeth, you will expose the off white plastic, it has holes all the way around,
that where the ball and spring go to make that clicking sound. Not a big deal, I misplaced mine and I've been using the grinder
for a few years now without it. https://www.juraprofi.de/Jura-Ersatzteil...
@jimmylasvegas is right. This ball is the detent for the adjustment of the grinder.
VauWeh -
I cleaned the grinder because it was dirty and didn't grind well: no coffee output. After everything is cleaned and replaced it is turning free but doesn't grind. There is still no coffee output. I do not understand why the coffea beans do not come through the grinder. Has anybody a soluton?
Thank you! I want to attempt this service after reading your post.
Do the grinding burrs fit an XJ9 Jura? I cannot find the parts at a reasonable price anywhere else. Any advice is very much appreciated
You need special grinder burrs, as it is a Aroma+ grinder. In the meantime they are available. I do not know, If they will ship it to your country, at least in europe they do.
VauWeh -
-
-
-
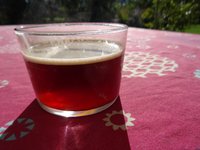
Die beiden Bilder sind absolut echt: der Kaffee vor dem Tausch ist dünn und durchsichtig. Danach schwarz und kräftig, er hat mehr Crema. Weitere Einstellungen wurden nicht geändert! Die Reparatur hat sich sehr gelohnt.
This is very helpful. My question is that when disassembling the unit, a very small ball came loose (not one of the balls under the grinder cone that you flagged). Now my grinder does not adjust for a fine grind so i think the ball was somewhere in the grinder adjustment assembly?
Thanks
Yes. This must be the ball in the grinder adjustment. Have a look to the steps 5 - 7 in the guide for saeco: https://de.ifixit.com/Anleitung/Saeco+Vi..., the grinder is nearly the same. The big black gearwheel can be lifted upwards using a little force and you can see all those little holes - and the ball was sitting under one of them thus keeping the adjuster in position. Hope it helps and you can fix it!
Do you have a picture of where that tiny spring and ball should be placed back? When I was unscrewing the grinder unit from the body (hadn’t yet disassembled the grinder itself) the little spring and ball hopped out of somewhere and my video didn’t catch where from. I have a Bosch Benvenuto built-in and couldn’t find it in the parts diagram catalog.
Jan Don -
Yes Sir, e.g. here, picture included.
VauWeh -
You lost your balls? there’s 2 ball bearings that make the clicking sound as you adjust the grind. I lost both of mine, never found them again. Anyone know what size they are? you can buy new balls at a local bearing store or on alibaba/ebay.
Hello VauWeh,
I’ve cleaned my grinder and assembled it back. One thing I can’t restore is that grinder adjuster doesn’t click anymore. Could you please advise something that might affect it? The coffee is perfect but the grinder setting doesn’t stay in place. When it grinds, vibration makes it move towards a more coarse setting.
Hello, as I mentioned in my answer dated 18.11.2019, I suppose you lost the ball, which makes the clicking sound and holds the position of the big wheel. Sorry, I don't know a solution for that.
VauWeh -
Thanks, coffee is black now, and full of aromas but a bit strong !! So take some time before reassembling all , to set the outer ring for default medium grind, not respecting the outside green mark.
Merci le café est maintenant noir et sent très bon. Le réglage de la bague doit se faire avant de tout remonter, pour régler la finesse de monture par défaut. J'allais jeter la machine....
Thank you very much for the clear instructions. I started with just disassembling the grinding unit of my 9 years old Solo and cleaning it. That did not give the results I was hoping for. Bought an new set of grinders, installed following these instructions and the result is fantastic. Hoping for another 9 years on this machine with the help of the repair guides on this site (of which I have successfully used a couple now).
It is always a pleasure for me when my guide could help.
VauWeh -
ou trouver les meules pour une caffeo solo ?
Ce sont les mêmes que pour Jura, affichées dans l'introduction.
VauWeh -
I followed these steps (helfpul, thank you). I was careful to set the grinding ring back to the standard setting as described, however when reassembling, the coffee comes out watery. Sure enough I take out the drip tray and the grounds are very large.
I did notice that the burr and the ring were quite damaged/ rusty.
Would you suggest that the grounds being far too large is more likely to be due to the reassembly being incorrect, or the stones being damaged/ worn?
@jimbo27280 As a rule of thumb: if the stones have more than 10,000 cups on them, they should be replaced. But if you really see that they are broken, replace them in any case. It's worth the money and the effort!
VauWeh -
Just replace the burrs, you can find them on eBay and aliexpress. I can't post links here but they cost between $10-35 shipped. They look identical to the originals.
-


Arbeite die Schritte in umgekehrter Reihenfolge ab, um dein Gerät wieder zusammenzubauen.
Arbeite die Schritte in umgekehrter Reihenfolge ab, um dein Gerät wieder zusammenzubauen.
Rückgängig: Ich habe diese Anleitung nicht absolviert.
10 weitere Personen haben diese Anleitung absolviert.
Team

Repair is War on Entropy Mitglied von Repair is War on Entropy
Community
29 Mitglieder
1.752 Anleitungen geschrieben
4 Kommentare
Hello there. Congratulations for you instructions. I am preparing to change the grinderstones on my Melitta too. Please tell me , probably it is necesary, which parts are better to be greased/regreased before reassembly ? Also do you have any knowledge of improved version of grindstones with better metal ? Some shop claim that they sell newer/improved version like for example version 5.2 . Any ideeas ? Thank you.
@ursanandrei I would buy the original ones. They do last for about 10 000 cups, I think this is OK ;-). The grinder (and the stones) for Jura, Melitta, Nivona, some Bosch, Siemens, AEG, Krups... are all the same. If you live in EU the price will be around 25€, e.g. here.
And: Normally there is no grease on the grinder. If the large gear wheel can no longer be turned easily because there are coffee grounds between the wheel and the grinder, you need to clean it and possibly lubricate it very thinly with food-safe silicone oil.
Thank you for your answer. Can you tell me if the grindstones kit with the code H432712 are suitable for my Melitta E 957-240 ? ******
I think so, yes it should fit. This is the standard kit for the normal Melitta. In the unlikely case it does not fit, be prepared to give it back.
VauWeh -
bei meiner Maschine muss ich die Schale 3-4 mal rausnehmen / einsetzten damit sich das Signal von „dauerhaft an“ auf „blinkend“ einstellt, deutet das daraufhin das der mikroschalter getauscht werden sollte. Übrigens, danke für das tolle Tutorial ..lg Tom
Hans-A Shole - Antwort
Problem ist behoben, Schalter getauscht, Position des Schalters ist bei der Caffeo Solo 950 sehr gut erreichbar. Alter Schalter konnte auch wieder gangfähig gemacht werden und dient nun als Ersatz.
Hans-A Shole - Antwort