Zum Hauptinhalt wechseln

Moto C Plus Earpiece Speaker Replacement

Was du brauchst

  1. Moto C Plus Earpiece Speaker Replacement, Back Cover: Schritt 1, Bild 1 von 3 Moto C Plus Earpiece Speaker Replacement, Back Cover: Schritt 1, Bild 2 von 3 Moto C Plus Earpiece Speaker Replacement, Back Cover: Schritt 1, Bild 3 von 3
    • Power off your phone before beginning disassembly.

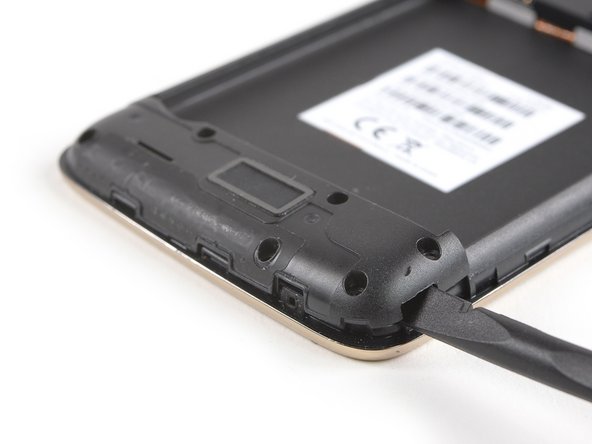
    • Insert a thumbnail, or spudger, into the notch on the bottom right to start separating the phone unit from the back cover.

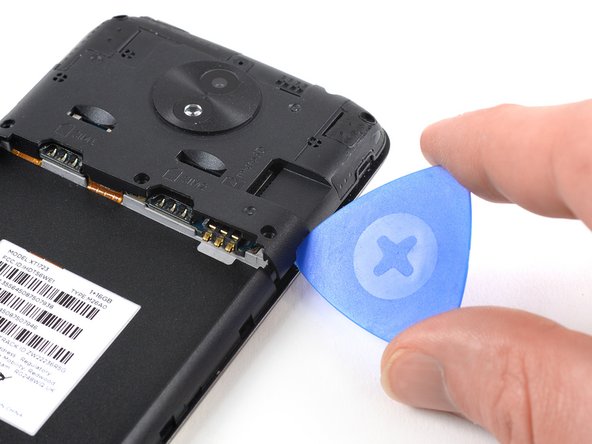
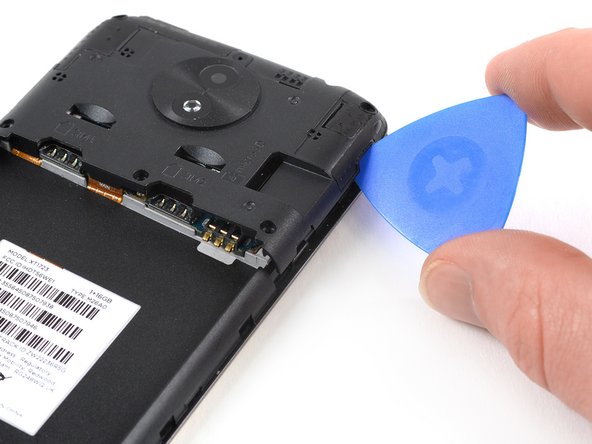
    • Move to the bottom left corner and pry the phone unit out of the back cover until you can get a good grip.

  2. Moto C Plus Earpiece Speaker Replacement: Schritt 2, Bild 1 von 2 Moto C Plus Earpiece Speaker Replacement: Schritt 2, Bild 2 von 2
    • Lift the phone out of the back cover.

  3. Moto C Plus Earpiece Speaker Replacement, Battery: Schritt 3, Bild 1 von 3 Moto C Plus Earpiece Speaker Replacement, Battery: Schritt 3, Bild 2 von 3 Moto C Plus Earpiece Speaker Replacement, Battery: Schritt 3, Bild 3 von 3
    • Use a spudger or fingernail to lift the battery starting at the notch on the bottom left.

    • Lever the battery out of its recess and remove it.

  4. Moto C Plus Earpiece Speaker Replacement, Daughterboard Cover: Schritt 4, Bild 1 von 1
    • Remove the six 3.1 mm Phillips #00 screws securing the daughterboard cover.

  5. Moto C Plus Earpiece Speaker Replacement: Schritt 5, Bild 1 von 3 Moto C Plus Earpiece Speaker Replacement: Schritt 5, Bild 2 von 3 Moto C Plus Earpiece Speaker Replacement: Schritt 5, Bild 3 von 3
    • Apply a spudger to the right side of the daughterboard cover.

    • Twist the spudger sideways to pry up the daughterboard cover until you get a good grip.

    • Remove the daughterboard cover.

  6. Moto C Plus Earpiece Speaker Replacement, Motherboard Cover: Schritt 6, Bild 1 von 1
    • Remove the five 3.1 mm long Phillips #00 screws.

  7. Moto C Plus Earpiece Speaker Replacement: Schritt 7, Bild 1 von 3 Moto C Plus Earpiece Speaker Replacement: Schritt 7, Bild 2 von 3 Moto C Plus Earpiece Speaker Replacement: Schritt 7, Bild 3 von 3
    • Apply an opening pick to the bottom right corner of the motherboard cover.

    • Twist the opening pick to free the motherboard cover out of the plastic clamps on the right side of the phone.

  8. Moto C Plus Earpiece Speaker Replacement: Schritt 8, Bild 1 von 2 Moto C Plus Earpiece Speaker Replacement: Schritt 8, Bild 2 von 2
    • Repeat the previous step on the left side of the motherboard cover to free it out of the plastic clamps.

    • Pry up the motherboard cover until you can get a good grip.

    • Remove the motherboard cover.

  9. Moto C Plus Earpiece Speaker Replacement, Motherboard Assembly: Schritt 9, Bild 1 von 1
    • Remove the two 3.2 mm Phillips #00 screws securing the motherboard.

  10. Moto C Plus Earpiece Speaker Replacement: Schritt 10, Bild 1 von 2 Moto C Plus Earpiece Speaker Replacement: Schritt 10, Bild 2 von 2
    • Use the tip of a spudger to lift the latch on the power and volume button ZIF connector.

  11. Moto C Plus Earpiece Speaker Replacement: Schritt 11, Bild 1 von 2 Moto C Plus Earpiece Speaker Replacement: Schritt 11, Bild 2 von 2
    In diesem Schritt verwendetes Werkzeug:
    Tweezers
    $4.99
    Kaufen
    • Use a pair of tweezers to pull the power and volume button flex cable out of the ZIF connector.

    • Fold the power and volume button flex cable out of the way.

  12. Moto C Plus Earpiece Speaker Replacement: Schritt 12, Bild 1 von 2 Moto C Plus Earpiece Speaker Replacement: Schritt 12, Bild 2 von 2
    • Pry up and disconnect the antenna cable.

    • Fold the antenna cable out of the way.

  13. Moto C Plus Earpiece Speaker Replacement: Schritt 13, Bild 1 von 2 Moto C Plus Earpiece Speaker Replacement: Schritt 13, Bild 2 von 2
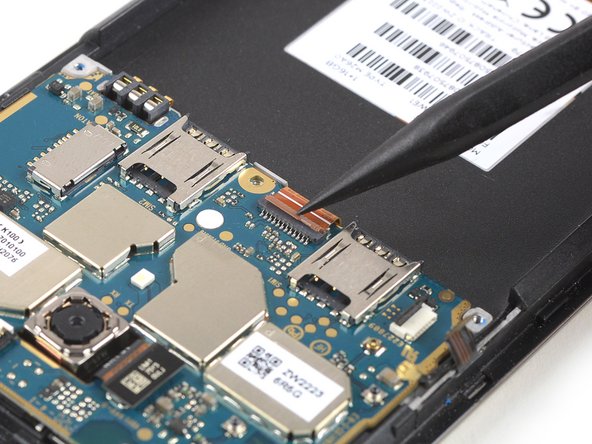
    • Use the tip of a spudger to open the interconnect cable ZIF connector by lifting the brown flap.

    • When reassembling make sure the white line on the cable aligns with the closed flap.

  14. Moto C Plus Earpiece Speaker Replacement: Schritt 14, Bild 1 von 2 Moto C Plus Earpiece Speaker Replacement: Schritt 14, Bild 2 von 2
    • Use a pair of tweezers to pull the interconnect flex cable out of the ZIF connector.

  15. Moto C Plus Earpiece Speaker Replacement: Schritt 15, Bild 1 von 2 Moto C Plus Earpiece Speaker Replacement: Schritt 15, Bild 2 von 2
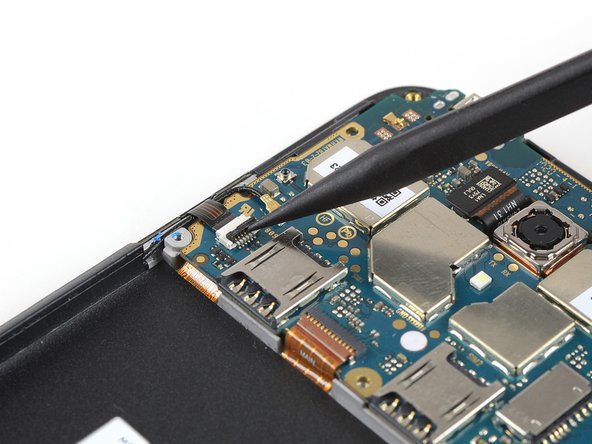
    • Use the tip of a spudger to open the flap of the ZIF connector next to the headphone jack.

  16. Moto C Plus Earpiece Speaker Replacement: Schritt 16, Bild 1 von 2 Moto C Plus Earpiece Speaker Replacement: Schritt 16, Bild 2 von 2
    • Use a pair of tweezers to pull the flex cable out of the ZIF connector.

  17. Moto C Plus Earpiece Speaker Replacement: Schritt 17, Bild 1 von 2 Moto C Plus Earpiece Speaker Replacement: Schritt 17, Bild 2 von 2
    • Don't try to remove the motherboard all the way yet. The display flex cable is still connected to its rear side.

    • Use a spudger to carefully lift the motherboard until you can get a good grip. Avoid to damage the cables next to the motherboard.

    • Lift the motherboard and fold it back until you have enough space to disconnect the display flex cable.

  18. Moto C Plus Earpiece Speaker Replacement: Schritt 18, Bild 1 von 2 Moto C Plus Earpiece Speaker Replacement: Schritt 18, Bild 2 von 2
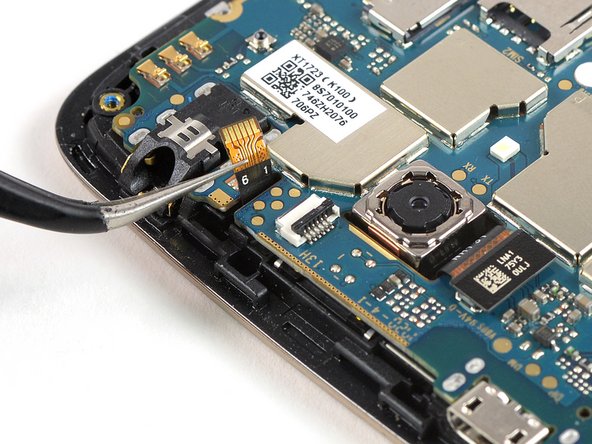
    • Use the edge of a spudger to pry up and disconnect the display flex cable from the motherboard.

  19. Moto C Plus Earpiece Speaker Replacement: Schritt 19, Bild 1 von 1
    • Remove the motherboard.

  20. Moto C Plus Earpiece Speaker Replacement, Earpiece Speaker: Schritt 20, Bild 1 von 1
    • Use an iOpener and apply it to the top edge of the display to loosen the adhesive beneath the earpiece speaker.

  21. Moto C Plus Earpiece Speaker Replacement: Schritt 21, Bild 1 von 2 Moto C Plus Earpiece Speaker Replacement: Schritt 21, Bild 2 von 2
    In diesem Schritt verwendetes Werkzeug:
    Tweezers
    $4.99
    Kaufen
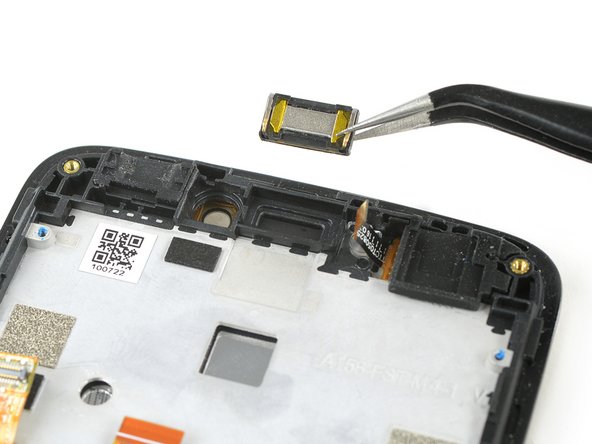
    • Use a pair of tweezers to carefully grab and remove the earpiece speaker.

Abschluss

To reassemble your device, follow these instructions in reverse order.

2 weitere Nutzer:innen haben diese Anleitung absolviert.

Dominik Schnabelrauch

Mitglied seit: 11/23/16

204.268 Reputation

682 Anleitungen geschrieben

Team

iFixit Mitglied von iFixit

Staff

135 Mitglieder

17.243 Anleitungen geschrieben

0 Kommentare

Kommentar hinzufügen

Seitenaufrufe:

Letzte 24 Stunden: 1

Letzte 7 Tage: 5

Letzte 30 Tage: 14

Insgesamt: 1,103