Einleitung
Hier wird der Austausch des Netzteils gezeigt. Du musst einige wenige Teile ausbauen, aber das Netzteil ist eines der ersten Bauteile der PS4, die du herausnehmen kannst.
Was du brauchst
-
-
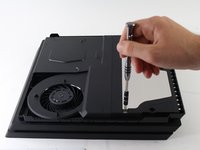
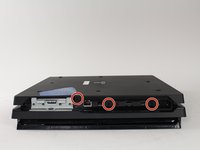
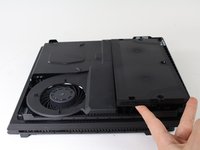
Lege die Konsole mit der Unterseite nach oben hin.
-
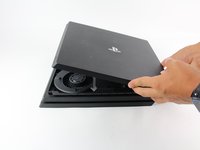
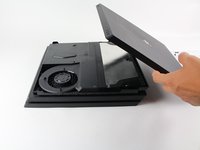
Ziehe den Plastikdeckel über der Festplatte mit den Fingern heraus und lasse ihn ausschnappen.
-
-
-
Entferne die einzelne Kreuzschlitzschraube #0, welche den Festplattenträger befestigt.
-
Ziehe den Festplattenträger gerade heraus.
-
-
-
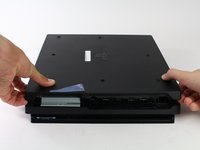
Stelle die Konsole mit der rechten Seite nach oben ab.
-
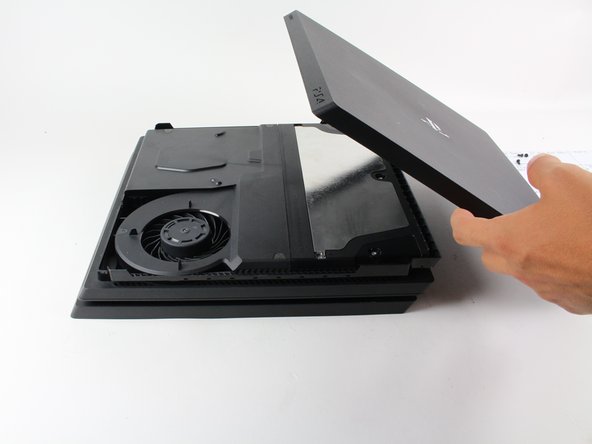
Fasse die beiden Ecken an der Vorderseite an.
-
Ziehe nach oben, bis du ein lautes Klicken hörst.
-
Wenn sich beide Ecken gelöst haben, dann kannst du die Abdeckung nach hinten schieben und abheben.
-
-
-
-
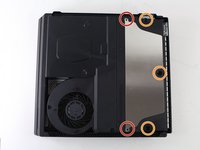
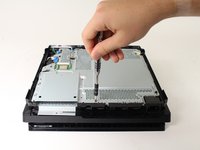
Entferne fünf Torx T8 Security Schrauben auf der Rückseite des Geräts.
-
Zwei 31 mm Schrauben.
-
Drei 10 mm Schrauben.
-
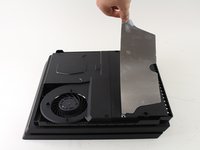
Ziehe die Metallplatte nach oben und entferne sie.
I couldn’t open the middle 10mm screw with T8 Torx Security screwdriver :(
How do I get the middle plastic black screw out? It's not doing anything but stripping it.
it’s like rubber or something on that middle screw.
On newer models the black screw in the middle is just plastic and does not have to be removed. Skip it or you’ll just drive yourself crazy and end up producing a small pile of plastic-dust and that’s it.
-
-
-
Drehe die Konsole wieder um, so dass der Boden nach oben zeigt.
-
Entferne drei schwarze 7 mm Torx T8 Security Schrauben von der Rückwand.
-
Entferne die Bodenabdeckung auf die gleiche Art, wie die obere Abdeckung. Fasse die Abdeckung an beiden Seiten und ziehe daran, bis es klickt. Schiebe dann die Abdeckung weg.
If you have a console that has not been fixed before - these screws will be hidden under warranty stickers - so make sure you understand that completing this step will basically void the warranty.
-
-
-
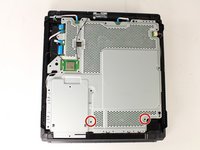
Entferne die zwei 10 mm silberfarbenen Torx T8 Security Schrauben von der Metallplatte.
-
-
-
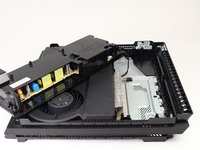
Drehe die Konsole wieder um und arbeite wieder von der Oberseite her.
-
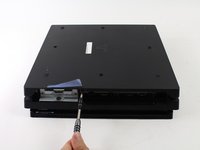
Setze die Finger auf beiden Seiten unter die Kanten des Netzteils und ziehe gerade nach oben.
-
Fasse den Stecker hinter dem Netzteil und ziehe ihn gerade heraus.
what kind of wire is that ive been looking everywhere for a replacement
There are 3 different power supplies for the pro model.......... take it apart and read the numbers off it to make sure you get the correct one. 300ER, 300CR, 300FR
This is the only screw I can't get out on top of the power supply so I can replace my pasta what size is it
This is the screw I had trouble with I don't know why and it's the only screw holding the power supply in on top in the middle when you take the foil off
-


Um dein Gerät wieder zusammenzusetzen, folge den Schritten in umgekehrter Reihenfolge.
Um dein Gerät wieder zusammenzusetzen, folge den Schritten in umgekehrter Reihenfolge.
Rückgängig: Ich habe diese Anleitung nicht absolviert.
39 weitere Personen haben diese Anleitung absolviert.
Besonderer Dank geht an diese Übersetzer:innen:
100%

Diese Übersetzer:innen helfen uns, die Welt zu reparieren! Wie kann ich mithelfen?
Hier starten ›
Team

Cal Poly, Team S21-G5, Livingston Spring 2017 Mitglied von Cal Poly, Team S21-G5, Livingston Spring 2017
CPSU-LIVINGSTON-S17S21G5
4 Mitglieder
49 Anleitungen geschrieben
10 Kommentare
I bought a PS4 power supply CR 300 and my PS4 has an FR 300 power supply will they interchange
My PlayStation Pro has a power supply FR 300 and the power supply I bought was a CR 300 power supply will they interchange
Hola como saber que tipo de fuente vida mi ps4 pro modelo 7215b
Solucionaste el problema?
for anyone attempting this please note that the motherboard connector for the power supply is very fragile and might break off will trying to disconnect. Try pinching the connector on the motherboard and gently pulling on the cables to try and keep that from happening
Good morning do you have a number to call for I can call about a ps4 Pro
Because I need my PS4 to get fixed I think one of the cords inside of it is broken and it do not want to turn on and stuff like that so ya what is the number I can contact you on