Einleitung
Folge dieser Anleitung, um einen defekten Lüfter an deiner PlayStation 5 zu ersetzen. Du kannst die Anleitung aber auch verwenden, um deinen Lüfter zu reinigen.
Bevor du beginnst, fahre deine Konsole komplett herunter und ziehe alle Kabel ab. Achte darauf, dass du ESD-sicher arbeitest und es nicht zu elektrostatischen Entladungen kommt.
Was du brauchst
Einführungsvideo
-
-
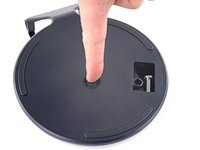
Wenn deine PlayStation 5 hochkant steht, drehe sie um, damit der Standfuß nach oben zeigt.
-
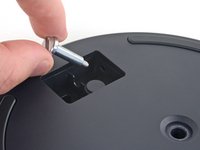
Entferne die 26,5 mm Schraube mit einem Schlitzschraubendreher oder einer Münze.
-
-
-
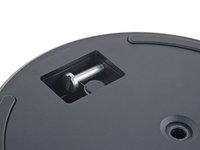
Stecke die Schraube in die Kerbe auf der Unterseite des Standfußes.
-
-
In diesem Schritt verwendetes Werkzeug:Tweezers$4.99
-
Löse die Abdeckung für das Schraubenloch mit einer Pinzette.
-
Drücke die Abdeckung auf das Schraubenloch.
-
-
-
Drehe den Standfuß gegen den Uhrzeigersinn, um die Abdeckung zu schließen.
-
-
-
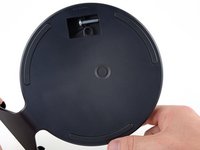
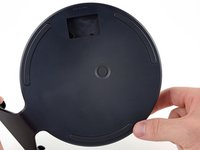
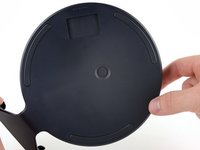
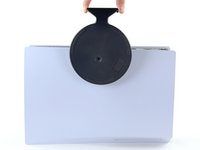
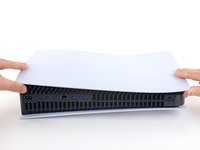
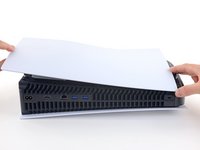
Wenn die PlayStation 5 noch flach liegt, dann stelle sie auf ihre Front, so dass die Ladebuchse nach oben zeigt.
-
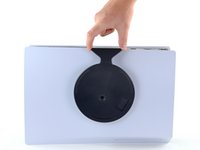
Hebe den Standfuß gerade nach oben, um ihn zu entfernen.
Do you guys sell the stand
-
-
-
-
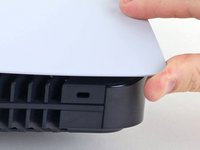
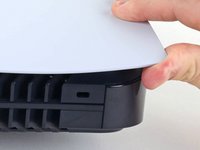
Kippe das Gerät so, dass dass die USB- und Ethernetanschlüsse von dir aus gesehen links sind.
-
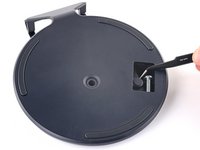
Heble die Frontplatte an einer Ecke hoch, bis sie sich vom Gehäuse löst.
-
-
-
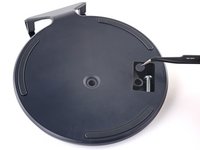
Hebe die rechte Frontplatte an der Ecke an und schiebe sie gleichzeitig zur Unterseite des Gerätes hin.
-
Entferne die rechte Frontplatte.
I recommend doing both covers at this time, to avoid hassle later. Skip to step 38, then come back here
-
-
-
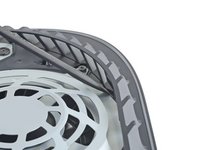
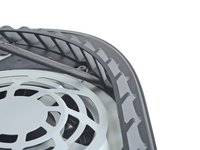
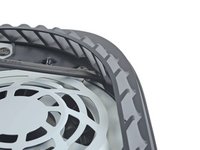
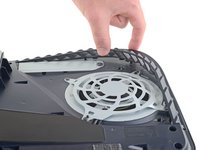
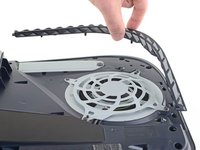
Setzt das flache Ende eines Spudgers unter das Gitter in die Kerbe über dem Lüfter.
-
Hebe den Spudger an, um das Gitter vom Gehäuse zu hebeln.
-
-
-
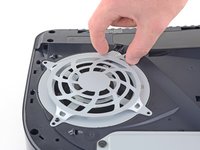
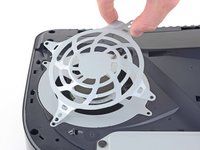
Hebe das Gitter vom Gehäuse und entferne es.
During reassembling:
There is a little flat pin in each end, they need to go into the console
-
-
In diesem Schritt verwendetes Werkzeug:Magnetic Project Mat$19.95
-
Entferne die vier Torx TR8 Sicherheitsschrauben, mit denen die Lüfterhaube befestigt ist.
-
Zwei 23,3 mm Schrauben
-
Eine 11,4 mm Schraube
-
Eine 31 mm Schraube
My ps5 seems to have tiny black caps over each screw. My spudger can’t get them off I see no other way to move forward besides breaking the shroud
wrong side, take the cover off the other side
The 31 mm-long screw just wont budge! do I turn that one counter-clockwise or clockwise? someone please help!
counter clockwise to remove
I damaged the 23.3mm on the bottom right next to fan connector. Is there any replacements? Can't seem to find any 23.3mm t8 screw anywhere online
I used a t8 for all of them and had no problem removing, except for that bottom right screw
Is there any replacement screws you can buy for the fan? I slightly damage 23.3mm screw.
My PS5 has TX8 (security Torx bit) screws on my fan shroud and all the case screws. A normal Torx driver won’t work you need the one with the hole in the middle of the bit driver.
Why does my ps5 have 3 different screws? 2 are the same then 2 other ones? Why?
Does anyone know the thread pitch of these screws? I just bought a used PS5 and the screws are missing. The fan has been glued in. Can't make this up.....
Ci sono viti di ricambio?
Dove posso trovarle?
Ho guardato dappertutto e non se ne trovano
Sind mit den Massen die dicke oder die Länge gemeint
-
-
-
Hebe die Lüfterhaube gerade nach oben und entferne sie.
-
-
-
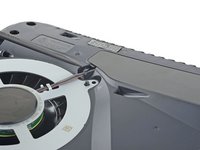
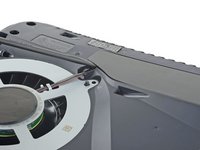
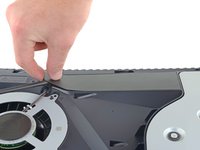
Setze das flache Ende eines Spudgers unter die schwarze Kabelabdeckung in die Lücke über den Lüfterkabeln.
-
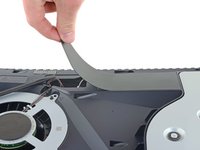
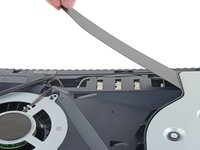
Löse die Abdeckung mit dem Spudger so weit, bis du die mit den Fingern greifen kannst.
-
-
-
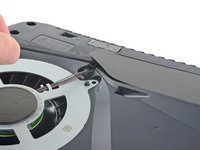
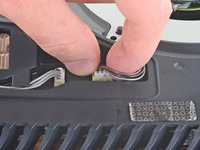
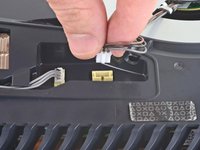
Greife mit deinen Fingern die Kanten des Kabelanschlusses und ziehe ihn gerade aus seinem Anschluss.
-
-
-
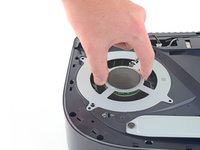
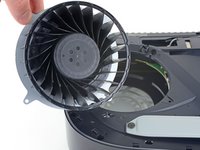
Hebe den Lüfter nach oben aus seiner Einbuchtung und entferne ihn.
-


Um dein Gerät wieder zusammenzubauen, folge den Schritten dieser Anleitung in umgekehrter Reihenfolge.
Entsorge deinen Elektromüll fachgerecht.
Lief die Reparatur nicht wie geplant? Probiere zunächst einige grundsätzliche Lösungen oder frage in unserem PlayStation 5 Forum nach Hilfe bei der Fehlersuche.
Rückgängig: Ich habe diese Anleitung nicht absolviert.
41 weitere Personen haben diese Anleitung absolviert.
Besonderer Dank geht an diese Übersetzer:innen:
100%

Diese Übersetzer:innen helfen uns, die Welt zu reparieren! Wie kann ich mithelfen?
Hier starten ›

7 Kommentare
Did you find out?
Popes -
I just did exactly that for a customer (technically it was a 23 blade 2.15A fan) it works great, the fan connector leads are just barely long enough to fit in the channel in a CFI-1215A model though, so careful not to tug too hard after plugging the fan connector and seating the fan in place.
Would a fan going bad prevent the PS 5 from turning on?