Einleitung
Den Akku findest du unter der oberen Abdeckung des UE Boom 2. Er ist mit vier Schrauben befestigt, zum Austausch genügt ein Spudger und ein Schraubendreher.
Was du brauchst
-
-
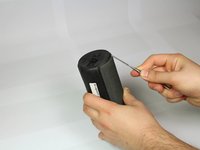
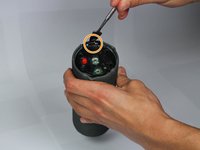
Entferne zuerst den D-Ring unten am UE Boom 2, gegenüber der Einschalttaste.
-
Entferne ihn, indem du ihn gegen den Uhrzeigersinn ausdrehst.
-
-
-
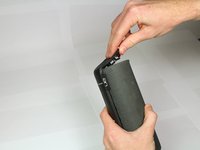
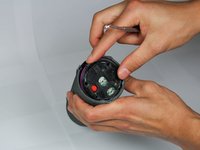
Wenn der D-Ring entfernt ist, kannst du die Gummiabdeckung über den Anschlüssen abnehmen.
-
-
-
-
Löse die Gummiabdeckung mit einem Metallspatel.
-
Heble langsam um die Kante der Gummiabdeckung herum.
Note - the end cap is an assembly of rubber pad glued to a plastic cap. Make sure you pry up from under the edge of the plastic cap, not remove the rubber alone.
You don’t need to continue down the side as mentioned below.
This step is a little bit hard. It requires little bit more force. Make sure not to damage the silicon part, push the tool more in where you can feel the hard plastic part.
Quite difficult non to break the retaining clips: be slow and careful. Here is a close view of the clips… so that you know what you have to manage…
-
-
-
Fahre mit dem Ablösen der Gummiabdeckung an der Seite fort, wenn du sie austauschen möchtest.
-
-
-
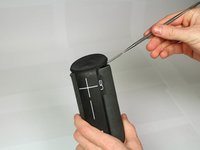
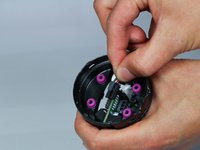
Drehe die vier 15 mm Kreuzschlitzschrauben #2 auf der Unterseite des Lautsprechers heraus. Öffne nicht die Seite mit der roten Kappe (wie in manchen Bildern gezeigt), der Akku ist auf der gegenüberliegenden Seite.
-
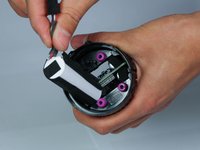
Heble die Plastikkappe mit einem Metallspatel hoch
Guide is missing a step as there are no screws under the rubber strip.
In the picture, the instructor is taking off the top of the speaker. DO NOT DO THIS. You must take off the bottom.
If you make the mistake of opening the top and pulling out the board that holds the power button, what may help you align the board back is undoing the fabric cover clips right on top of the volume up button and gently sliding that board back into place. The connectors aren't as forgiving (yup, it just slides through holes in PCB) as the bottom ones that have tapered female ends so go slow and gently as you can.
Future readers: Do not.... I repeat, DO NOT follow ANY of this article. I now have a UE Boom 2 that is a complete sh@#show! Rubber I can't fix, and scratches all over like you wouldn't believe. Listen to the previous comments instead. I now have to glue the rubber back on to mine.
Ok no screws - feeling really stupid for starting this and ordering the stuff from Ifixit
Same as above there are no screws visible and I am feeling really stupid from ordering the stuff from IFIxIt. Any solutions?
You only have to open the bottom cap. No need to remove the lateral.
Quite difficult non to break the retaining clips of the bottom cap: be slow and careful. Here is a close view of the clips… so that you know what you have to manage… https://youtube.com/shorts/jeU21ZM7roA?f...
In any case, after having replaced the battery, the cap does not close anymore like new: I’ve now about a 0.7-1mm gap. Not a problem for water (shower, not submersion) anyhow, as the impermeability is given by the second cap inside.
But… my dear UE Boom designers… it’s really sad that such a nice sounding device is so badly designed to replace a simple battery (something that is mandatory after some 2-4 years of usage… especially if very limited usage): quite disappointed!
Gianluca Meardi , c'est lui qui à raison, donc , croyez le !......
-
-
-
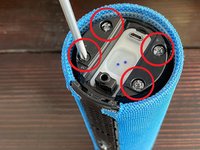
Fädle vorsichtig das Kabel mit einem Spudger aus den Haltestiften heraus. .
-
Drücke den kleinen schwarzen Clip am Akkustecker, hebe ihn hoch und trenne ihn ab.
-
Ziehe vorsichtig den Akku heraus, behandle ihn sorgfältig.
I can not disconnect the battery from the motherboard!!
I had the same problem. However, I eventually found that if you push the little clip in towards the main part of the connector, it comes free easily. Hope that helps!
I have the same problem as Cathleen. Is there a small clip that needs to be undone on the battery cable?
Battery What type of battery is better and how many amperes?
What type of 18650 battery is in amperage and how many pieces are needed
Any tips on how to replace the rubber cover? Is a type of glue needed?
I had the same problem as Cathleen, too. However, I eventually found that if you push the little clip in towards the main part of the connector, it comes free easily. Hope that helps!
Hello do you know where I could get the part with the PCB that holds the female jack and the power inlet
Armed with no spludgers but lots of brute force and ignorance I managed to bust the clips. I've explained to daughter it's a one time repair and I'm going to glue it shut when I get the new battery!
-


Um dein Gerät wieder zusammenzubauen, folge den Schritten in umgekehrter Reihenfolge.
Damit der neue Akku optimale Leistung bringt, solltest du ihn nach dem Austausch neu kalibrieren.
Vergleiche das Ersatzteil mit dem Originalteil. Möglicherweise musst du fehlende Bauteile übertragen oder Schutzfolien vom Neuteil abziehen, bevor du es einbauen kannst.
Bitte entsorge deinen Elektroschrott fachgerecht.
Rückgängig: Ich habe diese Anleitung nicht absolviert.
50 weitere Personen haben diese Anleitung absolviert.
Besonderer Dank geht an diese Übersetzer:innen:
100%
VauWeh hilft uns, die Welt in Ordnung zu bringen! Wie kann ich mithelfen?
Hier starten ›
Team

Cal Poly, Team S1-G3, Zimmerman Spring 2020 Mitglied von Cal Poly, Team S1-G3, Zimmerman Spring 2020
CPSU-ZIMMERMAN-S20S1G3
5 Mitglieder
11 Anleitungen geschrieben
27 Kommentare
I was looking for a battery replacement all over the place. Came up with this site that carries parts for the Boom 2:
Why is this set to difficult though? It doesn’t look THAT hard… And will this affect waterproofing of the feature?
Because you do not simply stick the plunger in and pop those tabs. They are a force of evil and I even bent my metal tools to open mine.
It isn't that hard if you've done a couple of repairs, although you gotta work slow and really make sure you got yourself like 3-4 spudger like items (butter knife) and look at reference images where the tabs are. Btw. You don't need to remove more than the bottom plastics and the plate with 4 screws to change the battery. Managed to change my battery while not damaging a single plastic tab
People replacing the battery be warned, you can buy a battery from China for 17 shipped on eBay, however what this guide does not tell you is one you open it, and re close it, there will forever be a gap on the top and bottom between the mesh and the rubberish spine. I have not since then tested the water proof feature because of this gap. You are warned and he should have warned us as well.
I managed it without a gap using e/t-6000 tech glue and some clamps and tape, you could also try:
- harvesting and cutting the adhesive strips out of an old iPhone or Samsung screen replacement kit
-that good old orange double sided tape.
BP 159 -
Missing a step, after removing the rubber you are met with smooth caps on the top & bottom of the speaker, no screws holes
Is this just a standard 18650 battery? Looks like it from the picture.
Will it effect the waterproofing?
If not done correctly, 100%
What have my ue boom ,sound comes on and goes off when is’s fully charged
What's the course of a ue boom when turning it on, sound comes on and goes off again the sound don't finish but cut off not complete sound comes on just half sound only,but it's fully charged
What's the course of a ue boom when turning it on and goes off again the sound comes on just half sound not really the complete sound
Then we buy a new battery or we just replace the same one. Please clarify me here?
What do you mean exactly? You need to buy a new battery and replace the one in the speaker with the new one.
Does Somebody also has this Problem?
I changed the battery, everything worked fine. But when I cranked the volume at the maximum, the speakers suddenly shut down and they only work again after inserting the original battery. I bought two batteries from different sources and both had the same problem. Is it just bad luck or does anybody else has this problem?
You need to get the same type of battery as the original. The original is probably a high discharge cell so that it can supply the strength to power higher volumes. There should be markings on the original that give a clue to what the exact cell is in there.
Doing this will cause cosmetic damage to the device around the base. This does not damage the waterproofing.
Waterproofing is provided by:
A) the rubber cap held on by the D ring protects the USB/AUX ports.
b) The purple O ring under the black plastic cap held in by the 4 Phillips screws.
So, if you put all that back correctly, the waterproofing will be fine.
I found that To more easily remove the top, Re-install the D-ring during step 3, then unscrew it 1.5 turns, and grip it with a pair of vice grips.
The vice grips in combination with the Spudger will ease removing the top cover. BE GENTLE, you don’t want to tear the rubber!
If you remove the blue rubber, and it’s smooth plastic underneath instead of 4 screws, you %@#%ed up, and separated the rubber over-molding from the top plastic.
Thanks Adrian!
Most helpful post here!
How this guide became “Featured” is beyond me. Some of the pictures show him opening up the wrong end of the speaker, but most importantly the technique shown here WILL break stuff. The way the top/lid is made makes it impossible to open like this without breaking the structure.
It will however mostly go back together, so it is possible to do it like this, just know that it wont be entirely like before. From what I gather the rubber seals are positioned so that the speaker should still be waterproof after changing the battery.
I took a lot of pics of mine after I opened it, shown here: https://www.reddit.com/gallery/iqq59a
used two small flat head screwdrivers to work around popping cap; worked fine, be sure to insert the blades between the cap teeth. I received a small circuit board with battery; what is that for?
Excellent guide. Beware though, it’s more about finding the right spots to put the spludge in since you need to pop the tabs. I think i broke one but there’s like 7 left so it’s pretty much as good as before. Except now the battery isn’t drained everytime I want to listen to it.
Can I send my UE boom in somewhere to fix it?
I replaced my battery with another recharge battery and for some reason it still won't hold a charge and ever time I try to place music one it is connected it shuts off