Einleitung
Wenn sich der DVD-Einschub am Laufwerk nicht mehr öffnen will, kann es leicht sein, dass der Antriebsriemen verschüttet ist, durchrutscht, oder sogar beides. Diese Anleitung zeigt, wie du das reparieren kannst.
Was du brauchst
-
-
Entferne zuerst die Festplatte, falls eine eingebaut ist. Drücke den Knopf vorne an der Festplatte, hebe sie hoch und entferne sie.
-
-
-
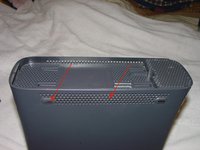
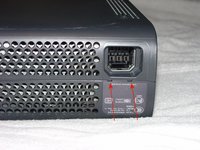
Entferne im nächsten Schritt die vordere Abdeckplatte. Ziehe sie an der rechten Seite heraus ( bei der USB-Abdeckung). Sie wird nur von Rasten festgehalten und lässt sich gut ablösen.
-
-
-
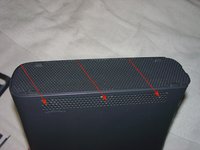
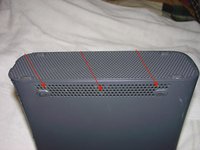
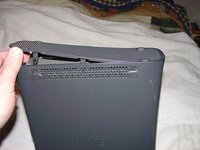
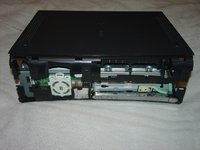
Als Nächstes wird die Lüfterabdeckung unten entfernt. Auf jeder Seite gibt es drei Laschen, benutze die stumpfe Spitze des Xbox-Werkzeugs oder die Spudgerspitze, um sie nacheinander zu lösen. Ziehe dann vorne hoch, so wie im dritten Bild gezeigt.
don’t use the tip of your spudger. it’ll bend/go blunt and break
alternatively use a 000 phillips if you dont have the xbox tool
-
-
-
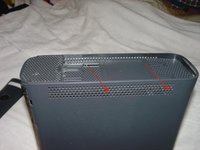
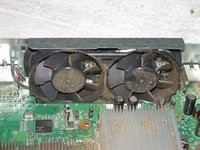
Der andere Lüfter hat zwei Öffnungen zur Vorderseite der Xbox hin. Schiebe die stumpfe Spitze des Xbox-Werkzeugs oder die Spudgerspitze in diese Öffnungen hinein und löse die vorderen beiden Rasten. Löse zwei weitere Rasten von der Seite her gelöst, hebe dann von vorne an. Die untere rückseitige Raste befindet sich unter dem Gummifuß.
-
-
-
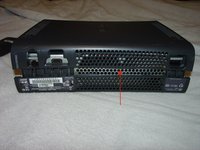
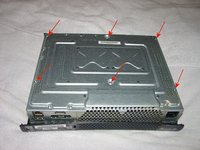
Zum Öffnen der Vorderseite musst du den Microsoft-Aufkleber abschneiden oder zurückziehen. Du verlierst dadurch eventuelle Garantieansprüche! Drehe die Xbox herum, löse die vier gezeigten Rasten und hebe die Vorderseite der Bodenabdeckung hoch.
-
-
-
-
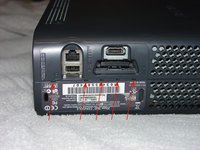
Löse die Rasten mit einem spitzen Werkzeug an den fünf Stellen unter dem Schild mit der Seriennummer. Hebe die Abdeckung seitlich hoch. In der Mitte befindet sich eine weitere Raste, die gelöst werden muss. Löse zum Abschluss noch die beiden Stellen am Eingang des Netzkabels. Hebe den Boden von der Xbox ab.
-
-
-
Löse die Raste an der Auswurftaste und hebe die Tasteneinheit aus der Vorderseite der Xbox heraus. Sie ist rechts mit einem Stift verankert, es ist vielleicht ein wenig knifflig.
-
-
-
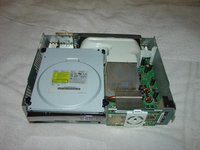
Das obere Gehäuseteil wird von sechs Torx T10-Schrauben gehalten. Entferne die Schrauben, drehe die Xbox herum und hebe das obere Gehäuseteil ab.
-
-
-
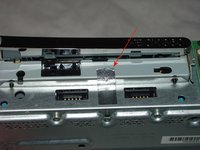
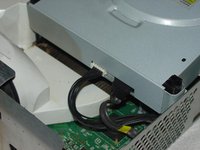
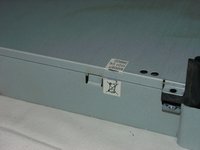
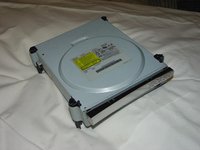
Ziehe zuerst das Ende des gezeigten Klebeband vorne am DVD-Laufwerk zurück, schiebe dann das Laufwerk teilweise weg, so dass du an die Anschlüsse auf der Rückseite herankommen kannst. Löse die Daten- und die Versorgungskabel auf der Rückseite, hebe dann das Laufwerk gerade nach oben.
-
-
-
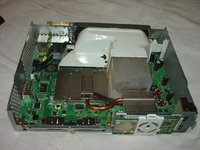
Jetzt ist eine gute Gelegenheit, um Schmutz herauszublasen. Löse die Raste in der Mitte der Lüfterabdeckung mit dem Finger oder einem Kunststoffwerkzeug und hebe sie gerade nach oben. An jedem Lüfter ist eine Raste, löse sie an der die Metalllippe. Vergiss nicht, auch den elektrischen Anschluss zu lösen. Reinige alles, baue dann wieder zusammen.
-
-
-
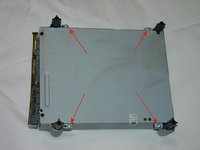
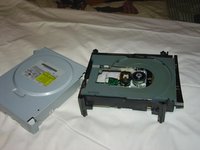
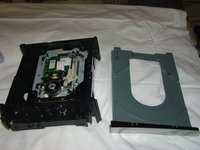
Entferne die Schrauben und löse (oder schneide) den Garantieaufkleber an der Seite des DVD-Laufwerks ab. (Die Garantie wird dadurch ungültig). Hebe den Boden und das obere Metallgehäuse ab.
-
-
-
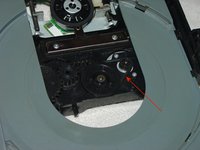
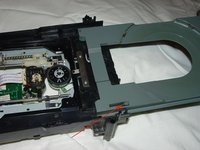
Vorne am Einschub befindet sich ein kleines Rad. Drehe es mit einem Kunststoffwerkzeug von rechts nach links, also von oben gesehen im Uhrzeigersinn. Dadurch senkt sich die Lasereinheit ab, dann kannst du den Einschub herausschieben. Reinige den Gummi-Antriebsriemen mit Alkohol, oder tausche ihn aus, wenn nötig.
Knowing where this wheel is (to raise and lower the laser assembly) is the most useful part of this guide - even after disassembling, cleaning, and re-assembling my Xbox tray wouldn't open, but moving the wheel every time I need the tray to work does the trick. Learn where the wheel is, and watch where it ends up when the box is reassembled.
Freddy Fred, it sounds like you need to replace the belt..it's simple to do, and you can get them for a few cents each...I bought 100 of them for 2 or 3 bucks.
I'd suggest rubbing alcohol on the gears adjacent to the belt drive as well. This was needed on my drive. Both the gears and belt needed cleaning.
if you’re having issues with this and it wont open (probably because the belt is loose), shine a torch on the left side and youll see a gear. turn that gear anti-clockwise with a screwdriver or pokey stick and itll open
Excellent overall instructions. The only discrepancy I encountered is that the rotation direction specified in Step 12 to unlock and open the tray is opposite that of the XBox 360 E that I just serviced. To lower the laser assembly and unlock the tray, I had to rotate the indicated pulley from left to right, i.e. counter-clockwise when viewed from above the DVD drive.
-
-
-
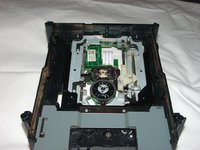
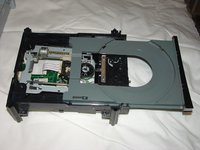
Reinige die Laufflächen auf denen der Einschub gleitet, ebenfalls mit Alkohol. Wenn sie, wie dieser hier, wirklich schmutzig sind, kannst du den Einschub für eine gründlichere Reinigung entfernen. Löse die abgebildete Lasche und ziehe den Einschub zur Seite heraus.
How do you release that clip? Do you push on the clip or pull it upwards?
Hello, You pull up on the clip. I'm doing mine right now. I also, after getting the side with the clip on it past the plastic piece with white rubber around it, had to gently, but firmly pull on the opposite side without a clip. I pulled that side towards the side with a clip and it came out, although it took a little more force than I thought it would.
Hope this helps!
-
-
-
Setze den Einschub nach dem Reinigen wieder ein und prüfe, ob er sich leicht bewegen lässt. Wenn er ganz eingeschoben ist, sollte er einrasten. Baue das Laufwerk wieder zusammen, dann ist es zum Einsetzen in die Xbox bereit. Baue dann die Xbox in umgekehrter Reihenfolge wieder zusammen und die Reparatur ist beendet.
-


Um dein Gerät wieder zusammenbauen, folge den Schritten in umgekehrter Reihenfolge.
Um dein Gerät wieder zusammenbauen, folge den Schritten in umgekehrter Reihenfolge.
Rückgängig: Ich habe diese Anleitung nicht absolviert.
66 weitere Personen haben diese Anleitung absolviert.
Besonderer Dank geht an diese Übersetzer:innen:
100%
VauWeh hilft uns, die Welt in Ordnung zu bringen! Wie kann ich mithelfen?
Hier starten ›

16 Kommentare
I started down this process when the drive would not read a game disc or a regular music CD. Cleaning the drive out did not help, but it was good to figure out how the laser lens assembly works and how one can get the drive to eject. In my case, the laser assembly needed adjustment (by decreasing the resistance of one of the two potentiometers).
How did you fix this issue
Great guide. My son's Xbox 360 tray jammed and a disc was stuck inside of it. I was able to follow this guide and clean the tray and put the cd tray back together and it ejects discs again. I am letting him mess with it for a few days before I put it back together otherwise I will clean it some more. Thank you for this helpful guide.
Outstanding instruction and pictures. I really screwed up my xbox trying to take it apart to replace the drive belt. On my second xbox was fortunate to find you on ask.com.
Awesome! I will pass this on to my friends.**********
Good tutorial.
Although I found it hard to pry it open in the back. I found that there are clips below the openings, and to open them you have to press the screw drive forwards and then down. It will damage a bit the openings and the clips, but nothing very noticeable. It will be just a bit coarse. The price of dealing such a abnoxious case.
I love this article. Any suggestions on "exact" type of replacement parts. Like the rubber ring? If its stretched too much, can i get any old rubber band replacement say from local hardware store etc? Or do i have to order a specific part# from M$? TIA.
This didn't work it still won't le me open the tray all the way. Can anyone help me please?
My lense won't come up when reinserting the tray, like it's not fitting the teeth when pushing the tray... HELP!
Had used the card trick to pop it open but it’s constantly jammed again. There was a little dust lurking and I didn’t think this this was going to do it, think it was the rubber belt cleaned that did it. Thanks for this solution, as good as new now! Saved me €€
Still didn't open, its not even attempting to open anymore
Been about 15 years since I last opened a 360, had one in the shop today with a sticky drive and this was exactly what I needed! Those rear clips however that secure the 2 halves of the shell are an actual nightmare, nearly snapped the lot off lol, ended up doing it with a metal ruler all the way along. Anyway, Thanks very much for the guide, invaluable!
Very good guide. I was able to dismantle the xbox360 and clean the 2 pulleys and rails. I am 76. Thanks, Lowry