Zum Hauptinhalt wechseln
Gemeinsam reparieren - Jetzt registrieren

Zojirushi Rice Cooker NP-HMH10 Internal Battery Replacement

Was du brauchst

  1. Zojirushi Rice Cooker NP-HMH10 Internal Battery Replacement, Internal Battery: Schritt 1, Bild 1 von 3 Zojirushi Rice Cooker NP-HMH10 Internal Battery Replacement, Internal Battery: Schritt 1, Bild 2 von 3 Zojirushi Rice Cooker NP-HMH10 Internal Battery Replacement, Internal Battery: Schritt 1, Bild 3 von 3
    • Flip the device over and remove the four screws on the base using the Phillips #0 screwdriver.

    Frag FixBot

    Kommentar hinzufügen

  2. Zojirushi Rice Cooker NP-HMH10 Internal Battery Replacement: Schritt 2, Bild 1 von 2 Zojirushi Rice Cooker NP-HMH10 Internal Battery Replacement: Schritt 2, Bild 2 von 2
    • Be aware, one of the four screws is a security Torx screw.

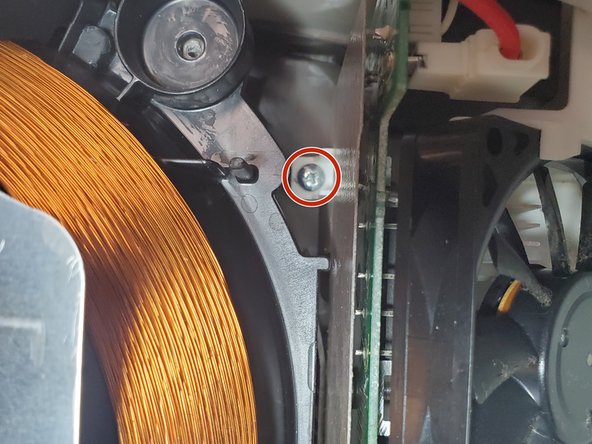
    • Using a Torx T9 screwdriver remove one screw from the bottom of the rice cooker.

    Frag FixBot

    Kommentar hinzufügen

  3. Zojirushi Rice Cooker NP-HMH10 Internal Battery Replacement: Schritt 3, Bild 1 von 2 Zojirushi Rice Cooker NP-HMH10 Internal Battery Replacement: Schritt 3, Bild 2 von 2
    • Gently lift the base from the device.

    • Be aware, DO NOT damage the cables that connect the base part and device.

    Frag FixBot

    Kommentar hinzufügen

  4. Zojirushi Rice Cooker NP-HMH10 Internal Battery Replacement: Schritt 4, Bild 1 von 3 Zojirushi Rice Cooker NP-HMH10 Internal Battery Replacement: Schritt 4, Bild 2 von 3 Zojirushi Rice Cooker NP-HMH10 Internal Battery Replacement: Schritt 4, Bild 3 von 3
    • Remove the five screws connecting the heatsink to the device.

    Frag FixBot

    Kommentar hinzufügen

  5. Zojirushi Rice Cooker NP-HMH10 Internal Battery Replacement: Schritt 5, Bild 1 von 2 Zojirushi Rice Cooker NP-HMH10 Internal Battery Replacement: Schritt 5, Bild 2 von 2
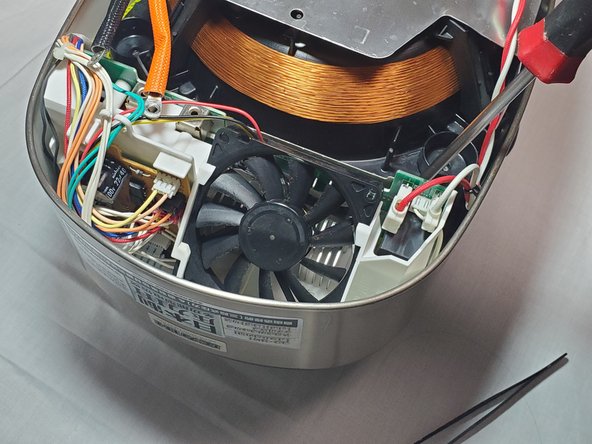
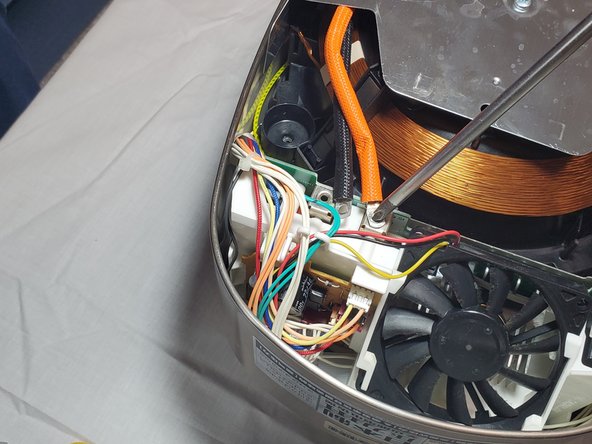
    • Remove the screws that connect the thick black and orange cables to the heat sink.

    Frag FixBot

    Kommentar hinzufügen

  6. Zojirushi Rice Cooker NP-HMH10 Internal Battery Replacement: Schritt 6, Bild 1 von 2 Zojirushi Rice Cooker NP-HMH10 Internal Battery Replacement: Schritt 6, Bild 2 von 2
    • Gently unplug the white-head pins with red and white cables on the other side.

    Frag FixBot

    Kommentar hinzufügen

  7. Zojirushi Rice Cooker NP-HMH10 Internal Battery Replacement: Schritt 7, Bild 1 von 2 Zojirushi Rice Cooker NP-HMH10 Internal Battery Replacement: Schritt 7, Bild 2 von 2
    • Now switch to the fan of the heatsink. Using a tweezer carefully lift the four clips around the fan.
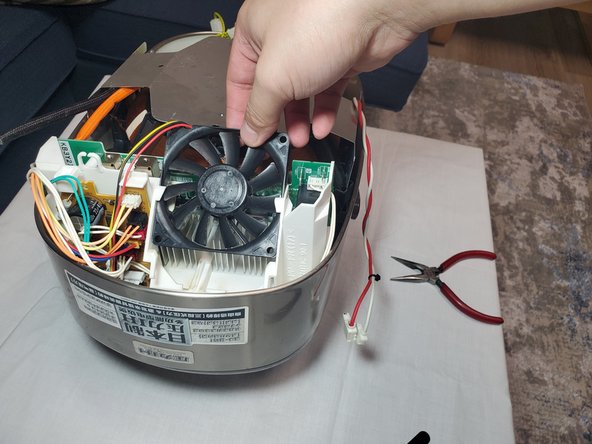
    • Pull out the fan.

    Frag FixBot

    Kommentar hinzufügen

  8. Zojirushi Rice Cooker NP-HMH10 Internal Battery Replacement: Schritt 8, Bild 1 von 2 Zojirushi Rice Cooker NP-HMH10 Internal Battery Replacement: Schritt 8, Bild 2 von 2
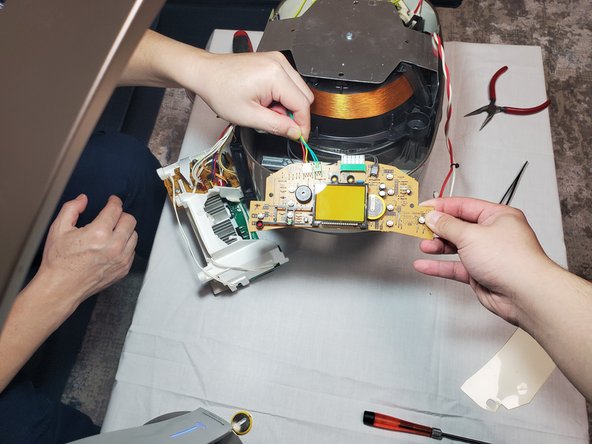
    • After removing the fan now you can take out the whole heatsink and access the below part.

    • Be careful about the cables that are still connected to the heatsink.

    Frag FixBot

    Kommentar hinzufügen

  9. Zojirushi Rice Cooker NP-HMH10 Internal Battery Replacement: Schritt 9, Bild 1 von 3 Zojirushi Rice Cooker NP-HMH10 Internal Battery Replacement: Schritt 9, Bild 2 von 3 Zojirushi Rice Cooker NP-HMH10 Internal Battery Replacement: Schritt 9, Bild 3 von 3
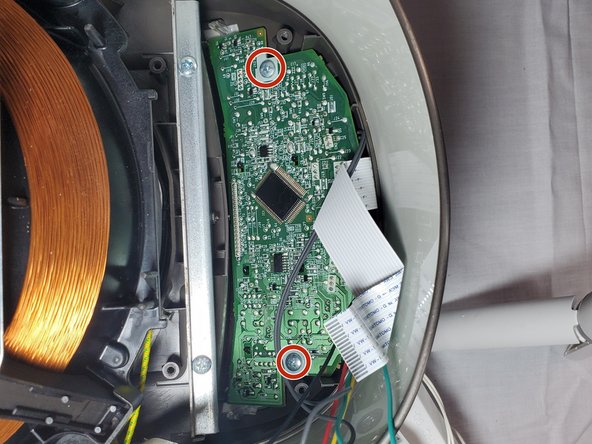
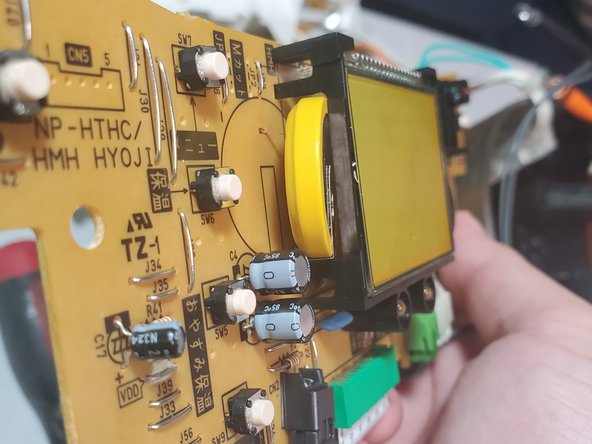
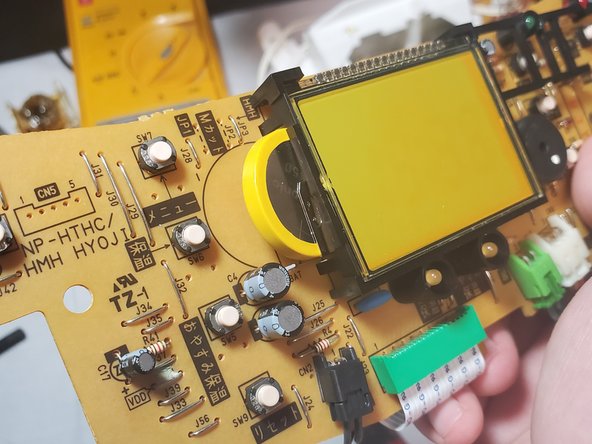
    • Above the PCB (Printed Circuit Board) is an isolated-plate. Take it away and unscrew the PCB below it.

    • Now you can have the access to the battery.

    Frag FixBot

    Kommentar hinzufügen

  10. Zojirushi Rice Cooker NP-HMH10 Internal Battery Replacement: Schritt 10, Bild 1 von 3 Zojirushi Rice Cooker NP-HMH10 Internal Battery Replacement: Schritt 10, Bild 2 von 3 Zojirushi Rice Cooker NP-HMH10 Internal Battery Replacement: Schritt 10, Bild 3 von 3
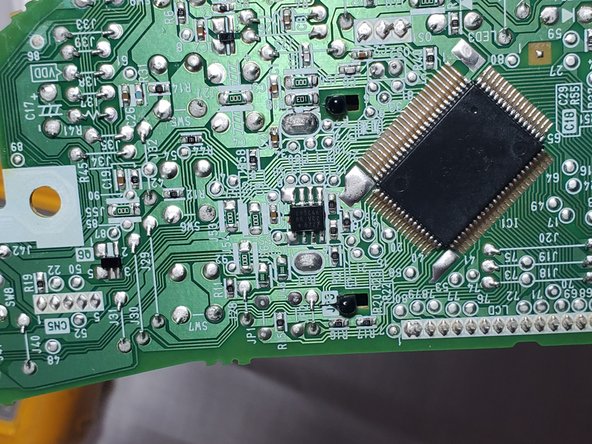
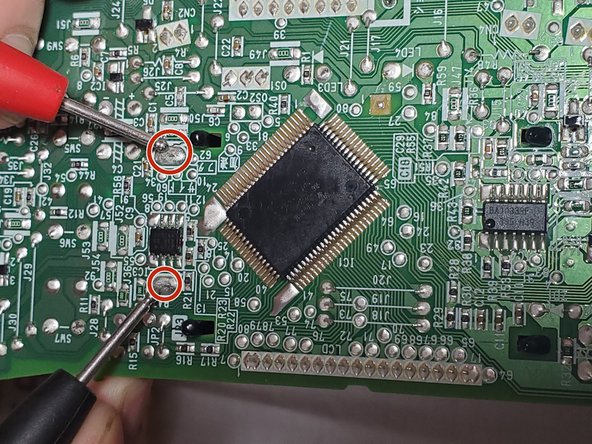
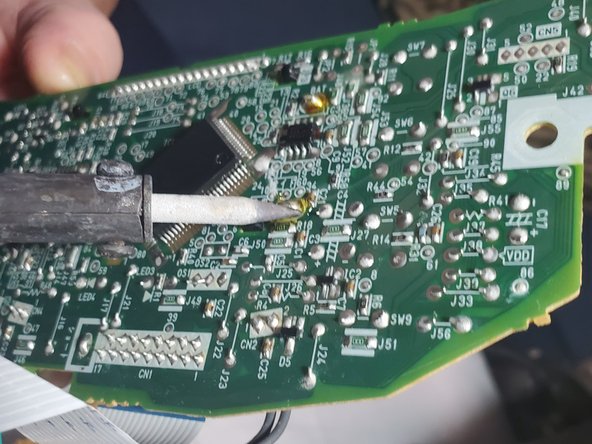
    • Turn the PCB to the other side. Find the soldering point of the battery as in the picture.

    Frag FixBot

    Kommentar hinzufügen

  11. Zojirushi Rice Cooker NP-HMH10 Internal Battery Replacement: Schritt 11, Bild 1 von 2 Zojirushi Rice Cooker NP-HMH10 Internal Battery Replacement: Schritt 11, Bild 2 von 2
    • Desolder the two tabs then unplug the old battery.

    Frag FixBot

    Kommentar hinzufügen

  12. Zojirushi Rice Cooker NP-HMH10 Internal Battery Replacement: Schritt 12, Bild 1 von 3 Zojirushi Rice Cooker NP-HMH10 Internal Battery Replacement: Schritt 12, Bild 2 von 3 Zojirushi Rice Cooker NP-HMH10 Internal Battery Replacement: Schritt 12, Bild 3 von 3
    • Take out the new battery. Install it onto the PCB and solder it.

    • When you install the battery, be sure to put the positive and negative tabs into the right hole.

    Frag FixBot

    Kommentar hinzufügen

  13. Zojirushi Rice Cooker NP-HMH10 Internal Battery Replacement: Schritt 13, Bild 1 von 1
    • After soldering, you can check your result by making sure the front screen is displayed properly.

    Frag FixBot

    Kommentar hinzufügen

  14. Zojirushi Rice Cooker NP-HMH10 Internal Battery Replacement: Schritt 14, Bild 1 von 1
    • To reassemble your device, follow these instructions in reverse order.

    • Set the device to the correct time and save the setting. If the time is displayed properly, then congrats, you have successfully completed the replacement of the rice cookers battery! Go to make a delicious rice bowl to reward yourself.

    Frag FixBot

    Kommentar hinzufügen

Abschluss

To reassemble your device, follow these instructions in reverse order.

Rückgängig: Ich habe diese Anleitung nicht absolviert.

4 weitere Personen haben diese Anleitung absolviert.

Team

York University, Team S2-G29, O'Regan Winter 2021 Mitglied von York University, Team S2-G29, O'Regan Winter 2021

YORK-O'REGAN-W21S2G29

1 Mitglied

1 Anleitung geschrieben

11 Kommentare zur Anleitung

Thank you! It’s a shame the machine was designed without easy servicing for the battery. Otherwise a great rice cooker!

Paul Sharpe - Antwort Teilen

do you fix rice cook

TIM IE - Antwort Teilen

Nice repair. Thanks for sharing.

It looks as if you could replace the battery without doing any soldering. Once you break the yellow plastic surrounding the battery, can't you simply slide the battery out of the metal holder and slide in a new one?

gordonhamachi - Antwort Teilen

That’s not a holder. It comes from Panasonic with the two leads welded on and the yellow wrap is just there to keep those welds from seeing mechanical stress during shipping of the device it’s soldered into. If you pry the battery out, it’ll just break those spot-welds and won’t hold a new battery. Bottom line: It’s not designed to be user serviceable. It’s a PCB-mounted, soldered-on battery type. Someone on youtube suggested replacing it with a coin cell holder for a different battery size, but to each their own. I’ll probably replace mine with a genuine part from Mouser or Digikey. It’d be nice to use the delay cooking function again without having to set the clock first each time. It definitely is annoying that they expect customers to go to a service center for this. We hardly even have any electronics component stores in the USA anymore.

Note- I have a different model and it has a different battery. Don’t assume these instructions will translate to a different model. But thank you is due to Sirui Wu for sharing these.

Ryan Lewis - Antwort Teilen

Good Morning, when you had the rice cooker apart did you happen to notice if there might be a 120v tap on the power supply? The rice cookers from japan are much less expensive but only come in 100v 50/60hz

Navy Retired - Antwort Teilen

Kommentar hinzufügen

Seitenaufrufe:

Letzte 24 Stunden: 9

Letzte 7 Tage: 44

Letzte 30 Tage: 186

Insgesamt: 20,259