Diese Übersetzung enthält möglicherweise noch nicht die neuesten Änderungen der Original-Anleitung. Hilf mit, die Übersetzung zu aktualisieren oder sieh dir die Original-Anleitung an.
Einleitung
使用本指南来带代替你破碎的屏幕iPhone SE。它会告诉你如何删除主页按钮,前置摄像头和传感器组件,耳机喇叭,液晶板都将需要转移到你更换前面板。如果你已经拥有的那些部分更换屏幕,follow this much shorter guide instead.
在任何情况下,重要的是传递的'original”按钮到新的显示为Touch ID(指纹扫描)功能。
这部分也与iPhone 5s兼容。
你也可以使用本指南来代替以下部分:'''
Was du brauchst
-
-
如果你的手机显示屏碎了,请避免屏幕碎裂更加严重,可以通过使用透明胶粘贴屏幕来避免屏幕的主体损坏。
-
把透明胶带贴在iPhone手机显示屏上,尽可能的覆盖整个屏幕。
-
-
-
不论你使用什么工具,你需要确保你把整个屏幕拉起来了。
-
如果如图一所示,玻璃开始和塑料分离,在塑料框和金属机身之间插入一个撬棒,撬开后屏幕的卡扣。
-
-
-
一只手固定好iPhone机身,另一只手轻轻地把机身从前面板底端的home键上分离。
-
当你左手使用吸盘拉动的时候,右手用塑料撬棒在后机壳边缘处,轻轻地撬动,使屏幕和机身分离。
-
-
-
稍微打开屏幕,可以看到盖住home键电线的挡板铁片就可以了。
-
只有手机原装的Home键组件才能使用Touch ID功能。如果你扯断这根电线,装上新的home键只能恢复home键功能,而将失去Touch ID功能。
-
使用手机撬棒推动松下铁片,再用镊子取下来。
-
-
-
一旦连接器被撬开了后,把home键底端从机身上拉起,把手机顶端当做一个转动支点。
-
把显示屏立起来,保持跟机身成90度角。在你维修手机的过程中一直保持这个状态。
-
用橡皮筋把显示屏如图三所示固定住。这会避免在维修过程中显示屏电缆的损坏。
-
-
-
-
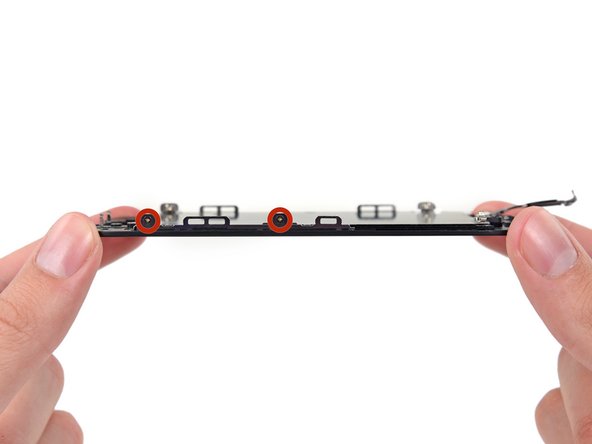
移除以下螺丝,这些螺丝把前面板组件上的挡板贴片固定到逻辑主板:
-
一个1.7 mm 菲利普斯(十字) #000号螺丝
-
一个1.2 mm 菲利普斯(十字) #000号螺丝
-
一个1.3 mm 菲利普斯(十字) #000号螺丝
-
又一个1.7 mm菲利普斯(十字) #000号螺丝
-
-
-
使用一个 iOpener 来软化胶带来安全移除。我们的iOpener使用步骤 可以教你用。
-
-
-
用小撬棒把感应器从卡槽撬起。
-
Use the point of a spudger to lift the ambient light sensor and proximity sensor out of their recess in the display assembly.
-
-
-
用平头塑料撬棒把前置摄像头撬起。
-
Use the flat end of a spudger to gently peel the front-facing camera portion of the cable away from the display assembly.
-
-
-
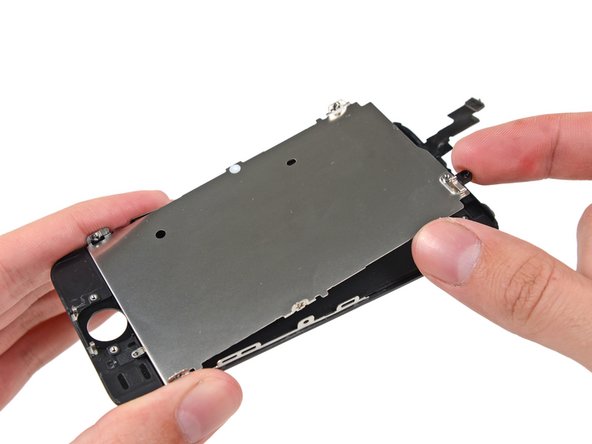
小心翼翼的把排线从屏幕挡板上撕下。
-
Carefully peel the cable assembly off of the LCD shield plate to remove it from the display.
-


将您的设备,遵循这些指示,以相反的顺序。
将您的设备,遵循这些指示,以相反的顺序。
Rückgängig: Ich habe diese Anleitung nicht absolviert.
120 weitere Nutzer:innen haben diese Anleitung absolviert.
Besonderer Dank geht an diese Übersetzer:innen:
75%

Diese Übersetzer:innen helfen uns, die Welt zu reparieren! Wie kann ich mithelfen?
Hier starten ›


7 Kommentare
Have issues after a couple days. I replaced the screen according to instructions and started up well. Screen started having issues and within a few minutes screen showed likes and faded to black.
This will be the screen that you have purchased, or due to a faulty repair…Not due to the guide.
Hi, thanks in advance for your support! I managed to detach the digitizer from the LCD after a small drop, thus I bought a replacement screen from ifixit… unfortunately resulting in a very bad quality aftermarket piece. Dimmed luminosity, changes in temperature(color), and affected by polarized glass, which I wear. I already reclaimed this to Ifixit and I`m waiting for support, but I thought to pick up my broken original display and glue back the digitizer, is that possible, or is this shown in any guide here around??
Thanks again!
STEPS 9-12 need a re-working - Re-assembly instructions should be put just under the disassembly instructions so that when you scroll back up the page, you’re re-assembling in step order ;)