One way to familiarize yourself with a MacBook Pro's internals...

Mein Problem
I chose to replace to Upper Case on my MacBook Pro "15 after a drink splashed across the keyboard, ultimately causing keys not to register. Sometimes I had to press the same key upwards of 4-5 times for the computer to recognize it. But since the repair cost over $350, I tried to get by with an external keyboard; however that didn't solve the prolbem. Occasionally a random key would be "pressed" or get "stuck" and keep repeating. (I did notice, however, that if I ran my hand across all the keys at once the problem with a "phantom" key press went away for a day or so, therefore I knew the built-in keyboard would have to be replaced.) And so finally I got fed up with the erratic behavior and ordered a new Upper Case. Not being under warrenty I decided to fix it myself as in the past it took (what I consider) far too long for AppleCare to fix another unrelated problem and I didn't want to be without a computer for that length of time.
Meine Reparatur
Replaced the Upper case. All in all I would consider it to be a fairly painless process as it only took maybe 2.5 hours to tear down and rebuild the entire system. I was able to carry out every step published in the guide to replacing the Upper case on a "15 MacBook Pro (mid-2010).
Mein Rat
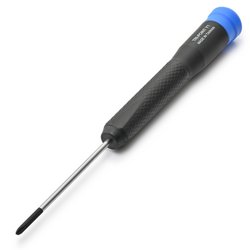
Assuming your follow the guide on iFixit.com to a tee... while undoing each set of screws at any particular point, label them with the step number you're currently on by taping them to a post-it note with that number written down (the step number displayed in the guide). (A little photo is attached if what I'm writing doesn't make any sense). The extra time spent labeling each set of screws was well worth it when it came time to put them back in. (I can actually say I didn't have a single extra or missing screw.)
Also, don't trash your old Upper Case right after you finish disassembling the thing. There was at least one piece I needed that didn't come with the new case, found at step 35. In the guide it's called the "optical drive bracket" and required to put the 4.5 mm Phillips screw circled "red" back in place.
One other piece of advise is to make sure you get ALL the connectors hidden around where the logic board goes, pulled out and into the open before reattaching it (the logic board). I had to unscrew the board 2-3 times as various connectors were discovered "missing" later on.
One final piece of advice is to make sure the Upper case and screen match up when closed. The very first step in reassembly is to attach the screen to the Upper case with six screws. Don't tighten them fully until you've opened and closed the lid and made sure the case and screen line up. (Mine is off by about a millimeter when closed.) And since this is the very first step in reassembly you can't go back to fix any alignment issues unless you're willing to take the entire thing apart again.
All in all it's very doable if you don't mind spending a little time working with small parts. (I've take a few iBooks, an an iMac apart so I kind of had an idea of what I was getting into before hand.)
BEST PIECE OF ADVICE: LABEL EVERYTHING, its worth it in the end.

0 Kommentare