Einleitung
Die Galaxy Smartphone Reihe von Samsung hat in Sachen Reparierbarkeit bisher immer gut abgeschnitten, aber das S5, das Flaggschiff-Modell vom letzten Jahr, ist mit seinem lahmen Ergebnis von 5/10 ziemlich abgesunken. Wird uns das neu-designte S6 wieder in den Sternenhimmel zurückbringen oder werden wir noch tiefer in ein schwarzes Loch der Reparierbarkeit versinken? Sei dabei, wenn wir das Samsung Galaxy S6 auseinander bauen!
Interessiert dich das abgerundete Gegenstück des S6? Dann sieh dir den Teardown des Samsung Galaxy S6 Edge an.
Dschoin us in der sozialen Netzwerk-Stratosphäre! Aktuelle Neuigkeiten gibt es auf Twitter, folge uns auf Facebook und check unsere Fotogalerie auf Instagram.
Was du brauchst
-
-
Verglichen mit dem S5 sieht das S6 definitiv besser aus – zumindest auf dem Papier. Die Spezifikationen sind absolut identisch wie die des S6 Edge:
-
5,1" Super AMOLED kapazitiver Touchscreen (1440 x 2560 Pixel, ~577 ppi, 16M Farben)
-
Exynos 7 Octa 7420 Prozessor mit integrierter Mali-T760 GPU und 3 GB Speicher
-
16 MP Rückkamera mit HDR, LED Flash, und Dual-Videoaufnahme
-
Eingebautes kabelloses Laden
-
32, 64, und 128 GB Speicheroptionen
-
Corning Gorilla Glass 4 Rückseite
-
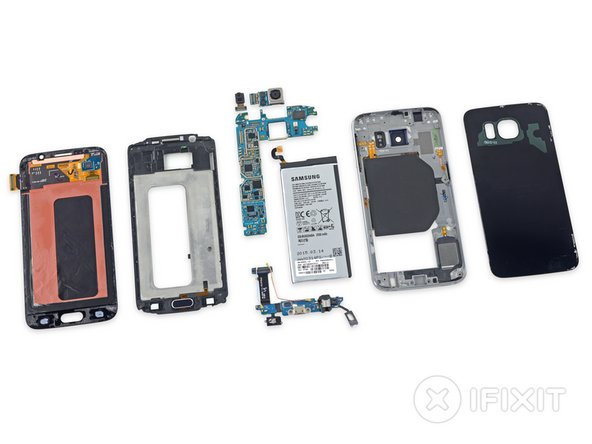
Es hat mehr Leistung. Es hat mehr Pixel. Und dennoch bleibt das Gefühl, dass irgend etwas fehlt. Wir können noch nicht genau sagen, was, also fangen wir an, das Ding auseinanderzunehmen. Zeit für den Teardown!
-
-
-
Genau wie sein Bruder mit den abgerundeten Kanten verfügt das neue Galaxy über ein Gorilla Glas 4 auf der Vorder- und der Rückseite.
-
Eine Kantenansicht des Galaxy.
-
Dünner, aber nicht kleiner - das S6 ist etwas höher und breiter als sein Bruder und auch ein kleines bisschen schwerer (6 Gramm).
-
-
-
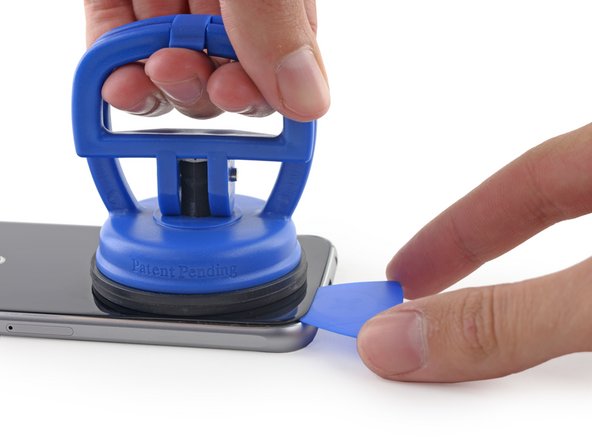
Das S6 Edge war übelst schwer zu öffnen, und das S6 hat höchstwahrscheinlich den gleichen fiesen Kleber. Dieses Galaxy sieht vielleicht von außen ganz unschuldig elegant aus, aber es ist ein ganz schön zähes Ding. Aber wir nehmen den Kampf auf und erwärmen es mit einem iOpener.
-
Nach einem kurzenDéjà-Vu-Anfall schaffen wir es dank Saugheber und Opening Pick ins Innere zu gelangen.
The device needs to be heated up using a hot plate or other appropriate alternative before you can follow these instructions.
The iOpener is such a heat source, is it not?
-
-
-
Die Rückabdeckungen sehen so ähnlich aus, dass wie sie zum Vergleich nebeneinander legen: wie zu erwarten war, ist die S6 Edge Rückabdeckung etwas kleiner als die standard S6 Rückabdeckung (links).
-
Der Kleber ist dieses Mal in großen Batzen am Mittelrahmen hängen geblieben und verdeckt die Schrauben. Einen Moment lang schieben wir Panik, weil wir denken, wir müssten, wie beim S5, durch das Display durch.
-
Aber nachdem wir den Kleber abgezogen haben, sind alle Schrauben vollzählig anwesend und jetzt dann auch entfernt!
-
-
-
Zeit, dieses Galaxy noch weiter zu öffnen.
-
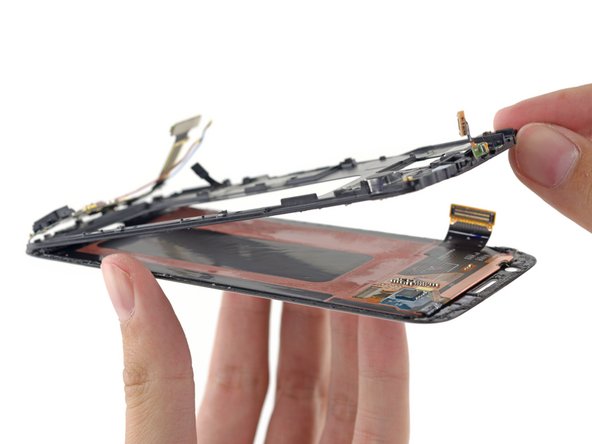
Das Entfernen des Mittelrahmens enthüllt ... ein S6 Edge?
-
Vielleicht nicht, aber man muss schon ganz genau hinschauen, um den Unterschied zu sehen. Außer einer leichten Verschiebung des Vibrationsmotors sind diese Innenteile die exakten Doppelgänger dieses anderen Samsung Flaggschiff Smartphones, das wir vor Kurzem auseinander genommen haben.
remember to take out the sim card holder before removing the mid frame
What is the function of the large black thing in the center of the midframe?
As in the S6 Edge link, it’s an NFC/wireless charging coil.
-
-
-
-
Wer treibt das Smartphone an? Der Akku!
-
Beim S6 sollte es etwas einfacher sein, den Akku auszubauen als beim Edge. Im Edge verlief das Akkukabel unter dem Motherboard, bevor es mit der Oberseite verbunden wurde, weshalb es notwendig war, zuerst das Motherboard zu entfernen, um an den Akku zu gelangen.
-
Anscheinend konnte Samsung durch das bisschen extra Platz im regulären S6 das Kabel über dem Motherboard verlegen, um einen Schritt beim Akku-Ausbau einzusparen.
-
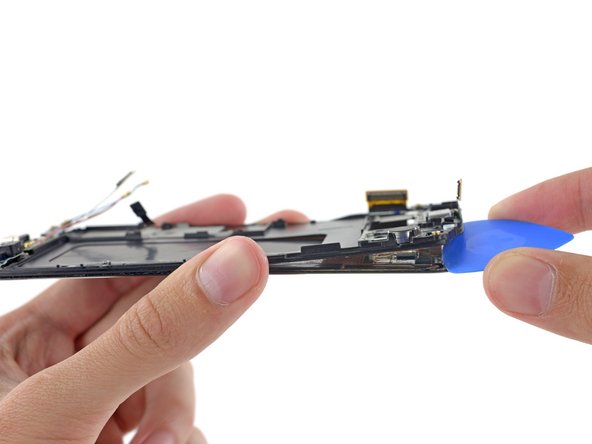
Dank des Flachbildschirm-Designs des S6 ist es auch einfacher, ein Opening Pick direkt in den Spalt zwischen Akku und Displayeinheit zu schieben, um den (immer noch genauso starken) Kleber zu durchschneiden, der den Akku befestigt.
-
Man kann das kaum als einen vom Nutzer austauschbaren Akku bezeichnen, aber es ist ein bisschen einfacher als im S6 Edge. Es ist jedoch trotzdem ein riesiger Rückschritt im Vergleich zu vorherigen Galaxy Smartphones wie das S5, bei dem der Akku mit ein bisschen Köpfchen ganz leicht ausgetauscht werden konnte, und selbst das brauchte man nicht wirklich.
-
-
-
Das Galaxy verfügt über einen 3,85 V, 9,82 Wh Akku, der Samsung zufolge bis zu 23 Stunden 3G Gesprächszeit, 12 Stunden Wi-Fi Internet-Nutzung sowie bis zu 57 Stunden Musikwiedergabe bietet.
-
Der Übergang zu schwereren Gehäusematerialien hat Samsung vielleicht dazu bewogen, beim Akku Gewicht einzusparen. Der 9,82 Wh Akku im S6 und der 10,01 Wh Akku im S6 Edge erscheinen im Vergleich zu den 10,78 Wh des Galaxy S5 ziemlich klein.
-
Der Akku ist um einiges größer als der 6,91 Wh Akku, den wir im iPhone 6 gefunden haben, aber er bietet wohl weniger Gesprächszeit. Der grössere Bildschirm braucht anscheinend wesentlich mehr Saft.
-
-
-
Das Motherboard wird immer noch durch die Anziehungskraft eines nervigen Daughterboard-Steckers gehalten. Wir heben es geschwind mit einem Spudger an, um uns das näher anzusehen.
two other connectors need to be removed, one twoards the top and another along the side
We don't write teardowns to be detailed disassembly instructions—they're supposed to provide a fun look inside new devices. If you're looking for step-by-step guides, we do have a complete set of repair manuals that include all the details for individual component replacements.
-
-
-
Wir schnappen uns eine Pinzette, um die Kameras des Galaxy genauer zu untersuchen.
-
Die 5 MP Selfie-Kamera des S6 ist das genaue Ebenbild der Frontkamera, die wir bei seinem Bruder gefunden haben.
-
Und die Ähnlichkeiten enden hier noch nicht. Die 16 MP OIS Rückkamera sieht fast identisch aus wie die im Edge. Und auf dieser Leiterplatte ist definitiv ähnliche Hardware:
-
Winbond W25Q32FW Serial Flash Speicher
-
InvenSense IDG-2030 Doppelachsen- Gyroskop für die optische Bildstabilisation
-
-
-
Wir betrachten zunächst einmal die Rückseite des Motherboards und finden ein paar bekannte Schwergewichte:
-
Samsung Exynos 7420 Octa-core Prozessor - 64-bit, 2.1 GHz Quad + 1.5 GHz Quad, mit eingeschichteter Samsung K3RG3G30MM-DGCH 3 GB LPDDR4 RAM
-
Samsung KLUBG4G1BD 32GB NAND Flash
-
Skyworks 78041 Hybrid Multimodus Multiband (MMMB) Frontmodul (FEM)
-
Avago AFEM-9020 PAM
-
Broadcom BCM4773 GNSS Location Hub
-
Samsung C2N8AF (möglicherweise ein Bildprozessor)
-
Avago A7007 (wie schon im Galaxy S5 gesehen)
The teardown does not mention that there is a Samsung Shannon 333 Modem Chip underneath the NAND Flash Chip (Orange).
Its stacked and soldered with the same connectors onto the board.
It Also doesn’t mention that this is the E0B1 Variety. (32GB EMMC Chip)
-
-
-
Ein paar bekannte Gesichter zieren auch die Vorderseite des Motherboards:
-
Wolfson Microelectronics WM1840 Audio Codec
-
Samsung S2MPS15 (wahrscheinlich eine Power Management IC ähnlich wie die S2MPS11)
-
Samsung Shannon 928 RF Transceiver
-
Maxim MAX77843 Companion PMIC
-
Maxim MAX98505 Class DG Audio Verstärker
-
Samsung Shannon 600B5D
Huh.. So that pesky little PMIC is whats burning my hands when my phone charges.
-
-
-
Der Versuch, das Daughterboard hochzuhebeln misslingt aufgrund der Softbutton LED Kabel.
-
Die Softbutton LED Kabel sind zwischen dem Display und dem Trägerrahmen des Displays eingeschlossen.
-
Also hebeln wir den Displayrahmen hoch, um das Daughterboard zu lösen.
-
-
-
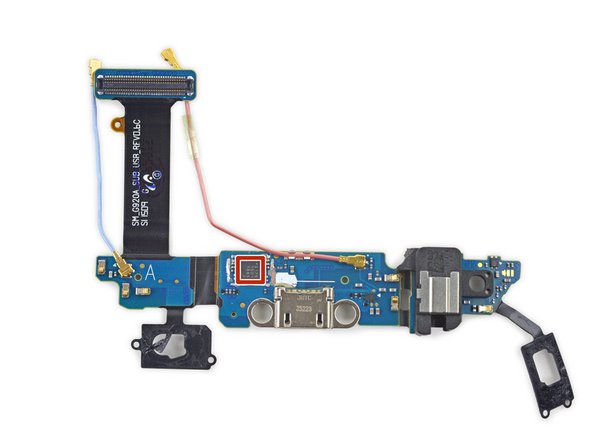
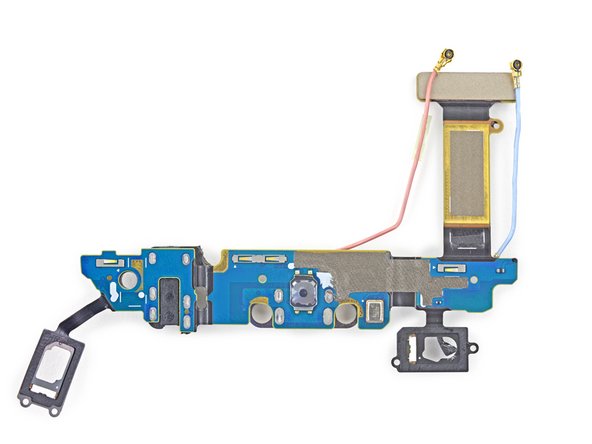
Wenn es erst einmal herausgelöst ist, ermöglicht das Daughterboard einen guten Blick auf seinen Kopfhöreranschluss sowie seinen super modernen microUSB (2.0) Port.
-
Das scheint ein weiterer Rückschritt im Vergleich zum S5 zu sein, das einen zehnmal so schnellen USB 3.0 Port hatte.
-
Auf dem Board erspähen wir eine einzelne IC:
-
Cypress 3175 1501 1885 (wahrscheinlich ein Touch- oder Fingerabdrucksensor-Controller)
-
-
-
Nach dem Ausbau des Displays finden wir denselben STMicro FT6BH Touchscreen Controller wie im S6 Edge.
-
-
-
Das Samsung Galaxy S6 erhält 4 von 10 Punkten auf unserer Reparierbarkeits-Skala (10 ist am einfachsten zu reparieren).
-
Viele Komponenten sind modular und können unabhängig voneinander ausgetauscht werden.
-
Beim S6 muss im Gegensatz zum S5 nicht erst das Display ausgebaut werden, um ins Innere des Gerätes zu gelangen, aber wenn du den USB Port ersetzen willst, musst du das Display entfernen.
-
Im Gegensatz zum S6 Edge kann der Akku entfernt werden, ohne dass vorher das Motherboard ausgebaut werden muss. Aber starker Kleber und eine eingeklebte Rückabdeckung machen den Austausch schwerer als nötig.
-
Eine Vorder- und eine Rückseite aus Glas verdoppelt die Zerbrechlichkeit und starker Kleber auf dem Rückglas erschwert den Zugang zum Inneren des Gerätes erheblich.
-
Es ist wahrscheinlich unmöglich das Glas zu ersetzen ohne das Display zu zerstören.
My samsung s6 dropped in water and only comes on when it is plugged in. As soon as the cord is removed it shuts off. Ive had the battery looked at and thats not the problem. Any suggestions?
Possibly the daughterboard (assuming charging circutry is on daugtherboard) may be providing power to motherboard but not battery
Samsung is a phone which is one of the best phone of the world. There is no doubt.
But at the same time …probably the most difficult phone to get opened !!!
-


Besonderer Dank geht an diese Übersetzer:innen:
94%


Diese Übersetzer:innen helfen uns, die Welt zu reparieren! Wie kann ich mithelfen?
Hier starten ›
24 Kommentare
So once the rear glass is removed once the screws are removed the chassis is removed? As I want to replace my chassis on my s6 at some point and don't want to remove anything I don't need to.
Any help is appriated.
We have a full set of step-by-step replacement guides for the components in this phone!
My wife dunked hers in the Pool right after my Daughter's Wedding so we need to get the pictures off.
I tried drying it out for a week before even attempting to turn it on. However it is dead!
Any suggestions?
dissemble it first and replace the dead battery. Usually that's the first component that fails upon touching water. Once dissambled, replaced the dead battery and try again. You will be able to check the rest of component with a minimum investment. Cheers.
kavenzc -
My son put my s6 in the bath. The motherboard is blown. My data is fine to retrieve. Is there a way I can retrieve my data and how much would it cost? and also without replacing the motherboard? I just want my photos and videos. I'm not worried if my phone does not fixed afterwards.
I have the same problem. The cost of a recovery company are around 450 till 600 euro.
But the one I brought it to weren't able to retrieve the data
kirsten -
Theoretically, you can move the flash NAND to another S6 and use it that way, I'd assume. That would be pricy but it is possible to do
AdamA -
hello my Samsung s6 does not go fast charging. what is the component on the motherboard that handles the fast charging?
I am looking for the same thing I have replaced the USB port and board but still no fast charge
Hello! I had recently dropped my phone on a hard surface. My screen did not crack but my whole screen went black & now it will not read my fingerprints or anything. Is it possible to get it replaced? (Censor?) Underneath your screen? & If so what would be the price range?
Thank you!
It think you broke the digitizer (in other words, your screen is no longer useful). Although, t here is a chance your screen connector just got disconnected, you should take it to a technician, and see if there is a solution for it!
kavenzc -
4 out of 10??? 1 or 2 out of 10 I think...
If broken micro usb connector: need dissasembly lcd and battery cover. Significant risk of breakage
if broken microphone: need dissasembly lcd and battery cover. Significant risk of breakage
if broken mini jack connector: need dissasembly lcd and battery cover. Significant risk of breakage
if broken battery: need dissasembly battery cover; the paint of cover is broken in old phones. (if battery inflated lcd broken)
Samsung make this phone bad for repair; bad durability, bad for the environment...
Very bad for Earth.
0 out of 10 in practice!!!
Trying to fix a broken back button… Which part should I replace? The daughterboard, the cables? What?
Thanks.
Hi Dave! The button won’t “click” or work? Does the back button still light up? The Daughterboard button cables are just for the LEDs, the button function should be part of the digitizer in the display assembly. You can try opening the phone and reconnecting the digitizer cable, but I think it will likely be more trouble than it’s worth, I’d suggest an on-screen accessibility button. But if you want to try the connector, or fully replace your screen, check out our step-by-step display replacement guide!
My s6 finally died today. Can the SD card be put in a refurbished s6 phone or s6 casing so i can retrieve my photos and texts? My last backup was two months ago but i have important stuff post-backup which i really need. Pls advise, thx
Unfortunately no, the data is stored internally.
I’m a boat service tech, my S6 has had several baths, if im not close to my house I wrap it a towel with a knot and swing it around mh head several times, pull the sims card set it in the sun with card opening up. close to house smae thing with but i have a block of soft foam i cut a slot in. wrap in towel put it in the washing dry on the longest spin cycle. after that i use a hair dryer no heat gun few minutes put charger on it as it warms the moisture expels as steam. put in front of a fan walk away. hour or so put card in it . off and running again. it’s 2015 model.
Hi, I changed the battery in my s6 and now the touch doesn’t work anymore. How can I fix the problem?
Make sure you reconnected the screen fully..if so then replace.
Hi, I replaced my screen and lost the screws to the mid frame…Do you happen to have the thread size and length of the screw? Samsung was useless when asking.
Our guides have the screw lengths (side note: this is not a guide). Not the thread pitch though. If you’re looking to buy replacement screws, I’m not sure what to tell you. A phone repair shop might be able to help you out, as they sometimes have dead phones they can scavenge for parts. Good luck!
Hi, I dropped my S6 a while ago and it has a small hairline fracture in the upper screen. It won’t turn on anymore but clearly tries to, as the blue power LED is lit as long as it tries to turn on. (Acts like a bootloop) The screen in completely black and will not show anything. Once you try to turn it on, turning it off is nearly impossible. I have data on it that I want to recover. What needs to be fixed?
The Loud Speaker. seems to be bonded into the midframe. How is it released for replacement?