Einleitung
An die Druckeinheit gelangt man nur begrenzt, entweder zur Fehlersuche oder um einen besonders üblen Papierstau zu beseitigen. Wenn die Scannereinheit ausgebaut ist, geht das viel einfacher, auch als Vorarbeit zu weiteren Reparaturen.
Die Flachbandkabel sind alle eingeschoben. Um sie zu lösen, musst du sie behutsam, aber doch fest aus ihren Anschlüssen herausziehen. Zum Anschließen musst du das verstärkte Ende des Flachbandabels fest in den Anschluss hinein drücken, achte dabei darauf, dass er richtig orientiert ist.
Was du brauchst
-
-
Es ist zwar nicht unbedingt notwendig, die Tintenpatronen zu entfernen, um das Gerät zu zerlegen, macht die Sache aber doch einfacher. Gehe nach dem Handbuch vor und lagere die Tintenpatronen in einem Plastikbeutel, so dass sie nicht austrocknen oder Flecken auf der Kleidung oder dem Mobiliar hinterlassen.
-
Schalte den Drucker aus. Drücke dazu den Ausschaltknopf, bis die Statusleuchte nicht mehr blinkt. Ziehe nun den Netzstecker und ein eventuelles USB Kabel heraus.
-
Hebe die Scannerklappe soweit wie möglich an. Drücke die Raste in der Mitte an jedem Scharnier, so dass sie frei kommt.
-
-
-
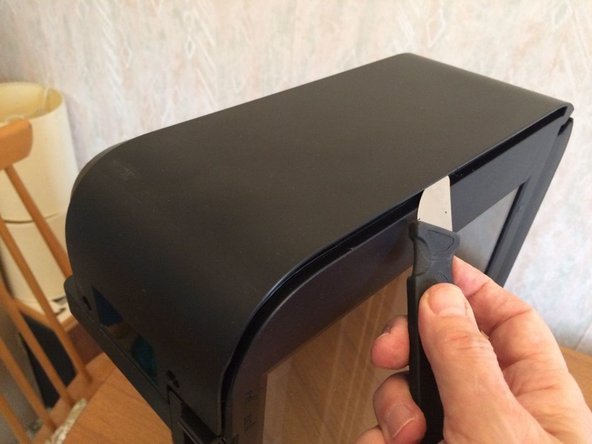
Löse mit einem Jimmy oder ähnlichem Werkzeug die Rasten an den Kanten der Abdeckung über dem Control Panel, hebe dann die Abdeckung ab.
-
-
-
Drehe die beiden Kreuzschlitzschrauben auf der Rückseite heraus.
-
-
-
Entferne die beiden Kreuzschlitzschrauben vorne rechts am Drucker.
-
Lege den Drucker auf seine linke Seite, löse das rechte Seitenpanel erst an seiner Oberkante ab, dann an der Rückseite. Es sollte dann ganz abzulösen sein.
-
-
-
-
Löse das linke Seitenpanel auf der Rückseite ab.
-
Raste zuerst die Vorderseite des linken Seitenpanels aus.
-
Das Seitenpanel wird immer noch von einer versteckten Raste unter einem rechteckigen Loch nahe am Control Panel festgehalten. Löse sie, indem du sie mit der Klinge eines Flachschraubendrehers herunterdrückst. Jetz sollte sich auch das linke Seitenpanel ablösen lassen.
-
-
-
Entferne eine Schraube in der vorderen linken Ecke des Control Panels.
-
Entferne eine Schraube in der Mitte auf der linken Seite Control Panels.
-
Entferne eine Schraube auf der Rückseite des Control Panels.
-
-
-
Hebe das Control Panel hoch, achte darauf, dass das immer noch angeschlossene Flachbandkabel nicht zu sehr belastet wird.
-
Löse das Flachbandkabel ab.
Yes, just pull. See Step 2 in Erkennen und Trennen von Kabelverbindern
How to access and replace Ink Absorber
Hallo, Wirklich den Stecker abziehen ? Ich bekomme das nicht ab ... Hab Angst es zu zerstören
Hello, Are you sure you want to unplug it? I can't get this off... Afraid of destroying it
The ribbon is reinforced where it enters the connector so no danger of tearing it. Grip it close to the connector and pull quite hard.
Das Band ist dort verstärkt, wo es in den Stecker eintritt, sodass keine Gefahr besteht, dass es reißt. Fassen Sie es nahe am Stecker und ziehen Sie ziemlich fest.
Pull the ribbon not the black connector. See also Erkennen und Trennen von Kabelverbindern (I no longer have this printer so can't get extra photos. Perhaps you'd like to add one?)
-
-
-
Trenne das Flachbandkabel zum WiFi-Modul von der Hauptplatine ab.
-
Entferne die Schraube, mit der die Halterung des WiFi-Moduls befestigt ist und entferne die Halterung zusammen mit dem Modul.
-
-
-
Löse ein breites Flachbandkabel oben an der Hauptplatine ab.
-
Löse ein schmales gefaltetes Flachbandkabel in der unteren linken Ecke ab.
-
(Der Stecker mit den zwei roten Kabeln an der linken Seite der Hauptplatine muss nicht abgelöst werden).
-
-
-
Entferne die Schraube links oben an der Glasscheibe.
-
Entferne die Schraube links unten an der Glasscheibe.
-
Hebe dann behutsam die beiden Laschen an den Stellen ab, wo die zwei eben entfernten Schrauben waren und verschiebe die Glasscheibe etwa 5 mm nach links.
-
Hinweis: Achte darauf, dass kein Staub ins Innere der Scannereinheit gelangt.
-
Wenn du nicht weiter in die Druckeinheit hinein willst, dann höre hier auf. Ansonsten schiebe die Glasscheibe zurück und fahre fort.
-
-
-
Entferne eine Schraube in der Vertiefung des WiFi Moduls.
-
Entferne eine Schraube an der linken Vorderseite des Gerätes.
-
-
-
Entferne eine Schraube an der rechten Vorderseite des Gerätes.
-
Löse eine Raste an der linken hinteren Seite des Gerätes (von hinten gesehen) und hebe die Scannereinheit heraus.
-
Jetzt ist die Druckeinheit leichter zugänglich und du kannst weitere notwendige Reparaturen im Inneren durchführen.
Note: if you want to further disasemble the scanner unit, don’t try to pry it open by force like I just did :-/.
Instead, gently slide the upper glass pane from right to about 5 mm and it should come loose.
Please then make sure not to let any dust in of course.
-


Um dein Gerät wieder zusammenbauen, folge den Schritten in umgekehrter Reihenfolge.
Um dein Gerät wieder zusammenbauen, folge den Schritten in umgekehrter Reihenfolge.
Rückgängig: Ich habe diese Anleitung nicht absolviert.
33 weitere Nutzer:innen haben diese Anleitung absolviert.
Besonderer Dank geht an diese Übersetzer:innen:
100%
VauWeh hilft uns, die Welt in Ordnung zu bringen! Wie kann ich mithelfen?
Hier starten ›

Team

12 Kommentare
Very good description. I need to empty my ink collection tank/tray. Once I have removed the scanner assembly as you describe, will I then gain access to theis container? Thanks.
See link to YouTube video below. You need long tweezers and be careful when replacing the pads as they can drop into the mechanism easily .. which is why I found this tutorial on how to dismantle the printer!
Hi. Where inside the printer to look in order to clear the error 5b02_ Thank you!
Hi, how can i clean my ink tank to clear the 5B02 error code? Thank you
thank you very much! you saved my workday! i am a girl and i really appreciate so simple manual. i wish every manual was so simple! :)))
Well done Patricia! You never need to apologise or anything of the sort for being a girl - girls are often better at this sort of thing as they tend to be more careful whereas boys sometimes rush on in a slapdash manner as if it were a race! Just believe in yourself and don’t be afraid to make mistakes - that’s how you learn - and you’ll soon be an ace fixer!
Well done explanation. You saved my printer from trash. Unresolved head alignment (tried everything) by opening the printer and perfectly clean the plastic band behind heads (it’s a pace counter in reality), as well as the plastic circle on the side opposite to head rest . were really dirty and giving false positioning to the head. Now works smoothly and precisely as new. Many thanks !
Hello everyone and thanks for the very useful guide. My Mg3650 has a paper loading problem, that is, sometimes it is unable to take it, other times it takes it a little crookedly and the paper gets stuck inside the printer... I noticed that the trolley with the two rubberized wheels which is used for pulling the paper in, it doesn't put enough pressure on the paper because I think it has a broken spring... before opening the printer following the guide, can anyone tell me if it is possible to replace or repair the spring? Maybe it's just unhooked but I'll only know when I open it. I'm wondering if any of you have had the same experience. Thank you!