Diese Übersetzung enthält möglicherweise noch nicht die neuesten Änderungen der Original-Anleitung. Hilf mit, die Übersetzung zu aktualisieren oder sieh dir die Original-Anleitung an.
Einleitung
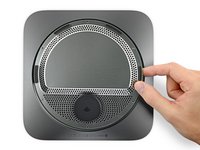
Diese Anleitung zeigt dir, wie du die große kreisförmige Antennenplatte des Mac Mini ausbauen oder ersetzen kannst. Diese Platte bedeckt den Boden des Mac Mini und muss entfernt werden, um an innere Bauteile zu gelangen.
Was du brauchst
-
-
Löse die untere Abdeckung vorsichtig mit einem Opening Tool von deinem Mac mini ab.
-
-
-
Hebe die untere Abdeckung an und entferne sie.
-
Richte sie sorgfältig so aus, dass du die Schrift "Mac mini" lesen kannst, wenn die Anschlüsse zu dir gerichtet sind.
-
Drücke dann von oben auf die Abdeckung, bis die drei versteckten Klammern einrasten.
-
-
In diesem Schritt verwendetes Werkzeug:Magnetic Project Mat$19.95
-
Entferne sechs Torx TR6 Sicherheitsschrauben, mit denen die Antennenplatte befestigt ist. Sie haben folgende Längen:
-
Drei 4,1 mm Schulterschrauben
-
Drei 1,8 mm Schrauben.
Does anybody know the bolt diameter and tread size of the TR6 screws? Eg M2.5 screws? Planning a mod for my MAC mini and will be great if someone knows the exact specs of the screws Apple uses :)
Stripped all of those screws instantly. Anyone know how to fix that so I can finish the upgrade?
The RED screws are Torx T7H and the YELLOW are Torx T6H from their toolkit. fyi.
I used a TR6 (Torx security with the hollowed tip, as per the ifixit instructions) on both the “red” and “yellow screws”, Mini 2020 model.
Also, the red ones had a small amount of blue stuff (thread compound?) around the threads, which made it slightly trickier to reinsert them straight. No big problem though
Make sure you have decent quality screwdriver for the T6 security screws. I bought a crappy one from Amazon that wore out after turning three screws.
Bei mir ging es nur mit einen T7 Torx Schraubendreher (MacMini2018)
This is the third MacMini that I have done some kind of upgrade. The first two were circa 2012. One thing I learned after the first one is to make sure I kept the little tiny screws (LTS) in the right place and segregated for each step of the process. So, what I do now is print the image (from this guide) of the step which requires removal of the LTS and as I remove each one I tape the LTS with a piece of Scotch tape on to the page with the image where it needs to be reattached. It makes it so much easier to reassemble the unit. The time required as listed is a bit understated. I just finished upgrading the memory chips on the 2018 MacMini and it took me one hour and 10 minutes from start to finish. Hope this tip helps.
Intel Mac Mini, purchased June 2021. All screws were TR6 Torx
Intel Mac mini, purchased in April 2021. All screws were TR6 Torx too.
-
-
-
-
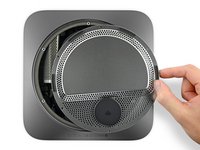
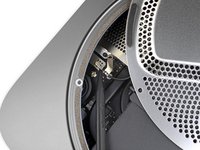
Lege den Mac Mini so, dass die Anschlüsse zu dir zeigen. Hebe dann die Antennenplatte behutsam hoch und schiebe sie etwa 2,5 cm nach rechts.
-
-
-
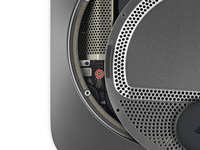
Entferne die 2,8 mm Torx T6 Schraube, die das Antennenkabel am Logic Board des Mac Mini befestigt.
Interestingly on my Mac mini there was no torx screw holding this on at all, it was just attached to the logic board. There isn’t actually a screw hole to screw it into on the logic board as it appears to be a river of some kind instead.
There wasn’t one in mine either. Wondering if it’s because I bought refurbished. What can be done about this? Is it risky to proceed without one?
Gary -
interesting! mine definitely did - it should be noted that this screw is incredibly small and should be taken out and stored with care
What can you do when you accidentally rip off the connector from the logic board? A piece has become un-soldered and now I have a brick. This was an EXTREMELY, EXTREMELY FRAGILE part. For future folks who are trying this, be extra careful and try to find info on exactly where you should be pulling from. Apparently I lodged my spudger underneath the entire socket where it soldered, rather than above it where its simply connected. It’s very easy to rip the so ket right off the logic board. Now I’m looking for micro-soldering repair places. Do I have other options?
If the 2.8 mm screw securing the antenna cable to the Mac mini's logic board “disappears” and cannot be located after the motherboard is extracted, the screw has propably settled in below the speaker. There is a neodymium magnet in the speaker and it will attract the screw. Loosen the speaker to collect the screw - do not try to push the screw out with a tool as you might do damage to the motherboard. The whole operation of retracting the screw is less than 2 minutes.
Under the speaker is where I found my antenna screw !!
I have only ever cursed Apple a couple of times (as opposed to the several million times for Microsoft!), and this was one of them. That damned antenna screw, putting it back in was a trial of patience and perseverance.
One trick for putting the screw back in is to mount it to the screw driver first. Then wrap tape around both. There's not much screw head for the tape to stick to, but it doesn't need much because it is so light. The tape comes out with the screwdriver as soon as the screw is partially threaded.
-
-
-
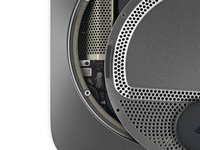
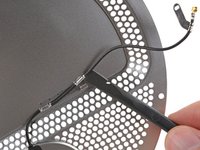
Heble vorsichtig den Stecker des Antennenkabels mit der Spudgerspitze oder einer feinen Pinzette gerade aus seinem Anschluss auf dem Logic Board hoch.
Sorry Ray… I didn’t follow your directions. When I took mine apart, the connector pulled clean off the motherboard. I looked at the icon on the back antenna cover, and it appeared to be a wifi symbol. Not a big deal for me since my Mini is always plugged in via ethernet. So I finish putting it back together… thankfully Mini boots as expected and new memory is registered.
But… everything seems to work fine. Wifi… bluetooth… internal speaker… what antenna is this connector attaching?
I had a similar experience. I finished the RAM install and as I was trying to reconnect the antenna I noticed I pulled the connector clean off the motherboard. I was able to boot the Mac mini and everything seems to be working fine, including Wifi and Bluetooth. I don’t know what the purpose of the antenna is for and I can’t find anything online. I have my Mac mini connected to Wifi and a dedicated ethernet cord just in case the Wifi acts up. It would be nice to know what I broke. I’m just thankful I don’t have a paperweight.
Re-connecting the antenna lead plug was by far the hardest part of the entire operation for me. I found it easiest to roughly position it and then screw the guide in loosely before trying to get plug properly back into the socket. When it goes in you will feel a very slight click. You can tell it is correctly located by comparing it with the two sockets beside it. If it looks like them, then you have it in correctly.
Put the screw into the retaining clip before reseating the antenna cable and screwing it down.
Trying to guide that tiny screw into the right position after the antenna’s plugged back in without it spinning off into the depths of your Mini is an exercise in futility.
Thumbs up on this comment. I had to thread the screw into the hole/slot on the clip, but it stayed seated and it was easy to guide the clip back to the hole that receives the screw.
The cable connector socket is ridiculously fragile. Be extremely careful to apply pressure exactly as shown in the Step 6 photo (zoom in for a better look) — which is to say, on the metal wire clamp away from the connector. I used a spudger, but must have caught the socket on the logic board, because the whole assembly snapped off. Have successfully done this sort of disconnection a number of times on previous Mini models, but it’s far more delicate on this model — access and visibility are limited, so be very careful.
Totally agree with Michael above. Re-connecting the antenna was the most fiddly part of the entire operation. First connecting it and secondly lining up the small guide plate where the screw keeps everything in place.
My tip would be that the connector isn’t particularly difficult as such. It’s just very small.
It is at the top of the cable so line that up. When it is lined up some gentle pushing secures it in place. Definitely don’t try to force it as it looks easily damaged. Like everything, when it’s lined up it’ll be easy and you’ll know it’s all good hearing and feeling it gently fasten.
The screw was easier by comparison. After a couple of attempts the hole was visible enough and it took the screw.
I found it easier to move the antenna plate (instead of the connector) until the connector was over the socket, and then gently push down with my finger until there was a clear click. The same strategy helped me get the metal tab correctly positioned over the hole.
I agree 100%. To remove the antenna was a little difficult. The cable was underneath that heat tube. But for me it was very difficult to reconnect that antenna. It took me long time trying to align the connector. It’s most likely because of the tight confinement of that connector.
Getting antenna back on was the most difficult of the whole operation. Rescrewing connector first helped align the socket.
When I disconnected the antenna, a small foam block popped out with it. What is this and do I need to put it back?
The solder joint broke while I was putting back the antenna. nevertheless I screwed it back on and placed it in the initial position as if nothing had happened. I prayed very hard that it worked.
Well, this had no impact on the quality of WiFi reception. Oo'
I guess I got lucky. This part of the reassembly disassembly is really very delicate. Everything else is a piece of cake.
I slipped a small hook under the cable and gently worked it off. Definitely a little nerve wracking based on the posts here. When placing it back, I also partially screwed the clip down which I believe made it easier to reattach. But still getting the antenna to "pop" back into the socket was tedious and more complex than expected. Appreciate Alex's comment above
So difficult to pry this up. Mine finally came up and took the lil white square insulator with it… hoping it will just reattach to the gold socket nub… oh well 🤷🏻♂️
-


Vergleiche dein neues Ersatzteil genau mit dem Originalteil. Möglicherweise musst du fehlende Bauteile übertragen oder Schutzfolien abziehen, bevor du es einbauen kannst.
Um dein Gerät wieder zusammenzusetzen, folge den Schritten in umgekehrter Reihenfolge.
Entsorge deinen Elektromüll fachgerecht.
Die Reparatur verlief nicht wie geplant? Schau in unsere Community zur Fehlerbehebung.
Rückgängig: Ich habe diese Anleitung nicht absolviert.
4 weitere Personen haben diese Anleitung absolviert.
Besonderer Dank geht an diese Übersetzer:innen:
88%

Diese Übersetzer:innen helfen uns, die Welt zu reparieren! Wie kann ich mithelfen?
Hier starten ›


5 Kommentare
Wow, I have no problem doing this, but I walked my parents through a RAM upgrade on their 2014 Mac Mini when all you to do is remove the bottom cover and pull the modules out. I’ve already told them to skip this model. Great guide, I have the board in front of me and waiting for Amazon to deliver the new RAM today. Thanks!
“a RAM upgrade on their 2014 Mac Mini” should be “a RAM upgrade on their 2012 Mac Mini”
willg -
Me too.It just works without plate. Not sure whether it’s assistant antenna for further and reliable signal… or just fake parts to check whether users tried to tear down and give Apple chance to reject customer service…you know it’s quite fragile part.
Joon -
Broke the female connector in the process of replacing the ram. It detached from the board. It's there a way to fix it? Wifi signal is still working but not as strong. Everything else working. Thanks
I got as far as this step to do one thing, blow out all the dust. It was far enough and a lot of dust came out. I used a XPower A-2S to blow out the dust.
nirv - Antwort