Einleitung
Folge dieser Anleitung, um eine defekte Festplatte auszutauschen.
Wenn deine neue Festplatte langsam oder fehlerhaft arbeitet, dann ersetze das Festplattenkabel. Dieses Kabel ist eine häufige Fehlerquelle, es kann den Datentransfer von und zum Laufwerk bremsen oder sogar verhindern.
Was du brauchst
Einführungsvideo
-
-
Entferne die folgenden zehn Schrauben:
-
Drei 14,4 mm Kreuzschlitz #00 Schrauben
-
Drei 3,5 mm Kreuzschlitz #00 Schrauben
-
Vier 3,5 mm Kreuzschlitz #00 Ansatzschrauben
-
-
-
Löse mit den Fingern in der Nähe vom Ventilator die Gehäuse-Unterseite vom Hauptteil des Gehäuses.
-
Entferne die Gehäuse-Unterseite.
-
-
-
Löse mit der Kante eines Spudgers den Akkuanschluss nach oben, weg vom Sockel auf dem Logic Board.
-
-
-
-
Biege das Akkukabel vorsichtig weg vom Sockel des Logic Boards, damit es sich nicht aus Versehen beim Arbeiten wieder verbindet.
-
-
-
Entferne die beiden Phillips Schrauben, die die Festplattenhalterung an dem oberen Gehäuse befestigen.
-
-
-
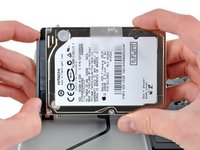
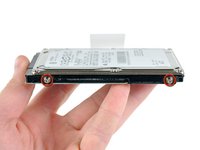
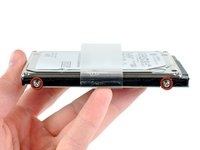
Entferne die vier 6,0 mm T6 Torx Haltebolzen, die an den Seiten der Festplatte befestigt sind.
-
Übertrage die vier Bolzen auf die neue Festplatte.
-


Arbeite die Schritte in umgekehrter Reihenfolge ab, um dein Gerät wieder zusammenzubauen.
Arbeite die Schritte in umgekehrter Reihenfolge ab, um dein Gerät wieder zusammenzubauen.
Rückgängig: Ich habe diese Anleitung nicht absolviert.
841 weitere Personen haben diese Anleitung absolviert.
Besonderer Dank geht an diese Übersetzer:innen:
100%


Diese Übersetzer:innen helfen uns, die Welt zu reparieren! Wie kann ich mithelfen?
Hier starten ›

44 Kommentare
In case you need to install/reinstall your OS, the new MBPs no longer come with an install disc. To install your OS you will need to hold down CMD + R while booting up until it chimes. It will then walk you through the process.
After holding command + R during start up I ran into a problem using Time Machine trying to restore all the files in my system. Apparently the Samsung solid state SSD 859 EVO drive I put in first needs to be formatted before Time Machine can even recognize it! No error message appeared, but no destination disk could be located. Apparently that's what happens with an unformatted hard drive. The solution is to select Disk Utilities in the first window seen after pressing command +R. Then In the left sidebar I could see all the drives including the external hard drive with my Time Machine back up and also the Samsung solid state hard drive I installed. With the newly installed hard drive selected, use the default erase and re-formating options and click on ERASE (this will also format the erased drive). This operation was very quick. I then returned to Time Machine and voila, the hard drive was locatable as a destination disk.
To the people that this still doesn’t work, try pressing cmd+alt+R, after connecting to WiFi go to Disk Utilities, format the new hard drive, and then you can proceed to restore or clean install iOS.
I needed to install the OS X in the new HD using a USB (manual in applesfera), then I was surprised when after do all this guide I see a message "Can't verified the copy...." I fixed reinstalling my old HD, and run the old OS, changed the date and time, I change again the HD, but (this is the important) don't pull off the battery connector. If you disconnect the battery, the system lost the date and time and yo can't install the OS X with and USB. I don't test the cmd + R option.