Einleitung
Diese Anleitung zeigt, wie das Motherboard in der Samsung Galaxy Watch Active2 ausgetauscht werden kann.
Was du brauchst
-
-
Drücke und halte die untere Taste an der Samsung Galaxy Watch Active2 etwa 3 Sekunden lang, bis sie sich ausschaltet. Du solltest ein kurzes Vibrieren spüren.
-
Wenn das "Ausschaltsymbol (Power off)" erscheint, dann drücke auf die Mitte des Displays, bis die Uhr herunterfährt. Diesmal solltest du zur Bestätigung ein längeres Vibrieren erhalten.
-
-
-
Entferne die vier 4 mm langen Tri-Point-Schrauben Y00 auf der Rückseite der Uhr.
Y1.5 works just as good
Bekomme ich nicht auf … Schrauben zu fest
The screws are attached to the cover. So you just need to loose them, not remove them.
Any tips for a too tight screw ?
-
-
-
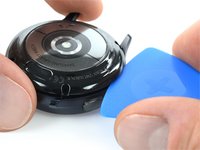
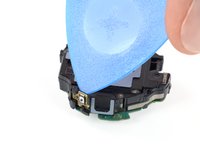
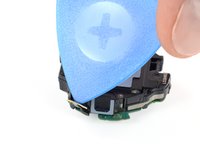
Setze ein Plektrum in der Nähe der Tasten zwischen die Kunststoffrückseite und das Metallgehäuse.
-
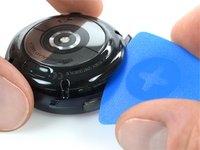
Drücke das Plektrum hinein, bis sich die Rückseite vom Gehäuse löst.
There is a glue-ish gasket keeping it closed. I used an exacto knife to start it opening.
This was super helpful thank you! Perfect timing
Waarmee kan ik de achterste oplaadplaat weer vast lijmen op de achterste behuizing
-
-
-
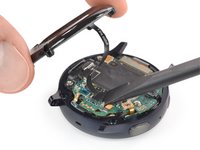
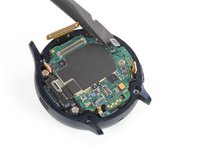
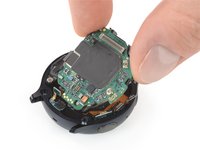
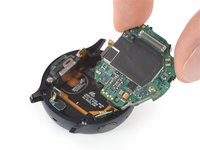
Hebe die Rückseite vorsichtig hoch, um an den Stecker der Sensorgruppe heranzukommen.
-
Trenne den Stecker der Sensorgruppe mit einem Spudger vom Motherboard ab.
-
-
-
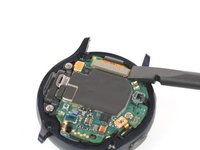
Entferne die Rückseite.
Where would you recommend buying a new back panel/charger?
Una pregunta. y para poner el reemplazo sería necesario algún tipo de sellador o silicón?porque pues usualmente este tipo de tapas vienen sellados de fabrica para evitar cualquier posibilidad de que le pudiera entrar agua
-
-
-
-
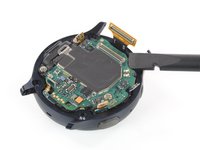
Trenne das Display und den Lautsprecher mit einem Spudger ab.
-
-
-
Trenne den Luftdrucksensor, die Tasten und das Mikrofon mit dem Spudger ab.
-
-
-
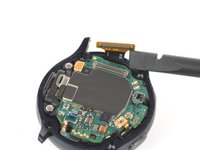
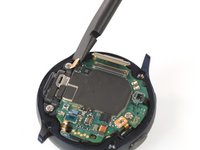
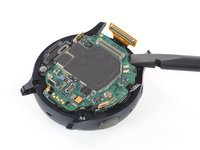
Setze einen Spudger oben rechts, nahe beim Displaystecker, unter das Motherboard ein.
-
Verdrehe und hebe den Spudger ein wenig, um die Haupteinheit zu lösen.
I would not suggest to do so. There are components underneath the motherboard as well. There are none in this specific corner, but the core assembly does not come out that easily and people might try other corners and positions. Rather unscrew the motherboard and remove the battery from the core assembly directly.
Yes! I was unable to remove the motherboard as pictured unless the screw was removed (Step 12). I suggest a re-ordering of steps in this guide.
-
-
-
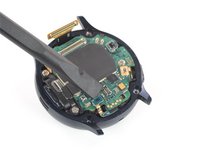
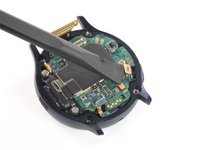
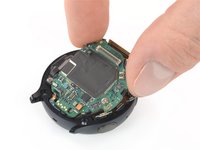
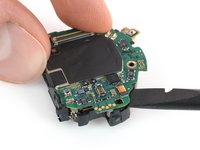
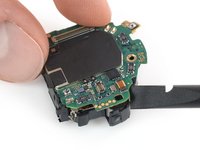
Fasse die Haupteinheit behutsam an und schiebe sie unter den Kabeln heraus.
-
Entferne die Haupteinheit.
I had to remove that screw on the core assembly using a Phillips 000. When I initially tried lifting, the core assembly started to bend. Mine also has a connector under the core assembly near the thumb in the picture. The connector goes from the underside of the core assembly to the screen/body. It prevents me from removing the core assembly as I'm not sure how it should be removed examining it
This step is really difficult, and I'm still not sure it was necessary. The core assembly is really packed in there, and it took me several attempts, lifting from various corners. Don't pull by the circuit board. It will bend if you're not careful. You've got to get under the core assembly. I had the most luck starting next to the display connector at the top, then moving to the sensor on the other end of the board (barometric sensor), then moving to the speakers on the left, and finally lifting from multiple points once it was out far enough. In really hoping I didn't damage anything.
I think the comments here should be added to the step before.
I would be very careful following Louis Finney's advice above. They are describing detaching the motherboard from the core assembly which also includes the battery and internal frame. Removing the motherboard from the rest of the core assembly exposes a very delicate looking ribbon cable that I nearly tore by trying to remove the screw holding the motherboard in place.
As Karl Arp notes, trying to pry the core assembly up by the motherboard feels like it puts a lot of strain on the circuit board, so it might be necessary to go at it from multiple angles.
Removing the whole core assembly was very difficult, and required a lot more force than I was expecting, and I had the luxury of being able to approach it from both sides, as the screen had already detached from the device (hence the need to repair), and still found it very challenging.I would advise, at a minimum applying mild heat to the metal outer frame to hopefully cause it to expand and give some additional clearance.
-
-
-
Drehe die Haupteinheit um, so dass das Motherboard nach unten zeigt.
-
-
-
Löse die obere Taste mit einem Plektrum aus dem Kunststoffrahmen.
-
-
-
Drehe die 4,4 mm lange Kreuzschlitzschraube heraus, mit der das Motherboard befestigt ist.
-
-
-
Setze das flache Ende des Spudgers unten rechts nahe der Kupferspule zwischen das Motherboard und den Kunststoffrahmen.
-
Verdrehe den Spudger, so dass das Motherboard aus den Kunststofflaschen herauskommt.
-
-
-
Schiebe das Motherboard unter den restlichen Kunststofflaschen hervor und entferne es.
-


Vergleiche das Ersatzteil mit dem Originalteil. Möglicherweise musst du Bauteile übertragen oder Schutzfolien abziehen, bevor du das Neuteil einbauen kannst.
Um dein Gerät wieder zusammenbauen, folge den Schritten in umgekehrter Reihenfolge.
Die Reparatur verlief nicht wie geplant? Versuche erst einige grundsätzliche Lösungen, ansonsten findest du Hilfe in unserem .
Rückgängig: Ich habe diese Anleitung nicht absolviert.
4 weitere Personen haben diese Anleitung absolviert.
Besonderer Dank geht an diese Übersetzer:innen:
100%

Diese Übersetzer:innen helfen uns, die Welt zu reparieren! Wie kann ich mithelfen?
Hier starten ›

Team

Tobias Isakeit - Repairability Engineer Mitglied von Tobias Isakeit - Repairability Engineer
Business
1 Mitglied
1.131 Anleitungen geschrieben
13 Kommentare
Hi, I am having issues with bluetooth, is it a replacement or do I need to swap the MB? Thank you
When you have ruled out any software issues (tried restart, factory reset, software update, etc) then this is most likely a MB replacement since all the modules are integrated on that tiny thing.
Nope, the Watch Active has a different motherboard.
My watch stopped vibrating all together, which part do I need to replace?
This would be the vibration motor which is located under the battery (small cylindrical component on the bottom right with two golden contacts) seen in the last picture.
My active 2 watch has water damage is it cheaper to replace the part or parts or get a new one at this point?
The screen has 0 response.
You can always try and open it up to assess the damage and see which parts need replacing.
My watch stopped working after swimming in a pool, What part/s could it be that needs replacement?
Hard to say. But you can always try and open your watch to assess the damage and see which parts need replacing.
If still under warranty, you might want to try and contact the seller.
If the watch is out of warranty it could be a loose display connector (try that first), a defective display, a weak solder joint or maybe water damage.
the power button on my active 2 is non responsive, I've tested the contacts across the button itself as well from the button to the main board and all have continuity. the responsiveness from the button has been getting worse over time. now it just no longer works is this a main board issue?