Einleitung
Hier wird gezeigt, wie du deine Festplatte austauschen oder aufrüsten kannst.
Was du brauchst
-
In diesem Schritt verwendetes Werkzeug:iMac Intel 21.5" Cardboard Service Wedge$4.99
-
-
Beginne an der linken Seite des Displays, auf der Seite der Ein-/Aus-Taste, und schiebe das iMac Opening Tool zwischen Das Glaspanel und das Rückgehäuse.
-
Arbeite vorsichtig! Das Glas bricht leicht, wenn es zu stark belastet wird. Erwärme die Kanten mit einem Haartrockner und löse das Klebeband ab, wenn die Raumtemperaturen niedrig sind.
A thin razor blade works well, but be careful to angle the sharp edge AWAY from the glass. Whatever tool you use you can easily scratch the paint on the back of the glass, which will show up when you look at he reassembled Mac on an angle later.
This was a great guide!
-
-
-
Benutze das Werkzeug wie einen Pizzaschneider - rolle es entlang des Schlitzes und es wird den Schaumkleber in der Mitte durchschneiden.
-
Fahre mit dem Werkzeug entlang der linken Displayseite.
-
-
-
Schneide den Kleber entlang der oberen Displayseite durch.
-
Du solltest mit dem Gerät immer etwas durch den Teil vor- und zurückrollen, den du bereits durchgeschnitten hast, um so viel wie möglich von dem Kleber zu lösen.
-
-
-
Schneide den Rest des Klebers an der rechten Seite des Gehäuses bis ganz nach unten durch.
-
-
In diesem Schritt verwendetes Werkzeug:Plastic Cards$2.99
-
Beginne an der oberen rechten Ecke des iMacs und schiebe eine Kunststoffkarte zwischen Display und Rahmen.
So sorry. Thanks for that caution.
Using suction cups (the ones that were made for removing the magnetic front glass on the 2011 and earlier iMacs) work well too. Place one in each top corner, while the Mac is lying face up on a table, and gently pull and it will separate the display from the main body. You might need to do a little more slicing around the edges if you did not get all the way through the first time with the roller. Then you can lift the display up at an angle to disconnect the cables.
This was a great idea, worked well for me. Thanks!
Florin -
-
-
-
Drehe die Plastikkarte leicht, um den Abstand zwischen Display und Rahmen zu vergrößern.
-
Bewege die Karte vorsichtig und langsam, und beanspruche das DIsplayglas nicht übermäßig. Eine Lücke von einem halben Zentimeter ist ausreichend.
-
-
-
-
Schiebe die Karte in Richtung der Mitte des Displays, um den Rest des Klebers an der oberen rechten Ecke durchzutrennen.
-
-
-
Schiebe die Karte wieder in die obere rechte Ecke und lasse sie dort stecken, um zu verhindern, dass der Kleber das Display wieder festklebt.
-
-
-
Schiebe eine zweite Karte in den Spalt zwischen Display und Rahmen an der oberen linken Ecke des iMacs.
-
-
-
Drehe die Karte vorsichtig nach oben, um den Abstand zwischen Display und Rahmen leicht zu vergrößern.
-
-
-
Schiebe die Plastikkarte in Richtung Mitte und höre wieder vor der iSight Kamera auf.
-
-
-
Schiebe beide Plastikkarten zwischen Display und Gehäuse und fange an, sie leicht zu drehen, um den Abstand zwischen Gehäuse und Display zu vergrößern.
-
Beginne, die obere Seite des Displays vom Rahmen hochzuheben.
-
-
-
Während du das Display mit einer Hand nach oben hältst, trenne mit der anderen Hand das Stromkabel des Displays. Achte darauf, dass du das Kabel nur an der Plastiklasche herausziehst, und nicht an den farbigen Drähten.
-
-
-
Klappe die Metalllasche am Anschluss des Display-Datenkabels mit einem Spudger hoch.
-
Ziehe das Display-Datenkabel vorsichtig aus seinem Sockel auf dem Logic Board.
-
-
-
Hebe den Bildschirm an, bis er fast senkrecht ist.
-
-
-
Fasse die kleine Lasche am Ende einer der Klebestreifen an der Unterkante des Displays, ziehe sie zur Oberkante des iMacs hin und entferne sie.
-
Wiederhole das Ganze für den anderen Klebestreifen.
The roller tool for slicing open the display works great for this step. Get in there like using the card and roll across the bottom to slice through the remaining adhesive.
-
-
-
Hebe den Bildschirm nach oben aus dem Rahmen heraus und entferne ihn aus dem iMac .
-
Möglicherweise musst du an einer Seite den Bildschirm anheben, damit sich der Rest des Klebebandes ablösen lässt.
After removing the display, I also removed the 3 screws for the processor fan, disconnected the power connector for it and set the fan shroud aside. Disconnecting the remaining cable (similar style to 1 of the cables for the display) that is in the way of the RAM chips is all that's left to do. I was then able to access and quickly remove the two Apple-provided RAM chips, and replace them with 3rd party RAM. Turning the iMac on its side, so that it's in a position where you're physically putting the RAM chips DOWNWARD into their respective slots is the best way to go about uninstalling and reinstalling the chips. Using a narrow but long'ish plastic spudger tool is the best way to defeat the spring-tabs which hold the RAM chips in place. After removing the LCD display, changing the RAM is about a 10 minute process!! And I'd SURE prefer not to remove all the parts and risk damage to the iMac via the standard procedure listed. As per usual, take your time and work gently :-)
Teardown the whole machine just to change RAM? While preparing to comment on this procedure I just noticed the comment made by Mitch K above. I ran pretty much the same procedure that he describes this afternoon (steps 1-23, 43-45, and step 55). Then I swapped out the original 2x4GB RAM chips for 2x8GB chips by reaching behind the logic board, releasing the spring retaining clips one chip at a time (starting with the chip further away from the logic board), pivoting the RAM towards the back of the machine, and then carefully sliding it out of the slot. I easily slid in the new chips and then pivoted them to lock them down. No hassle, no time lost. As Mitch K states above, not only is this “shortcut” method much quicker and easier, but it provides less risk of damaging cables, sockets and other delicate components during a total teardown. Why mess with the power supply board just to change RAM? I do not advise to follow the current iFixit.com procedure written by Sam Lionheart, regardless of user skill-level.
THAT sounds one !&&* of a lot easier than the full tear down. I wonder if there’s a video of the process described by Mitch K? Adding that to these verbal instructions would really help relieve the apprehension and anxiety around the process! I do sometimes find the additional warnings, though appreciated from a “safety first” perspective, are somewhat overstated. It’s been a very long time since I shorted out RAM, or fried a PCB, or broke a connector, regardless of how finicky, fragile or awkwardly designed and positioned. I may have WANTED to break something, and the air might be blue for a few seconds, but inevitably, things go back together, the start button gets pressed, the startup chime sounds, and we’re in business. Practice DOES make as close to perfect we are likely to get.
Mitch has the exact method that works a treat. You don’t need to follow steps 24-37 and also 40-63. Step 51 is the step to remove the camera cable and is needed. Steps 38 and 39 are for the Fan. That is all that is needed. Done quite a few like this.
Be careful not to drop the RAM down the back of the logic board!
By NOT removing all the other stuff you can avoid either damaging it or forgetting to plug in a cable.
I just trued this shortcut and it was not successful. I was not able to seat both RAM chips with this shortcut, and managed to slightly damage one of the retainer clips. I simply could not manipulate the chips into and out of the slots effectively without taking everything apart as described in the full set of steps.. I ended up retracing my steps and following the entire procedure, carefully, and that worked without incident. So, bottomline, it is definitely more work to follow all the steps but from my experience, it is decidedly safer. Your mileage may, of course, vary. It was successful in the end, and I swapped out the hard drive with an ssd during the same procedure and my machine is very, very much faster.
I have completed by following the Mitch K post and it is much easier than stripping down the whole thing, just be aware that to remove and replace the ram chips means working in a tight space, you need slim fingers and don’t be tempted to use force, take your time.
Well, I have slim fingers, but they are 60 years old, and they don’t work like they used to! LOL.
Agree with Mitch K’s procedure. The only added tip I would throw in is to use two 45 degree tweezers with their plastic covers still installed to easily pop loose the RAM. I couldn’t get the plastic spudger tool to work myself, but the tweezers easily reach the RAM clips. Just make sure the plastic covers are installed and you won’t be in danger of scratching or shorting anything out.
So thankful I discovered these comments. Saved me a TON of time! Thank you!!
These comments were very useful. Thank you. I just needed to modify a pair of tweezers to allow me to seat the new RAM more easily. The ifixit screwdriver wasn't able to turn some of the screws as they were installed too tightly, and I didn't want to wait to order and reveive a pair of right angled Torx screwdrivers that would give me more leverage to get those boards off.
-
-
-
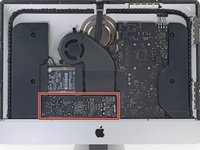
Entferne folgende Torx T10 Schrauben, welche die Festplattenhalterung am Rückgehäuse befestigen:
-
Zwei 21 mm Schrauben an der linksseitigen Festplattenhalterung
-
Eine 9 mm Schraube
-
Eine 27 mm Schraube
Pay attention to this photo and where the fan is. It is 180° from where the previous step shows it is oriented to you.
-
-
-
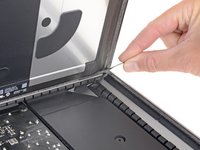
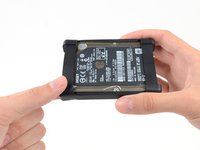
Hebe die Festplatte am Rand in der Nähe des Lüfters hoch und ziehe sie etwas aus ihrer Vertiefung heraus.
-
-
-
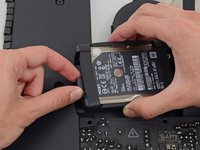
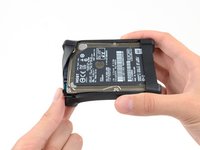
Löse die flexible Festplattenhülle von der oberen linken Ecke der Festplatte ab.
-
-
-
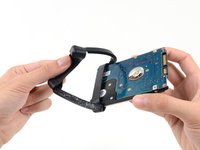
Fahre mit dem Ablösen der Festplattenhülle aus der Klebeverbindung zum Laufwerk fort.
-
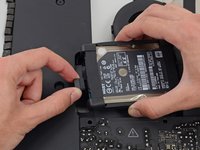
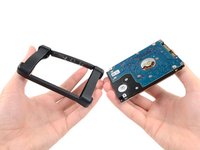
Entferne die Hülle von der Festplatte.
-
Die Festplatte bleibt übrig.
Followed the instructions in this guide using the included tool that I got with the strips. Everything worked great. Put in a brand new Samsung 850 Evo 250GB Drive. The guide makes it sound a little bit more complicated but everything went pretty smooth. Just took it slow and easy.
About torx is this good or what should I buy? https://www.amazon.it/gp/product/B00CIIM...=oh_aui_search_detailpage?ie=UTF8&psc=1
If replacing with an SSD, do you just use a mount? (I’ve don't this replacement in 27” models and the hard drive doesn’t have a silicone casing so I’m wondering how to get around this)
Great guide. I wanted to upgrade my late 2012 as much as I could to accommodate my large iTunes library. So with a little bit of cutting on the rubber hard drive cushion, I put a 15mm 5 TB hard drive and replaced the 120GB blade SSD with OWC’s 1 TB blade SSD. Now have 5.95 TB of fast usable space with my fusion drive.
No temperature sensor issues on this? I know the 27” needs a temperature sensor adapter.
I couldn’t get the SATA cable connected again with the rubber sleeve on. Luckily my iMac had it in two separate pieces to stick to the long sides only, so I plugged it in first and carefully attached the bumpers after.
What’s the trick to connect the SATA cable to the disk?? There’s very little play in the connector. Am unable to position it properly to get a connection. Maybe my fingers are too large.
Also, the photos are a bit misleading with regard to disconnecting the data display cable - show tweezers pulling on the distal end of the cable, which, is very fragile. Pictures should be improved and better description of that step added.
Success! For those contemplating this, it takes some persistence and a perfect diagonal positioning of the SATA cable connector to attach the hard drive. Geez - Apple always seems to make things so easy for us average joes and janes.
I was very impressed with the instructions above, took my time and was patient all through. I had to spend some time in the installation of the OS, care is required and attention to restoring a good backup is necessary. I had great success and would recommend undertaking this task. Many thanks IFIXIT.
Successfully replaced harddrive when original crashed in Big Sur upgrade. Excellent instructions.
The IFIXIT kit I bought included a SATA case, which I used to pull the data off the old hard drive which was on its last legs. Thank you, IFIXIT!
This was my first attempt at opening an iMac for anything but RAM upgrade (when it was possible easily on older iMacs). I too took it easy and slow. Replacing the hard drive was the easiest part of all this! The hardest part, which I'm still struggling with, was unplugging and replugging the display data and power cables. I was able to install an OS on the new SSD but in order to close the machine I had to unplug the display cables, and it seems that one of them did not seat properly, since the computer starts up but the display is black. Sigh. I will have to do the cutting and pasting of the glue strips all over again. Apple really doesn't want us doing these repairs.
-


Um deinen iMac wieder zusammenzubauen, folge diesen Schritten in umgekehrter Reihenfolge und benutze unsere Klebeanleitung, um das Displayglas wieder anzukleben.
Um deinen iMac wieder zusammenzubauen, folge diesen Schritten in umgekehrter Reihenfolge und benutze unsere Klebeanleitung, um das Displayglas wieder anzukleben.
Rückgängig: Ich habe diese Anleitung nicht absolviert.
355 weitere Personen haben diese Anleitung absolviert.
Besonderer Dank geht an diese Übersetzer:innen:
100%

Diese Übersetzer:innen helfen uns, die Welt zu reparieren! Wie kann ich mithelfen?
Hier starten ›


42 Kommentare
I used the iMac Opening Tool just as shown in this guide to separate the tape. DISASTER! The screen cracked! I used the tool slowly and carefully and despite this, the screen cracked. I should have simply used a guitar pick. That said, while I was inside my iMac replacing the Harddisk with a SSD, which was pretty easy to do, I decided to also see if I could replaced the 8GB RAM with 16GB RAM WITHOUT removing the logic board, as shown in other instructions on this site. I found that by simply removing the fan assembly, this makes enough room to reach behind the logic board and unclip the 2 memory modules. I installed 2 8GB modules (1600MHz DDR3L SO-DIMM PC12800 204 Pin) without much trouble. I used a plastic stick to reach behind the logic board and unclip the existing memory modules, then carefully inserted the new ones and clipped them into place. This is much easier than removing the power supply and logic board and all of the associated connectors and screws.
I had to replace the HD as it failed after less than two years. It was a good opportunity to increase the RAM from 8 to 16 GB. So I ordered the RAM chips from Kingston and a 256 GB SSD from Angelbird.
The repair went smoothly: to anyone trying this, please carefully follow the iFixit step-by-step guide. I recommend reading at least twice the whole procedure *before* beginning. Check all the photos. During the operation itself, I had the guide open before my eyes on my iPad and followed it step by step. The opening tool is a bit fragile, the wheel got damaged after the operation, but I guess it was designed to be used only once. After all, the adhesive strips can also be used only once!
For those replacing the hard-disk with an SSD: I highly recommend the Angelbird model "SSD wrk for Mac" (http://www.angelbird.com/en/prod/ssd-wrk...), for several dollars more you spare yourself the need to use additional software to enable TRIM or persuade the fans of your Mac that the HD's temperature is Ok.
Thanks for the tip on the Angelbird, working smoothly so far!
Elling -
Hi! Thanks for the tip! Do you know if can I put an SSD on an imac 21.5 in late 2012 ?
Very simple so long as you take your time. I had the benefit of an on site screen replacement so could see what the tech did. A few tips inc links to photos.
1. Use a marker to draw a line on the plastic card so you can see the max depth.
2. Use sticky tape either side of Apple logo on the front of the iMac, you can then position and rest the screen on the lower ledge in the right place, hold with the tape (don't remove the adhesive backing tape at this stage). The tape then acts as a hinge so screen can be lowered and raised to refit connectors and remove backing tape. More tape at top will allow you to trial fit and test prior to sealing the screen back on. It's what the Applecare tech did when he changed the screen!!
3. Be careful when removing old adhesive. Screen has a black plastic type backing to it (this forms the black frame that you see from the front) and is easy to peel and damage.
Good input. I just ordered the strips to swap my HD with a SSD. I've tested i via USB but it keeps getting corrupted, second SSD too and people say it's the fact that I'm running it via USB. So now I'm ready for the big step and actually taking apart my iMac :)
Tape seems like an excellent idea. What's that silvery tape you used?
Excellent guide and parts. My late 2012 iMac hard drive failed. As a side note, it passed SMART and Apple Diagnostics but was extremely slow - only about 5 MB/s transfer. In the logs I would occasionally see ioError but rarely.
I bought a new Retina iMac before attempting to fix this one. I'm a retired programmer and fixed computers all the time when I was young and could see better. So I was a little apprehensive about doing this but it went off without a glitch.
finepics comment and images above was helpful. Not mentioned was you need to clean off the adhesive from both the display and the iMac body. I wasn't sure if the black stuff on the display was supposed to stay as a mask but researching tech notes elsewhere said to remove it and that was correct.
Thanks so much to ifixit! I'm a long way from an Apple Store so this saved a lot of inconvenience as well as money. I bought an SSD to replace hard drive and that was less than just the labor from Apple.
This was a very straightforward repair and a lot easier than I imagined. I'm coming from a background of working on iPhones & iPads, this was a breeze in comparison. It took me only a few minutes to open it with the recommended tools. The adhesive was really easy to remove and replace as well. I could probably do the next one in less than half an hour from start to finish (excluding the time it takes to install the OS). Thank you for this guide!
My recommendation for anyone trying this, buy the service wedge. If it's your own iMac, it's definitely worth it if you need to open it up again. If you're in the repair business, it's a no-brainer. It tilts and holds the iMac at the perfect position to repair the device and the perfect position to lay the screen on the iMac before you seal it up.
I replaced the hard drive following the guide and used the adhesive strips which are a must.
You DO NEED to be very careful with the step of the "credit card" used to separate the screen from the frame.
Make sure to design a reference line on the card in order to avoid to push it too far inside the frame and risk to damage the screen connections. Many users failed to perform this part of the repair procedure and had to replace the screen itself.
I followed this perfect guide and I replaced the HD with a SSD of Kingston. The iMac comes on because you hear the usual "going" but the screen remains black. I tried to connect an external monitor and is the same black. What may have happened?
Same here, I replaced Samsung Evo 850 SSD, I can hear the start sound but it never show the Apple logo. The screen remains black.
Yas -
Will I have fan problems replacing my HD with an Samsung Evo 850 SSD on my iMac 2012 21.5?
I don't plan on installing fan software. Will this be a problem?
What fan is the one people are saying will run faster? CPU fan?
Will a 2.5 SSD fit fine?
Working on an iMac is a lot like working on a laptop. This is an awesome guide, but if you've never done it before it's not a good starter project.
Changed the horribly slow original hardrive to a Samsung 850 EVO SSD. Used the opening tool and the cards and everything went very well. Just be sure to follow the instructions very carefully and make sure you buy the adhesive stripes for the reassamble. I also added some extra RAM while opening the machine. I added an extra 8 GB from Crucial (1600MHz DDR3L SO-DIMM PC12800 204 Pin) so now I have 12 GB and that is enough for me. I did as stated above and removed the fan and then you can remove the RAM if you are very carefully. If you do as I did and upgrade only one of slots, one of the slots is very easy to reach. While being inside the machine I also carefully vacuumed the inside since there were som dust in there. My iMac now feels as good as new and is so much faster so the upgrade was well worth it.
hi, for the fans how you solved? Thank you
Labbrone -
Are the torx screws TR10 (security) or T10 (non-security)?
The screws are T10, but TR10 would work just fine!
Super easy to remove the LCD.
I use a utility knife and slow and carefully go around the LCD (1/4" deep). You can feel the tension as you move it along, so just go through it until the knife blade past every gap smoothly. Just keep going through it until all adhesive is loose and I mean ALL adhesive. At the end the knife should go along the LCD gap without any tension. At that point, just lift it up as described above. It should be so smooth that it feels there's no adhesive at all.
Excelente guía !! Instalé un SSD Crucial M550 1 TB y todo salió perfecto, ahora mi iMac 2012 vuela!! Gracias
Je viens de réaliser le changement de mon ancien DD par un SSD Samsung 850 Pro de 512Go, juste impressionnant, tout va plus vite!
C’était la première fois que je démontais un ordi, en étant très précautionneux et en suivant le tutoriel à la lettre, aucun souci. Pour le double face, j’ai mis un 3M standard de 6mm de largeur, ça convient parfaitement.
Avant la manip, j’ai utilisé Carbon Copy Cloner en version d’évaluation juste le temps du changement. J’ai retrouvé tout mon environnement après l’installation.
Juste un petit souci sur Microsoft Office qu’il faut réactiver sur le nouveau disque.
No mention of the extra cable needed for temperature control? Is it no longer required?
I do not believe the thermal sensor is required.I recently replaced my old HDD with the Samsung EVO 850 2TB SSD. The HDD was failing and taking 15+ minutes to boot. Not really sure if this had to do with age (6 years old, bought new) or with the fact that my drive had been partitioned; as I have read that some people have had their drives fail early due to partitioning. Regardless, the process was relatively pain-free, and have not had the issue with my fan running at full speed (runs at normal fan speed between 1200-1300 rpm’s). Computer feels brand new, and is now booting from restart in under 12 seconds. This website rocks!
Great guide, thanks!
bah this is way over complicated, take an exacto knife, put it out one or two clicks, cut off the adhesive, use a playing card or whatever if you need spacers to keep it from resealing, when you seal it back up get some strong velcro tape so you can get back into it later if you need to. If you can start at the camera since there’s no adhesive above it and pull away from it so you don’t scratch it, don’t cut the bottom it will act as a hinge and just come right off after disconnecting the cables. It’s not possible to cut any wires around the edges because there are no wires around the edges unless you go three inches deep.
I completed this today and it was easier than I had imagined. I have replaced the drives in around 30 of the older iMacs and I was a little annoyed about the screen removal process for this one (which is my daughter’s one)! I couldn’t find a use for the service wedge…
The hardest thing was getting the SATA cable back in, I ended up removing the rubber casing from the new drive and then plugging it in, there was more room and with the help of a spludger it was easy - I then eased the cover back on. I used an intel 545S series 512GB SSD.
My advice when following this guide is to take your time with the iMac opening tool and cards (and mark 3/8 inch on the card with pen) and if you can find an extra pair of hands then that’s good too. I had some help so we didn’t need to completely remove the screen, it just tilted back quite nicely. I didn’t need to worry about replacing the adhesive strips in the hinge area either.
The screen data and power cables were easy to manage.
Thanks!
How come there is no mention about using a sensor cable, other sites such as OWC recomend using it for fan control? And also sell one! I remember doing a ssd instal with out it but had to use a fan control software to not make it go crazy, some more detailed info about this would be nice no ? Thanks
Thank you for this guide, i‘ve done the instructions very carefully and slowly, not in one hour, but all is ok now, a new 2TB SSD does now what the old 1TB HDD done before( Smart says defect) . Now it runs much faster as it was a new iMac I think
I replaced my failing HD with a new SSD. Followed the instructions and the repair went smoothly. Good Luck.
The guide gave me all the information I needed to replace a dead drive. I purchased the tools I didn’t already have and the supplies such as the adhesive strips from iFixit. I kept the guide open on my laptop as I worked through the repair. Here are a few tips:
• The toughest adhesive strip to remove was on the lower left of the housing near the power button, where people grasp the Mac to turn it on.
• When the Mac was on the table with the screen facing up it was helpful to put something heavy behind the base so that it wouldn’t slide as I disconnected and reconnected the wiring. A no-skid pad would work, but I didn’t have one handy.
• The guide doesn’t mention them, but a couple of heavy-duty suction cup handles are handy for manipulating the screen. Not essential, but nice to have.
• Don’t rush! Read and understand the guide before you start, make sure you have all of the tools and materials and work slowly and carefully. Patience will be rewarded by success, impatience by problems.
i’v just replace my RAM from 8 to 16GB and my HD with a SSD, thank you for the tutorial ! it really help
i had an issue to restore my data from my Time Machine backup because my mac load the mac tool from OSX LION and my backup was on OSX Catalina. A good thinks to note before proceeding is to create a usb key launcher from your system :
https://support.apple.com/fr-fr/HT201372
After that, the Time Machine backup working like a charm !
I just replaced the hard drive on a late 21.5 inch iMac with a 1TB SSD using the kit from iFixit. Easier to do than I thought. I was really worried about breaking the glass. Key is to have a 2nd person to help keep it open while you are disconnecting and reconnecting the cables going to the monitor.
I also highly suggest not putting on the adhesive strips on until you are sure everything is working, i.e. temporary put the display back on and hold it in place with some masking tape, boot it up, and if it works, take the monitor back off and then apply the adhesive strips.
One final note…when I did boot the iMac up with the new SSD in it, it shows two separate drives…. the 128 GB SSD (the part left over from the fusion drive) and the new SSD. So, I am guessing I could have gotten by just buying the tools and not replacing the HD and just attaching an external HD for storage if needed. Oh well. I even cloned the fusion to the new SSD but I guess I didn’t need to. Ended up booting in Recovery mode and reinstalling everything.
That cutter works great, btw!
Hi Tony,
Just wanted to know what procedure you took before replacing the HD example, did you do a backup on time machine?
and after the upgrade how did you boot up without an operating system? because the OS went with the old HD you removed right?
and what did you do with the old HD?
The upgrade kit comes with an external HD but no info what to do with it. I mean am I supposed to back everything up on it
before I do the upgrade? I already have time machine backup.
Cheers mate
Steve
Hi, I have installed Crucial BX500 2.5 SSD, but the iMac can’t see it. I have checked the conections, but still don’t working. Any idea?
thanks!
Sam and friends, I was able to follow this guide and replace a 1TB original Hitachi drive with a Samsung 1TB SSD. Cloning the drive with MacOS Disk Utility was the first step. I ordered the recommended parts from iFixit, including adhesive strips and followed all the steps. Then I went reverse the steps as this article says. Then, OOPS! I had to backtrack to apply the new adhesive strips. But I did it, a really a complicated job for a first-time with iMacs. Super write-up with excellent photos. Apple designs EVERYTHING to be difficult to repair!
Hab das Set heute geliefert bekommen und mit der guten Anleitung innerhalb einer Stunde alles fertig bekommen.
Und der Geschwindigkeitszuwachs ist schon enorm. Bestens!
Mit der Anleitung und etwas Geduld war es sehr gut möglich, den Austausch der Festplatte gegen eine SSD durchzuführen. Vielen Dank ! Andreas November 2023
What is the SATA type? I'm trying to buy a SSD for it, and have no idea what to shoot for.
I have (21.5 inch, mid 2017, 2.3 ghz) base model same as this but not 4k. How much max ram can I install in my iMac??
Narendra Verma - Antwort
This guide contains many extra steps for what should be a straight forward, simple parts replacement without disturbing more than the display, left hand speaker and removal of 4 logic board screws for play. Nothing else except for the left hand speaker wire & iSight cable from logic board, the lower support bracket and loosening the speaker so as to move it around a bit.
For the ram, I bent a pair of cheap tweezers long ago supplied with these replacement kits to the perfect angle for holding, locating and inserting the ram into the slots under the logic bd after moving each retainer w/spudger and popping out the old. Pay attention to the orientation of the ram when removing/inserting the ram! An automotive mirror is handy along with a small flashlight for closeups. Once the ram is aligned properly substitute your fingers for the tweezers, ease it into the slot, push up & engage! Reinstall screws and all else. I have done this job successfully this way countless times. For a tweezers pic contact me!
Ross Elkins - Antwort
Additionally, if a blade is present, I install the OSx system on the blade and everything else, apps and home folders on the new SSD. You get the very fast boot off of the blade and the full ssd for all else!
Ross Elkins - Antwort