Einleitung
Folge dieser Anleitung, um die Front Panel Baugruppe zu ersetzen.
Was du brauchst
-
-
Wenn das Glas am Display zerbrochen ist, musst du weitere Schäden vermeiden und die Gefahr von Verletzungen verringern, indem du die Scheibe mit Klebeband sicherst.
-
Lege überlappende Streifen von durchsichtigem Klebeband über die Scheibe, bis alles bedeckt ist.
-
Folge der restlichen Anleitung so genau wie möglich. Wenn das Glas allerdings einmal zerbrochen ist, ist es wahrscheinlich, dass es während der Reparatur weiter zerbricht, und du musst unter Umständen einen Metallspatel benutzen, um das Glas herauszuholen.
-
-
-
Fasse den iOpener an seinen Laschen an und lege ihn auf die Seite des iPad links von der Home Button Einheit.
-
Lasse ihn dort fünf Minuten, um den Kleber unter dem Glas aufzuweichen.
-
-
-
Setze einen Saugnapf in die Mitte der erwärmten Seite.
-
Achte daruf, dass der Saugnapf gut sitzt, um sich gut festzusaugen.
-
Halte das iPad mit einer Hand fest und ziehe am Saugnapf, so dass das Frontglas sich leicht vom rückseitigen Gehäuse trennt.
This step is totally pointless if you have a shattered screen. The suction cup is rendered useless. Any tips on what to do if you can't get any suction due to a shattered screen?
just pick out the glass shards if it is cracked that bad you are better off scrapping the digitizer
-
-
-
Schiebe, während du das Glas mit dem Saugnapf nach oben ziehst, die Spitze eines Plektrums in den Spalt zwischen Glas und Gehäuse.
-
Löse den Saugnapf mit Hilfe der kleinen Plastiknoppe und entferne ihn vom Display.
thanks jfaulks1 (I did not copy and paste lol)
-
-
-
Erwärme den iOpener und lege ihn wieder auf.
-
Lasse ihn einige Minuten auf dem linken Rand des iPad liegen.
-
-
-
Setze ein zweites Plektrum neben das erste und schiebe es entlang des Randes des iPads, wobei sich der Kleber darunter löst.
-
-
-
Schiebe das Plektrum weiter die Kante des Displays entlang, um alle Klebeverbindungen zu lösen.
-
Wenn das Plektrum im Klebstoff festklebt, dann "rolle" es weiter die Kante entlang und trenne so die Verbindung.
-
-
-
Nimm das erste Plektrum an und schiebe es am iPad nach oben.
-
Erschrick nicht, wenn du die Spitze des Plektrums durch die Glasscheibe sehen kannst, ziehe das Plektrum nur ein Stückchen zurück. Meistens ist alles in Ordnung, versuche trotzdem das zu vermeiden, es könnte nämlich etwas Kleber direkt auf das LCD kommen und das ist schwierig zu entfernen.
-
-
-
Erwärme den iOpener wieder und lege ihn auf den oberen Rand des iPad über die Frontkamera.
-
-
-
Schiebe das Plektrum um die linke obere Ecke des iPad und löse so den Kleber.
Gezz this is though! Cracked the glass while replacing it.
:( sad (rip glass lol)
-
-
-
Schiebe das Plektrum an der Oberkante des iPads weiter und halte erst kurz vor der Kamera an.
-
-
-
Ziehe das Plektrum leicht heraus und schiebe die Spitze vorsichtig über den Bereich mit der Frontkamera and der Oberkante.
-
-
-
Lasse das Plektrum kurz nach der Frontkamera stehen.
-
Lasse das zweite Plektrum stehen, um so zu vermeiden, dass die linke Ecke wieder verklebt, wenn sie sich abkühlt.
-
-
-
Drücke das erste Plektrum etwas tiefer ein und schiebe es von der Kamera weg zur Ecke.
Shattered my screen pretty bad here, making it so that whenever I continued to move the pick the glass separated and I couldn’t continue moving it. Be VERY gentle moving the pick; almost no force is required.
-
-
-
Lasse die drei Plektren in den Ecken stehen, um so zu verhindern, dass sich beim Abkühlen wieder das Front Panel verklebt.
-
Erwärme den iOpener wieder und wende ihn auf die letzte lange Seite des iPad an, über den Lautstärkereglern.
-
-
-
Schiebe das rechte obere Plektrum um die Ecke, um die Oberkante des Glases ganz zu lösen.
-
Lasse das Plektrum stehen, um ein Wiederankleben zu verhindern, und benutze für den nächsten Schritt ein neues Plektrum.
-
-
-
Setze ein neues Plektrum daneben und schiebe es zur Mitte der rechten Seite, wobei sich auch hier die Klebeverbindungen lösen.
-
-
-
Schiebe das Plektrum entlang der rechten Kante nach unten, um die Klebeverbindungen zu lösen.
-
-
-
Lasse die Plektren an Ort und Stelle und erwärme wieder den iOpener.
-
Lege den iOpener auf den Rand mit dem Home Button und lasse ihn dort ein paar Minuten, um den Kleber unter dem Gals aufzuweichen.
-
-
-
-
Schieb das linke untere Plektrum um die untere linke Ecke und schneide so den Kleber auf.
-
Lasse das Plektrum auf der Ecke stehen. Trenne nicht weiter auf und entferne nicht das Plektrum.
-
Antennen
-
Die Vertiefung für den Home Button
-
Das Kabel des Digitizers
-
Die folgenden Schritte zeigen dir, wie und wo du arbeiten musst, um Schäden an den genannten Bauteilen zu vermeiden. Erwärme nur und hebele nur dort, wo angegeben.
-
-
-
Benutze ein neues Plektrum und schneide vorsichtig über die linke Antenne, halte kurz vor dem Home Button an.
-
Lasse das Plektrum stecken, bevor du zu den nächsten Schritten übergehst.
-
-
-
Setze die Spitze eines letzten Plektrums neben das aus dem letzten Schritt und schiebe es unter den Home Button.
-
Schiebe das Plektrum etwas tiefer ein und arbeite dich wieder zurück zum Home Button.
-
-
-
An der Oberkante des iPad, gegenüber dem Home Button, müssten noch Plektren an jeder Ecke stecken. Verdrehe sie so, dass sich das Glas sich anhebt und alle vier Kanten gelöst werden.
-
-
-
Hebe vorsichtig und leicht an, um die Klebeverbindung am unteren Rand zu lösen.
Really, add a few more pics and a few more picks, see how long and difficult you can make this guide. 26 steps to get the top screen off is ridiculous.
-
-
-
Wenn alle Klebeverbindungen getrennt sind, kannst du das Frontglas wie die Seite eines Buches aufklappen. Lege das iPad geöffnet auf die Arbeitsfläche.
I recommend wearing latex gloves or be sure not to put too many finger prints on the front or back of this front glass when lifting it or completing the remainder of the steps. I made this mistake and upon installing the new LCD and putting the iPad back together I realized that I left a few finger prints on the inside of the front glass. After re-securing the adhesive strips putting the iPad back together there are now unremovable fingerprints visible when the LCD is turned off. Just a recommendation on the gloves or be sure to wipe both sides of the front glass clean before putting all back together.
-
-
-
Das Gehäuse der Frontkamera klebt möglicherweise am Front Panel fest. Löse es ab und lege es wieder über die Kamera, um sie zu schützen.
-
Bewege das Kameragehäuse wackelnd an einer Kante nach oben, um es von der Klebeverbindung zu befreien und entferne es vom Front Panel.
-
Lege das Gehäuse der Frontkamera in seine Ausbuchtung im Rückgehäuse zurück.
-
-
-
Entferne das rechteckige Stückchen Schaumstoff, das die rechte obere Schraube für das LCD verdeckt, mit einer Pinzette.
-
Entferne das dreieckige Stückchen Schaumstoff, das die rechte untere Schraube für das LCD verdeckt.
-
-
-
Wenn das der Fall ist, musst du den Klebestreifen mit dem flachen Ende des Spudgers ablösen und so die Schraube darunter freilegen.
-
-
-
Entferne die vier 3,9 mm Kreuzschlitzschrauben #000, die das LCD am Gehäuse befestigen.
In my case the 4 screws are not the same. One is 4mm, and 3 of 3.5mm, or better 2 x 3.5mm and one 3.45mm. I put the longest one at the left edge at left of the LCD flat cable.
mitja
Hi Mitja. I just checked the measurements with an electronic digital caliper. I got 3.9 mm for all four screws. Are you sure it was the same model? Thanks.
ipad mini wifi no screws are longer
-
-
-
Löse das kleine Stückchen Klebeband, welches den LCD Rahmen mit dem rechten Lautsprecher verbindet, mit einer Pinzette ab.
-
-
-
Ziehe den Schaumstoffstreifen um das LCD mit einer dünnen Pinzette am oberen Ende hoch.
-
Löse den Schaumstoff mit der Pinzette ab, um die Oberkante des LCD freizulegen.
-
-
-
Setze eine Spudgerspitze zwischen LCD Rahmen und dem Band am oberen Rand des LCD ein.
-
Schiebe den Spudger entlang des Spalts zwischen LCD Rahmen und Band und trenne so die beiden.
I finished a successful replacement of my screen following these instructions. Thanks.
Step 36 (remove tape from LCD perimeter), however, seems unnecessary. I ended up spending a lot of time separating the tape from the LCD frame only to discover it was not necessary for steps 37-44 and actually made things really difficult for step 45-46 (removing the tape near the speakers). Finally, steps 45-46 can be skipped since it is much easier to remove this tape once you flip the LCD over (Step 55).
-
-
-
Setze das Plektrum in den Spalt zwischen LCD und rückseitigen Gehäuse, in der Nähe der oberen linken Kante des LCD.
-
Biege das Plektrum leicht weg vom iPad, gerade so viel um den Spalt zwischen LCD und Gehäuse zu vergrößern.
I found a very simple method for removing the LCD from the metal shield. Slightly lift one of the top corners and insert a 1' piece of fishing line. Insert the line under the other top corner placing the length between the LCD and shield. Once in place, gently pull each end toward the bottom of the LCD breaking the adhesive as you go. This will make things much easier than using the picks and possibly breaking the LCD.
The fishing line trick is amazing… although i had already broken the LCD when i saw that comment. Good Learn!
This step is what destroys my LCDs :(
I was able to do this the first time w/out damaging the LCD simply by following the instructions to the letter, slowly and carefully. The only thing I did differently was to follow Northstar’s instructions to remove the two pieces of tape at the bottom of the LCD before beginning.
I found a good way to remove the LCD without breaking it. Once you finish to clean up around the LCD just lift a bit one of the white metal backing plate and insert in the gap a plastified playing card under le LCD and slowly make your way to the center of the LCD. Repeat on the other side and the LCD will lift up intact.
nothing Brocken after
(I did not read the comments before doing it lol)
-
-
-
Setze das Plektrum an drei weiteren Stellen entlang der linken Seite des LCD an und schiebe dabei das LCD leicht auf die rechte Seite des Gehäuses hinüber.
-
-
-
Gehe nun auf die rechte Seite des LCD und hebele mit dem Plektrum an verschiedenen Stellen entlang der Kante, um das LCD wieder nach links zu schieben.
-
-
-
Setze das flache Ende des Spudgers zwischen LCD Rahmen und der Metallplatte dahinter.
-
-
-
Fange rechts oben am Gerät an, schiebe den Spudger zwischen LCD Rahmen und Metallplatte, dabei wird sich die Klebeverbindung lösen.
These steps were hard. I was too scared that I was going to brake the LCD. Luckily I got it off! Don’t know how delicate these things are and how much force they can take.
me to it was hard
-
-
-
Wiederhole das Ganze für den oberen Rand des LCD.
-
Setze das flache Ende des Spudgers zwischen LCD Rahmen und Metallblech. Schiebe den Spudger vorsichtig an der Oberkante des Gerätes entlang und löse so den Kleber.
-
-
-
Fahre am der linken Seite des LCD fort: setze das flache Ende des Spudgers so tief wie möglich zwischen das LCD und das Abschrimblech ein.
-
-
-
Hebe das LCD einige Zentimeter hoch um sicherzustellen, dass keine Klebeverbindung mehr da ist.
When I did it I found that the adhesive sticking was mainly on the edges, so if you take a spudger and just break that adhesive carefully it will help. Be gentle lifting the lcd as it’s very breakable.
-
-
-
Halte das LCD mit einer Hand und setze das flache Ende des Spudgers in den Spalt zwischen diesem Band und dem linken Lautsprecher ein.
-
Ziehe das LCD vorsichtig weg von den Lautsprechern und drehe dabei den Spudger nach außen um das Band vom Lautsprecher zu trennen.
-
-
-
Setze das flache Ende des Spudgers in den Spalt zwischen rechtem Lautsprecher und dem Band am LCD.
-
Drehe den Spudger nach außen, während du das LCD von den Lautsprechern wegziehst. Dadurch vergrößert sich der Spalt und es löst sich das Band vom Lautsprecher.
-
-
-
Entferne folgende Kreuzschlitzschrauben, die die LCD Abschirmung am rückseitigen Gehäuse des iPad befestigen:
-
Zwei 2,6 mm Kreuzschlitzschrauben #00
-
Dreizehn 1,7 mm Kreuzschlitzschrauben #00
-
Einige Geräte haben auch noch eine weitere 1,7 mm Kreuzschlitzschraube #00.
On my 1432 there were mixed in 4 tiny #000 screws holding the shield plate aong the right side. Looks like these can be mixed in without consequence as they are shorter anyway
I have a missing plate and screws
-
-
-
Setze das flache Ende eines Spudgers unter die Mitte der LCD Abschirmung von der Unterseite des iPad aus.
-
Hebele am Spudger hoch, um die Abschirmung aus den Seiten des Gehäuses zu lösen.
-
-
-
Entferne die LCD Abschirmung vom iPad.
Once the LCD is clear of the shield, wiggle a long plastic spudger up the center between the shield and the battery to gently bend the shield. That will help in getting it away from the sides and make it easier to come out.
-
-
-
Entferne die drei 1,3 mm Kreuzschlitzschrauben #00, die die Steckverbinder-Abschirmung am Logic Board befestigen.
Note: These three screws are smaller than the rest of the screws holding the larger LCD shield although they look similar. If you substitute the larger screws, you will pop a screw bracket which can damage the board on both the mini original and mini 2 retina. I just wrote a blog post about how this happens: http://mendonipadrehab.com/entries/gener...
Hi jessabethany. Thank you for the warning. I read your blog post and found it to be very informative. Thanks for adding the warning to the step. It will most definitely help others avoid any damage to the logic board. Thanks!
-
-
-
Fasse die Steckverbinder-Abschirmung mit einer Pinzette und entferne sie vom iPad.
-
-
-
Heble vorsichtig den Akkuverbinder mit einem Plastiköffnungswerkzeug aus seinem Sockel auf dem Logic Board.
Make sure you disconnect the battery. If not and ipad is still on you can have problems with the LCD backlight. To fix that problem you have to solder
I may be experiencing the backlight problem you mentioned. What connection needs to be soldered?
Have an issue - heard that if you don't disconnect the battery a fuse is blown. I need help to fix the blown fuse.
There is an extensive thread in Answers about iPad mini backlight problems.Th screen stays black after a digitizer replacement.
After unplugging the battery place a guitar pick in-between the two connections.
While continuing to work on the iPad you may inadvertently cause the two connections to touch.
Yeah, you need to put the pick in between the connections so the battery doesn't touch the logic board connector and blow a fuse and make your backlight not turn on. You really don't want to have to solder the 2 connections together, especially if you don't know how, like me! I will use your comment's advice when working.
I put a piece of cellotape on the contact side of the connector and could happily forget about it while getting on with the rest of the repair.
-
-
-
Heble den LCD Verbinder mit einem Plastiköffnungswerkzeug aus seinem Sockel auf dem Logic Board.
Putting the iPad back together: While plugging the LCD Connector back in, take your time finding the socket on the logic board. Do no use pressure until you are certain it is seated properly. Trust me, if you take your time you will know its seated correctly.
Does it shares the same shape/size of the LCD connector between the ipad mini wifi only WHITE and the other one ipad mini 32gb BLACK?
-
-
-
Setze das flache Ende eines Spudgers zwischen LCD und Klebeband auf der rechten Seite des iPads an, während du mit einer Hand das LCD festhältst.
-
Schiebe den Spudger nach außen und trenne so das Klebeband ab, während du vorsichtig das LCD anhebst und vom Band wegziehst.
Removing this tape and such to take the LCD off completely is unneccessary when replacing just the glass and digitizer, the digitizer cable is easily removed without further work to the LCD
When this tape damage, how we can take a new?
When this tape are damage, how we can order and take a new one?
Following from Nick H’s comment about LCD removal being unnecessary - I tried that first and got my broken glass OUT of the assembly by threading it thru a limited space beneath the LCD. Later when trying to reseat the digitizer connector I gave up and removed the LCD anyhow. Not that much extra work but a LOT easier to install the digitizer and reseat the connector without having to navigate around the LCD and its cable. Removal of the tape holding the LCD was easy - there are two short lengths of rubber or foam along the bottom edge of the LCD that faces the outside world. Remove those(save them) and then _carefully_ peel up the tape; I saw some metallic looking residue underneath. Later when re-assembling everything, I put the tape back and then those two short lengths of foam.
-
-
-
Halte weiterhin das LCD mit einer Hand fest. Gehe nun auf die linke Seite und wiederhole den vorigen Schritt, um das zweite Klebeband zu trennen.
-
Setze das flache Ende des Spudgers zwischen LCD Rahmen und Band, schiebe ihn nach außen und hebe währenddessen das LCD vorsichtig hoch.
-
-
-
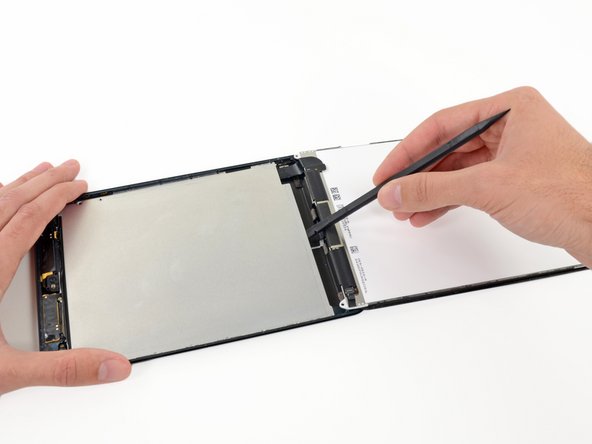
Um die Belastung des Anschlusses zu minimieren, solltest du versuchen, unter der kurzen Kante des Steckers zu hebeln und nicht unter der langen Kante, wie auf diesen Bildern zu sehen ist.
-
Heble den Stecker des Touchscreens vorsichtig aus seinem Anschluss auf dem Logic Board.
-
-
-
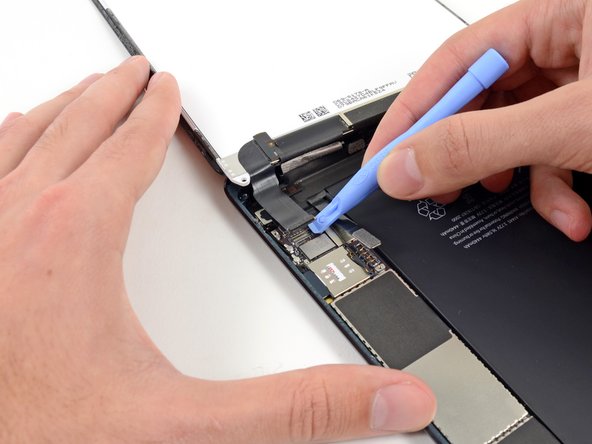
Hebe vorsichtig die Platine des Digitizerkabels aus dem Gehäuse.
There is adhesive holding it down, so it may take some time to get it off. It helped me to push with my spudger on the piece with the yellow text instead from the same side.
I put the iOpener under the iPad to weaken the adhesive for this step.
-
-
-
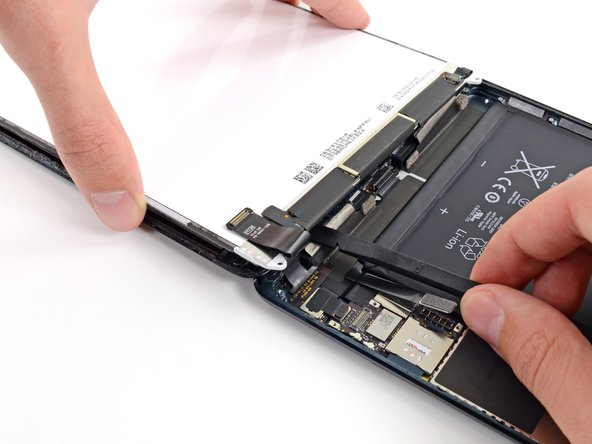
Hebe das Front Panel an und entferne es aus dem iPad.
== After step 55 ==
Before installing your new digitizer (front panel), make sure to put the necessary bends on the new digitizer's ribbon cable. Look at the old panel that you've removed to see the bends that you'll need to make. Without doing this, once you are at the last step of laying down the digitizer, the cable may bunch-up in between the glass and the iPad's aluminum frame. Thus, it will not allow that corner to sit flush and glue down. If you didn't make the bends, you can use the tweezers at that point to situate the cable. It is just easier to do this beforehand. Do not make the bends as if you were folding paper. You run the risk of damaging the ribbon by doing so. You just want enough pressure to make the cable retain a bend. Again, look at and copy the cable from your old panel.
Good Luck!!!!
If your panel is shattered, you may want to have some canned air to get rid of all those pesky little glass pieces that fly everywhere. I used a Giottos air blaster because that is all I had at my disposal.
Mike -
might be better to use a vacuum for safety reasons. you really dont want glass shards all over the place
If your case corners are damaged from being dropped, seal across the corners with wide packing tape, then grind them out carefully with a small motor tool. Use a corner piece from the broken screen (adhesive side upwards) as the template. Keep removing aluminium until screen piece above fits snug and flat. Remove all traces of metal filings before reassembly.
Good tip! Most times the corners are damaged.
-


Um dein Gerät wieder zusammenzubauen, folge den Schritten dieser Anleitung in umgekehrter Reihenfolge.
Um dein Gerät wieder zusammenzubauen, folge den Schritten dieser Anleitung in umgekehrter Reihenfolge.
Rückgängig: Ich habe diese Anleitung nicht absolviert.
32 weitere Nutzer:innen haben diese Anleitung absolviert.
Besonderer Dank geht an diese Übersetzer:innen:
100%

Annika Faelker hilft uns, die Welt in Ordnung zu bringen! Wie kann ich mithelfen?
Hier starten ›

3 Kommentare
i say you have too many steps.
and youre missing some too.
i'd put that bad boy in the dehydro for 30 mins and the lcd and glass come out like butta.
spudger on the top and the lcd comes off like nothing!
60C
30mins
remember to also cover all the contacts on the new digi so you don't short it.
if you're wondering which, theyre on the bottom, look at the OEM glass and look at the replacment, see the gold that isn't covered?
cover it, as well as transfer the magnets over to the new glass.
presto!
you win!
Cheers guys hope i helped!
In case of broken glass, here are some hints:
- I prefer 3M "3350" tape; a metalized polypropylene tape with an acrylic adhesive. It's a very thin, silvery HVAC tape, not your standard duct tape.
- Test your tape to make sure it sticks really well to the glass.
- Use isopropyl alcohol on a paper towel to remove fingerprints and other dirt to help the tape stick to the screen.
- Use the widest tape you can find, and apply it evenly, without trapping bubbles, without crinkles: This greatly improves your chance of success with the suction cup later.
- Cut tape pieces long enough and go over the (rounded) edge; afterwards carefully run a scalpel alongside the edge (between bezel and glass) to trim off any excess.
- Don't overlap edges of the tape: butt-join them instead.
- If needed: repeat in other direction.
- If needed: Cut square piece of tape (size of suction cup) and place it where you want to lift the glass, so that the suction cup doesn't cover any butt-joins.
Good luck, you brave person!
volty - Antwort
This is the second broken screen I’ve fixed. Overlapped package tape carefully stuck to the glass and trimmed to the edges will contain most of the shards. I found that a hair dryer works for softening the glue. After getting under an edge with the suction cup I carefully followed the opening sequence using a combination of plastic picks and a single edge razor blade to get under the small pieces. It was slow going with lots of reheating with the dryer (about 45 minutes), but the taped glass came off without glass everywhere.
Bill Roughen - Antwort