Zum Hauptinhalt wechseln

iPhone 6s Plus FaceTime Camera and Sensor Assembly Replacement

Was du brauchst

  1. iPhone 6s Plus FaceTime Camera and Sensor Assembly Replacement, Pentalobe Screws: Schritt 1, Bild 1 von 1
    • Before disassembling your iPhone, discharge the battery below 25%. A charged lithium-ion battery can catch fire and/or explode if accidentally punctured.

    • Power off your iPhone before beginning disassembly.

    • Remove the two 3.4 mm Pentalobe screws on either side of the Lightning port.

  2. iPhone 6s Plus FaceTime Camera and Sensor Assembly Replacement, Opening Procedure: Schritt 2, Bild 1 von 1
    In diesem Schritt verwendetes Werkzeug:
    Anti-Clamp
    $24.95
    Kaufen
    • If you don't have an Anti-Clamp, follow the next three steps to use a suction handle.

    • Apply mild heat to the lower edge of the iPhone using an iOpener or hair dryer for about a minute.

    • Heat softens the adhesive securing the display, making it easier to open.

  3. iPhone 6s Plus FaceTime Camera and Sensor Assembly Replacement: Schritt 3, Bild 1 von 1
    • Opening the display on the 6s Plus separates a thin strip of adhesive around the perimeter of the display. If you prefer to replace the adhesive, have a set of new adhesive strips ready before you continue. It's possible to complete the repair without replacing the adhesive, and you probably won't notice any difference in functionality.

    • Apply a suction cup to the lower left corner of the display assembly.

    • If your display is badly cracked, covering it with a layer of clear packing tape may allow the suction cup to adhere. Alternatively, very strong tape may be used instead of the suction cup. If all else fails, you can superglue the suction cup to the broken screen.

  4. iPhone 6s Plus FaceTime Camera and Sensor Assembly Replacement: Schritt 4, Bild 1 von 2 iPhone 6s Plus FaceTime Camera and Sensor Assembly Replacement: Schritt 4, Bild 2 von 2
    • Pull up on the suction cup with firm, constant pressure to create a slight gap between the front panel and rear case.

    • Pulling too hard may damage the display assembly. Apply just enough pressure to create a small gap between the display assembly and the rear case.

  5. iPhone 6s Plus FaceTime Camera and Sensor Assembly Replacement: Schritt 5, Bild 1 von 3 iPhone 6s Plus FaceTime Camera and Sensor Assembly Replacement: Schritt 5, Bild 2 von 3 iPhone 6s Plus FaceTime Camera and Sensor Assembly Replacement: Schritt 5, Bild 3 von 3
    • The safest place to pry from is the notch in the front panel above the headphone jack.

    • While still maintaining pressure on the suction cup, insert the flat tip of a spudger into the gap, directly above the headphone jack.

  6. iPhone 6s Plus FaceTime Camera and Sensor Assembly Replacement: Schritt 6, Bild 1 von 2 iPhone 6s Plus FaceTime Camera and Sensor Assembly Replacement: Schritt 6, Bild 2 von 2
    • Twist the spudger to widen the gap between the front panel and the rear case.

  7. iPhone 6s Plus FaceTime Camera and Sensor Assembly Replacement: Schritt 7, Bild 1 von 3 iPhone 6s Plus FaceTime Camera and Sensor Assembly Replacement: Schritt 7, Bild 2 von 3 iPhone 6s Plus FaceTime Camera and Sensor Assembly Replacement: Schritt 7, Bild 3 von 3
    • While firmly pulling up on the suction cup, slide the edge of the spudger under the bottom left corner of the display.

  8. iPhone 6s Plus FaceTime Camera and Sensor Assembly Replacement: Schritt 8, Bild 1 von 2 iPhone 6s Plus FaceTime Camera and Sensor Assembly Replacement: Schritt 8, Bild 2 von 2
    • Slide the tip of the spudger up the left side of the phone, between the front panel and the rear case.

  9. iPhone 6s Plus FaceTime Camera and Sensor Assembly Replacement: Schritt 9, Bild 1 von 2 iPhone 6s Plus FaceTime Camera and Sensor Assembly Replacement: Schritt 9, Bild 2 von 2
    • Insert the flat tip of the spudger under the right edge of the display.

    • Slide the spudger up the right side.

  10. iPhone 6s Plus FaceTime Camera and Sensor Assembly Replacement: Schritt 10, Bild 1 von 2 iPhone 6s Plus FaceTime Camera and Sensor Assembly Replacement: Schritt 10, Bild 2 von 2
    • Use a plastic opening tool to hold down the rear case while pulling up the suction cup to open the phone.

    • Do not remove the display completely, or you will damage the data cables connecting the display near the top edge of the iPhone.

  11. iPhone 6s Plus FaceTime Camera and Sensor Assembly Replacement: Schritt 11, Bild 1 von 2 iPhone 6s Plus FaceTime Camera and Sensor Assembly Replacement: Schritt 11, Bild 2 von 2
    • Pull up on the small nub on the suction cup to remove it from the display.

  12. iPhone 6s Plus FaceTime Camera and Sensor Assembly Replacement: Schritt 12, Bild 1 von 3 iPhone 6s Plus FaceTime Camera and Sensor Assembly Replacement: Schritt 12, Bild 2 von 3 iPhone 6s Plus FaceTime Camera and Sensor Assembly Replacement: Schritt 12, Bild 3 von 3
    • Gently grasp the display assembly and lift it up to open the phone, using the clips at the top of the front panel as a hinge.

    • Open the display to about a 90º angle, and lean it against something to keep it propped up while you're working on the phone.

    • Don't open the display more than 90º—it is still connected to the top of the phone by the display, digitizer, and front camera cables which can tear easily.

    • Add a rubber band to keep the display securely in place while you work. This prevents undue strain on the display cables.

    • In a pinch, you can use an unopened canned beverage to support the display.

  13. iPhone 6s Plus FaceTime Camera and Sensor Assembly Replacement, Battery Connector: Schritt 13, Bild 1 von 1
    In diesem Schritt verwendetes Werkzeug:
    Magnetic Project Mat
    $19.95
    Kaufen
    • Remove two Phillips screws securing the battery connector bracket to the logic board, of the following lengths:

    • One 2.9 mm screw

    • One 2.3 mm screw

    • Throughout this guide, keep careful track of your screws so that each one goes back where it came from during reassembly. Installing a screw in the wrong place can cause permanent damage.

  14. iPhone 6s Plus FaceTime Camera and Sensor Assembly Replacement: Schritt 14, Bild 1 von 2 iPhone 6s Plus FaceTime Camera and Sensor Assembly Replacement: Schritt 14, Bild 2 von 2
    • Remove the battery connector bracket.

  15. iPhone 6s Plus FaceTime Camera and Sensor Assembly Replacement: Schritt 15, Bild 1 von 3 iPhone 6s Plus FaceTime Camera and Sensor Assembly Replacement: Schritt 15, Bild 2 von 3 iPhone 6s Plus FaceTime Camera and Sensor Assembly Replacement: Schritt 15, Bild 3 von 3
    • Use a spudger or a clean fingernail to disconnect the battery connector by prying it straight up off the logic board.

  16. iPhone 6s Plus FaceTime Camera and Sensor Assembly Replacement: Schritt 16, Bild 1 von 3 iPhone 6s Plus FaceTime Camera and Sensor Assembly Replacement: Schritt 16, Bild 2 von 3 iPhone 6s Plus FaceTime Camera and Sensor Assembly Replacement: Schritt 16, Bild 3 von 3
    • Bend the connector back to ensure it doesn't make contact and power the iPhone on while you're working on it.

  17. iPhone 6s Plus FaceTime Camera and Sensor Assembly Replacement, Display Assembly: Schritt 17, Bild 1 von 1
    • Remove the following Phillips screws:

    • Three 1.3 mm screws

    • One 1.6 mm screw

    • One 3.0 mm screw

    • During reassembly, it's critical to place this 3.0 mm screw in the top-right corner of the bracket. Placing it anywhere else may damage the logic board.

  18. iPhone 6s Plus FaceTime Camera and Sensor Assembly Replacement: Schritt 18, Bild 1 von 2 iPhone 6s Plus FaceTime Camera and Sensor Assembly Replacement: Schritt 18, Bild 2 von 2
    • Remove the display cable bracket.

  19. iPhone 6s Plus FaceTime Camera and Sensor Assembly Replacement: Schritt 19, Bild 1 von 2 iPhone 6s Plus FaceTime Camera and Sensor Assembly Replacement: Schritt 19, Bild 2 von 2
    • Be careful to only pry up on the connector itself and not the socket on the logic board.

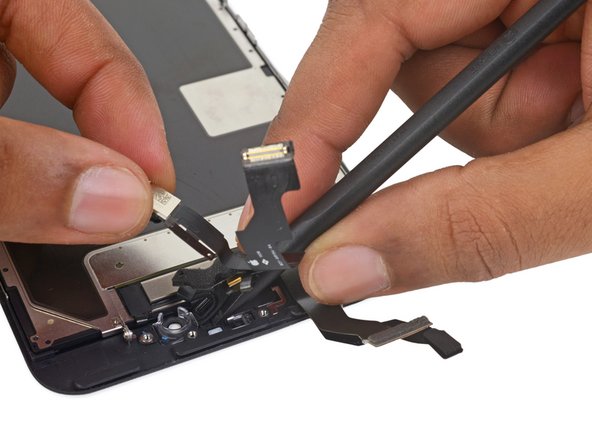
    • Use a plastic opening tool to disconnect the front-facing camera and sensor cable connector.

  20. iPhone 6s Plus FaceTime Camera and Sensor Assembly Replacement: Schritt 20, Bild 1 von 2 iPhone 6s Plus FaceTime Camera and Sensor Assembly Replacement: Schritt 20, Bild 2 von 2
    • Use a plastic opening tool to disconnect the digitizer cable by prying it straight up from its socket on the logic board.

    • When reconnecting the digitizer cable, do not press the center of the connector. Press one end of the connector, then press the opposite end. Pressing in the center of the connector can bend the component and cause digitizer damage.

  21. iPhone 6s Plus FaceTime Camera and Sensor Assembly Replacement: Schritt 21, Bild 1 von 2 iPhone 6s Plus FaceTime Camera and Sensor Assembly Replacement: Schritt 21, Bild 2 von 2
    • Make sure the battery is disconnected before you disconnect or reconnect the cable in this step.

    • Disconnect the home button/fingerprint sensor cable by prying it straight up from its socket on the logic board.

  22. iPhone 6s Plus FaceTime Camera and Sensor Assembly Replacement: Schritt 22, Bild 1 von 2 iPhone 6s Plus FaceTime Camera and Sensor Assembly Replacement: Schritt 22, Bild 2 von 2
  23. iPhone 6s Plus FaceTime Camera and Sensor Assembly Replacement, Earpiece Speaker: Schritt 23, Bild 1 von 1
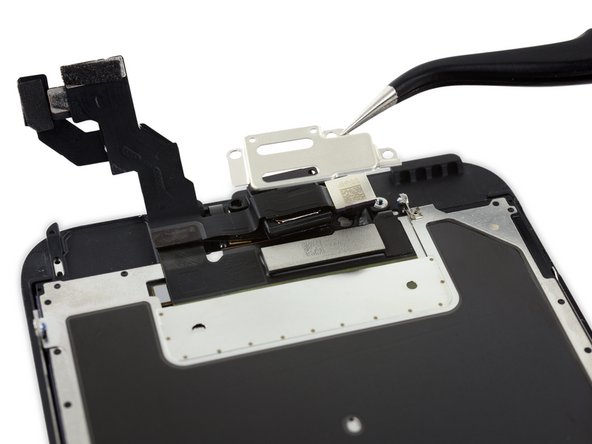
    • Remove the following three Phillips screws:

    • Two 2.7 mm screws

    • One 1.4 mm screw

  24. iPhone 6s Plus FaceTime Camera and Sensor Assembly Replacement: Schritt 24, Bild 1 von 2 iPhone 6s Plus FaceTime Camera and Sensor Assembly Replacement: Schritt 24, Bild 2 von 2
    • Remove the earpiece speaker bracket.

  25. iPhone 6s Plus FaceTime Camera and Sensor Assembly Replacement: Schritt 25, Bild 1 von 2 iPhone 6s Plus FaceTime Camera and Sensor Assembly Replacement: Schritt 25, Bild 2 von 2
    • Use the flat end of a spudger to lift the FaceTime camera out of its housing.

  26. iPhone 6s Plus FaceTime Camera and Sensor Assembly Replacement: Schritt 26, Bild 1 von 2 iPhone 6s Plus FaceTime Camera and Sensor Assembly Replacement: Schritt 26, Bild 2 von 2
    • Pull the FaceTime camera back and remove the earpiece speaker.

  27. iPhone 6s Plus FaceTime Camera and Sensor Assembly Replacement, FaceTime Camera and Sensor Assembly: Schritt 27, Bild 1 von 2 iPhone 6s Plus FaceTime Camera and Sensor Assembly Replacement, FaceTime Camera and Sensor Assembly: Schritt 27, Bild 2 von 2
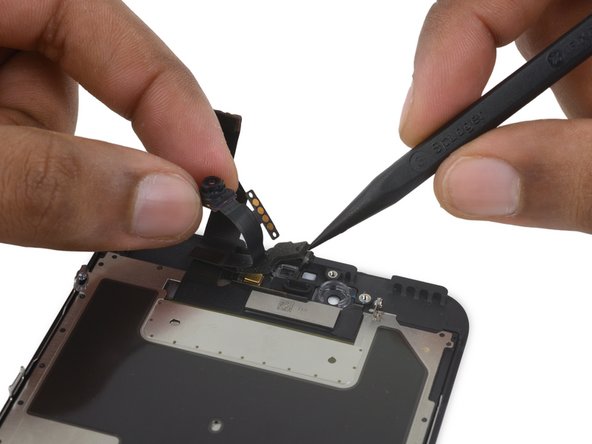
    • Use the pointed tip of a spudger to lift the ambient light sensor from its housing in the front panel.

  28. iPhone 6s Plus FaceTime Camera and Sensor Assembly Replacement: Schritt 28, Bild 1 von 2 iPhone 6s Plus FaceTime Camera and Sensor Assembly Replacement: Schritt 28, Bild 2 von 2
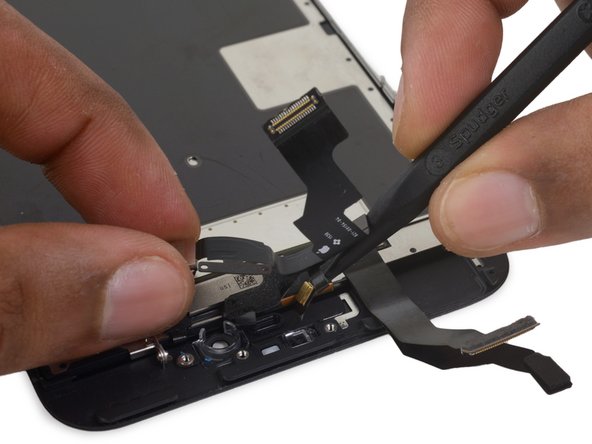
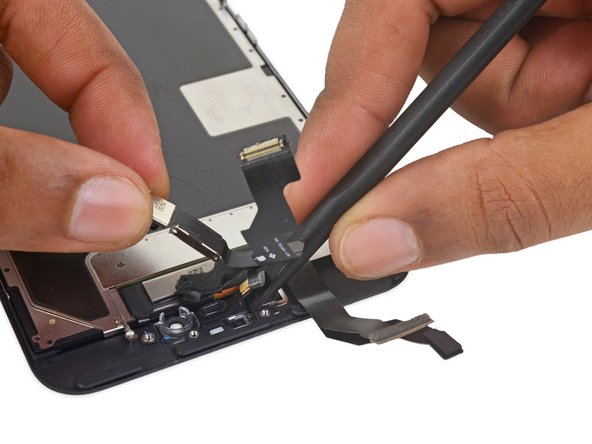
    • Insert the pointed tip of a spudger between the microphone flex cable and the front panel to break the adhesive holding it in place.

  29. iPhone 6s Plus FaceTime Camera and Sensor Assembly Replacement: Schritt 29, Bild 1 von 3 iPhone 6s Plus FaceTime Camera and Sensor Assembly Replacement: Schritt 29, Bild 2 von 3 iPhone 6s Plus FaceTime Camera and Sensor Assembly Replacement: Schritt 29, Bild 3 von 3
    • Use the flat tip of a spudger to lift up the microphone and earpiece gasket.

  30. iPhone 6s Plus FaceTime Camera and Sensor Assembly Replacement: Schritt 30, Bild 1 von 2 iPhone 6s Plus FaceTime Camera and Sensor Assembly Replacement: Schritt 30, Bild 2 von 2
    • Remove the FaceTime camera and sensor assembly.

Abschluss

To reassemble your device, follow these instructions in reverse order.

87 weitere Nutzer:innen haben diese Anleitung absolviert.

Evan Noronha

Mitglied seit: 02/05/15

223.469 Reputation

168 Anleitungen geschrieben

16 Kommentare

front camera not working but the problem not from the camera i checked, i do not know the reason, please help

Asmaa Adel - Antwort

Hello together

I changed this Kabel now the 6. Time. But the auto-brightness didn't work. When I install the old cable it works (microphone damaged). I try some descriptions of calibration, but it didn't work. Can somebody help me. Thanks.

Best regards from Germany.

Hogen.

Hogen - Antwort

It sounds like your ambient light sensor (step 26) is damaged or incorrectly placed. Reinstall the flex cable to ensure the sensor is sitting correctly in its housing. If that does not work, get in touch with your parts supplier and request a replacement.

Evan Noronha -

Hm but I have now the 6th cable! That is not realistic that all cable are broken or?

Also when I only connect the cable (without installing in to the display) it didn't work (for all 6 cable). The original work. It's crazy.

Hogen -

No, it's super unlikely that 6 cables in a row are all broken, but if the original flex cable works while the other 6 do not, the problem is almost certainly in the cable. Maybe order a part from a different distributor and see if you have better luck?

Evan Noronha -

Kommentar hinzufügen

Seitenaufrufe:

Letzte 24 Stunden: 3

Letzte 7 Tage: 20

Letzte 30 Tage: 125

Insgesamt: 41,661