Einleitung
Verwende diese Anleitung, um den Akku in deinem Huawei P8 aus zu tauschen.
Was du brauchst
-
-
Schalte zuerst dein Handy aus.
-
Entferne deinen SD- sowie SIM-Kartenhalter.
-
-
-
Entferne die zwei Torx T2 Schrauben links und rechts neben der Micro-USB-Buchse.
Torx 2 also works :)
Tried pentalobe drivers but had to get a Torx 2 in the end, possibly some variation across regional models.
Pentalobe screws on my p8…
In the kit,i have only T2…
-
-
-
Verwende einen iSclack oder Saugheber, um das Rückteil von der Displayeinheit zu trennen.
-
-
-
Entferne die beiden Kreuzschlitzschrauben #00, welche die die Halterungen der Display-/ Akku- und Frontkamera-Kabelsteckern fixieren.
-
-
-
Verwende eine Pinzette, um die Halterung über dem Display- und Akkustecker zu entfernen.
-
Benutze einen Spudger, um den Akkuverbinder zu lösen.
-
Entferne die Halterung, welche den Stecker der Frontkamera abdeckt.
-
-
-
-
Löse den Stecker des Kopfhöreranschlusses sowie den der Frontkamera.
-
Entferne die Frontkamera.
-
-
-
Benutze einen Spudger, um das Power- sowie Lautstärkekabel zu lösen und es aus dem Weg zu biegen.
-
Entferne den Flüssigkeitsindikator.
-
-
-
Entferne die fünf Kreuzschlitzschrauben#00, welche die Hauptplatine deines Huawei P8 befestigen.
-
-
-
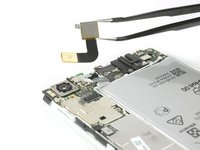
Löse den Stecker des Vibrationsmotors.
-
Ziehe den Stecker des Antennenkabels ab.
-
-
-
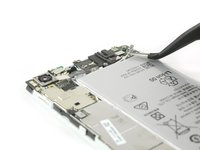
Löse den Stecker des Displaykabels mithilfe eines Spudgers.
-
Verwende eine Pinzette, um das Antennenkabel abzulösen und zu entfernen.
-
-
-
Löse vorsichtig das Flexkabel deines Lautsprechers.
-
Wenn sich das Kabel nicht leicht entfernen lässt, dann erwärme die Lautsprechereinheit mit einem iOpener oder einem Heißluftgebläse.
-
Hebe die Lautsprechereinheit mit einem Spudger heraus und entferne sie.
-
-
-
Lege das Ende vom ersten Klebestreifen frei, damit du gleich einen guten Halt hast.
-
Ziehe den Klebestreifen mit in einer langsamen und gleichmäßigen Bewegung heraus, um den Akku zu lösen.
-
-
-
Lege das Ende des zweiten Klebestreifens frei, um einen guten Halt zu bekommen.
-
Ziehe den Klebestreifen mi in einer langsamen und gleichmäßigen Bewegung heraus.
-
-
In diesem Schritt verwendetes Werkzeug:Tesa 61395 Tape$5.99
-
Hebe den Akku langsam heraus und entferne ihn.
-
Ersetze beim Zusammen bau deines Smartphones den alten Kleber durch elastische Akkuklebestreifen, doppelseitiges Klebeband oder vorgestanzte Klebestreifen.
-


Folge dieser Anleitung in umgekehrter Reihenfolge, um dein Gerät wieder zusammenzubauen.
Folge dieser Anleitung in umgekehrter Reihenfolge, um dein Gerät wieder zusammenzubauen.
Rückgängig: Ich habe diese Anleitung nicht absolviert.
18 weitere Personen haben diese Anleitung absolviert.
Besonderer Dank geht an diese Übersetzer:innen:
100%


Diese Übersetzer:innen helfen uns, die Welt zu reparieren! Wie kann ich mithelfen?
Hier starten ›


9 Kommentare zur Anleitung
Really helpful guide. Only hiccup was that on my handset the screws holding the casing together (Step 2) were Torx 2 rather than pentalobe, possibly a regional variation. I opted not to remove the loudspeaker (Step 10) as the ribbon cable was firmly stuck down and I worried it would break. This meant I could only cleanly remove the adhesive pad in line with the charging port. I was able to prise out the battery using spudger and screwdriver to scrape the other pad from the phone body. All now reassembled and working properly!
Overall a very helpful guide . I also had torx screws in mine . The torx screws are tiny , so make sure you have the right screwdriver before starting . We didn’t bother removing the loudspeader assembly either (Step 10) . You can just prise up the ribbon cable (carefully) . Add heat if necessary . Now to the biggest problem . Removing the old battery from the phone . What a nightmare ! It’s really stuck down .We took our time using a hairdryer (no heat gun) , and a flat head screwdriver , and went from one end to the other prising it off gently . It still took about 20 minutes . Saying that . Don’t rush it , as it’s the final stage . Also . If you do use a flat head screwdriver then don’t twist it , as you might damage the casing . Just slide it underneath it applying heat . Total time to remove the old battery was 90 minutes , but about 50 of those were spent just getting the first 2 screws out . 20 minutes to put the new battery in and reassemble . Make sure all flex connectors are properly reseated .
My P8 battery has completely died on me. I cannot believe that to replace a battery, we have to now go to these lengths to do it. There must be a mountain of mobile phones, where the only issue with them is a flat battery. Surely, this cannot be allowed to continue. I know why the manufacturers want to make it hard to simply replace a battery, because it sells more mobile phones. But think of all that wasted technology, where a phone may have lasted just over a 24 month contract before the battery is done.
Many thanks for this tutorial. Together we shall beat them!
Thank you for a very nice and easy to follow tutorial!
I have now replaced my battery with what should be an original battery for the Huawei Ascend P8, battery nr: HB3447A9EBW. For some reason the width of the new battery is a few millimeters smaller than the old one, meaning that it does not fill out the space completely. Has anyone else experienced the same?
After having assembled the phone again I experience some weird issues with the battery level dropping from 50%, 60%, 70% or even 100% in an instant. I have tried calibrating the battery by, letting it die completely, recharge it to 100% let it drain completely again and recharge. I have tried different battery calibration apps and a factory reset - nothing helps.
I contacted the company I bought the battery from and got a replacement - still same issue.
Unfortunately i damaged the original battery when taking it out, so i cant use that as a reference.
Any suggestions would be most appreciated!
Most likely you’ve got a fake battery… :( A telling thing can be if the serial does not match the one you can read from the QR code beside it. Only solution would be to get a genuine one. I can feel your pain.
I have the same issue… I open the back cover and unplug the battery flex connector and then reconnect it again… it is OK for some time but when flex connector is loose again… I grtget the same problem… InIn my case… The battery bracket holding the plug tight is lost and hence connection losen after some time… I smam thing to cut a bracket from a Pepsi Cane…
after replacing battery phone doesnt switch on only if charger pluged in does it show the hauwie logo then restart same thing again