Einleitung
Mit dieser Anleitung ist das Ersetzen des Akkus deines Lenovo Yoga C930 13IKB schnell und einfach erledigt.
Akkus verschlechtern sich generell im Lauf der Zeit oder weisen Probleme auf. Dies kann zu kürzeren Betriebszeiten oder Schwierigkeiten beim Laden und der Selbstentladung führen. Sieh dir Die Anleitung zur Fehlersuche für mehr Informationen über mögliche Schäden am Akku und der Fehlersuche an.
Diese Anleitung ist erforderlich, wenn dein Akku Aufgrund von schneller Entladung etc. ausgetauscht werden muss. Du wirst die Rückabdeckung zuerst entfernen, um Zugang zu deinem Akku zu bekommen, dann musst du alle Befestigungselemente, die den Akku befestigen, entfernen.
Für deine Sicherheit: Entlade deinen Akku unter 25% verbleibende Ladung, bevor du dein Gerät auseinander baust, dies reduziert das Risiko, dass sich der Akku entzündet oder sogar explodiert, falls er versehentlich während der Reparatur beschädigt wird.
Wenn deine Batterie aufgebläht ist musst du entsprechende Vorsichtsmaßnahmen treffen.
Was du brauchst
-
-
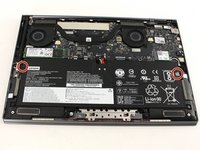
Drehe dein Gerät um, sodass die Unterseite nach oben zeigt.
-
Entferne die sechs 3,5mm T5 Torx Schrauben.
-
-
-
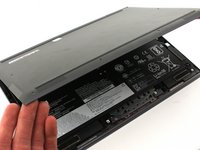
Heble die hintere Abdeckung mit dem Plastiköffnungswerkzeug auf.
-
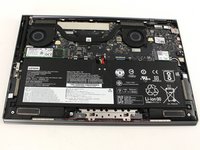
Löse die Rückabdeckung an mehreren Stellen mit dem Öffnungswerkzeug und entferne dann die gesamte Rückseite.
-
-
-
-
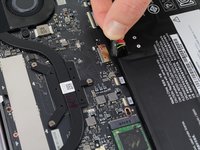
Trenne den Akku von der Hauptplatine ab, indem du die Kabel mit deinen Fingern fasst und kräftig herausziehst.
-
-
-
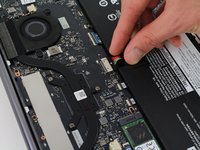
Heble mit den Fingern die durchsichtige Kunststofflasche für einen der elastischen Klebestreifen auf.
-
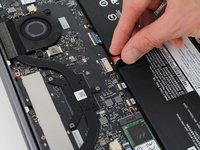
Fasse die Zuglasche und ziehe sie langsam in einem flachen Winkel vom Akku weg. Der Klebestreifen dehnt sich auf ein Vielfaches seiner Länge aus und löst sich langsam unter dem Akku.
-
Wiederhole den Vorgang für den zweiten Streifen auf der gegenüberliegenden Seite des Akkus.
-
Entferne den Akku mit deinen Händen.
-


Um dein Gerät wieder zusammenzubauen, folge dieser Anleitung in umgekehrter Reihenfolge.
Entsorge deinen Elektromüll fachgerecht.
Reparatur verlief nicht wie geplant?
Probiere einige grundsätzliche Lösungsansätze, oder bitte in unserem Forum um Hilfe.
Um dein Gerät wieder zusammenzubauen, folge dieser Anleitung in umgekehrter Reihenfolge.
Entsorge deinen Elektromüll fachgerecht.
Reparatur verlief nicht wie geplant?
Probiere einige grundsätzliche Lösungsansätze, oder bitte in unserem Forum um Hilfe.
Rückgängig: Ich habe diese Anleitung nicht absolviert.
21 weitere Personen haben diese Anleitung absolviert.
Besonderer Dank geht an diese Übersetzer:innen:
100%

Diese Übersetzer:innen helfen uns, die Welt zu reparieren! Wie kann ich mithelfen?
Hier starten ›

Team

Cal Poly, Team S19-G5, White Winter 2020 Mitglied von Cal Poly, Team S19-G5, White Winter 2020
CPSU-WHITE-W20S19G5
4 Mitglieder
16 Anleitungen geschrieben
13 Kommentare
One little addition: After removing the bottom cover of the computer, there are two little clear plastic tapes, one on each side of the battery, that you should peel free before starting to lift the battery out. One of those tapes is shown in this photo, just to the right of the icon that resembles a figure eight: https://d3nevzfk7ii3be.cloudfront.net/ig... Those clear tapes are attached to the black plastic strips beneath the battery, that you want to try to leave in place. If you don’t peel back the clear tape tabs, they will increase the likelihood of pulling up those black plastic strips when you start to lift the battery up. My original battery was adhered quite strongly to those plastic strips, and it took a fair bit of work to “dissect” them from the battery using a straight plastic tool that had an end like a regular screwdriver. I did peel those strips up off the computer a bit, but they stuck back down after I separated them from the battery. Thanks for the instructions!
After I had finished putting my C930 back together, I noticed that the underside of the original battery had four soft black strips adhered to it, perhaps as a cushion between the battery and the components beneath. It is possible to remove those, and they could be re-applied to the new battery before installing it, but I’m not going to bother going back now to do that.
I was able to remove the 4 black, “spongy” strips from the original battery and place them on the new battery. This created a “landing” area for the adhesive strips that remained working the computer housing. All instructions were good and quite thorough. Thank you!