Diese Übersetzung enthält möglicherweise noch nicht die neuesten Änderungen der Original-Anleitung. Hilf mit, die Übersetzung zu aktualisieren oder sieh dir die Original-Anleitung an.
Einleitung
Diese Anleitung zeigt dir, wie du das Logic Board austauschen kannst.
Ein Austausch des Logic Boards bedeutet auch, dass du neue Wärmeleitpaste auftragen musst.
Bevor du mit der Arbeit am Mac Pro beginnst: ziehe den Stecker und halte die Einschalttaste zehn Sekunden lang gedrückt, damit sich die Kondensatoren im Netzteil entladen.
Sei sehr vorsichtig , keine der Anschlüsse an den Kondensatoren und keine der Lötstellen auf der Leiterplatte des Netzteils zu berühren. Fasse die Leiterplatte nur an den Kanten an.
Was du brauchst
-
-
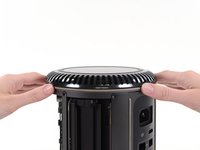
Schiebe den Verriegelungsschalter nach rechts in die entriegelte Position.
-
-
-
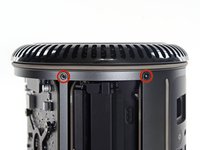
Entferne die fünf 5,1 mm T10 Torx Schrauben, die rund um die Lüftereinheit herum angebracht sind.
Fat Mango is correct. That said. If you do pull the fan assembly note that the screws are all held in with blue Permatex and breaking them free takes a fair amount of effort. Getting a good set of Torx screwdrivers is a must.
Hey guys, what would happen if you only replace one card.. I have a D300 but the plan is to upgrade to D500 or D600. So If I can afford and install one instead of the pair would it increase something? or will it cause any conflict? I guess I don’t understand if I the Mac Pro has 2 D300 graphic cards that means each has 1GB? Same as If I would Install 1 D600 that would increase 3GB only? Thanks.
D300 = 2GB each card. Very few apps uses two cards at the same time.
Gio Cas -
The (5) Screws are Apple part number 923-0713
-
-
-
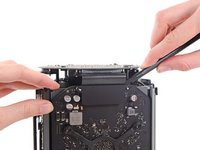
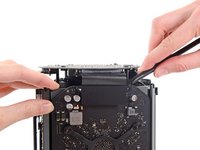
Halte die Lüftereinheit mit einer Hand fest und löse die zwei T8 nicht verlierbaren Schrauben in der Halterung des Lüfterkabels.
On my machine, a TR7 worked to remove them due to the weird angle.
-
-
-
Benutze eine Pinzette, um die Halterung des Lüfterkabels von der Lüftereinheit zu entfernen.
-
-
-
Benutze das flache Ende eines Spudgers, um das Flachbandkabels der Lüftereinheit vom IO board zu trennen.
-
-
-
Entferne das Antennenkabel der Lüftereinheit vom IO board.
-
Entferne die Lüftereinheit vom Mac Pro.
-
-
-
Entferne die fünf 5,1 mm Torx T10 Schrauben entlang der Außenkante des Gehäuseunterteils.
-
-
-
-
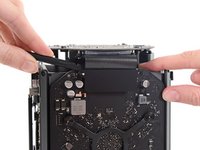
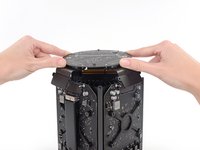
Benutze das flache Ende des Spudgers, um mit einer behutsamen Drehbewegung eine Seite der Datenverbindung zur Grafikkarte zu lösen.
-
-
-
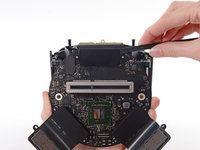
Löse genauso vorsichtig die andere Seite.
-
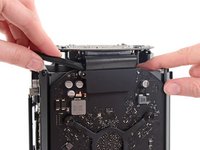
Klappe den Stecker hoch, so dass er der Grafikkarte nicht mehr im Weg steht.
-
-
-
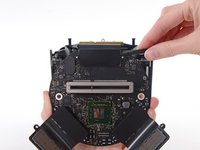
Entferne die beiden 6 mm Torx T7 Schrauben, mit denen die Verbindungsplatine am Kühlkörper befestigt ist.
Ended up being T9 screws for me.
T8 screws for me, i did and edit to this step
Ended up being T15 screws on my machine
-
-
-
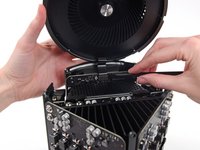
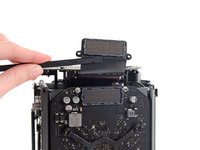
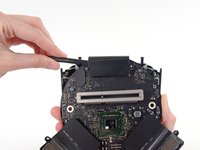
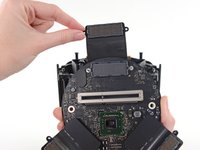
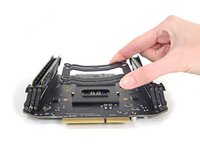
Lasse die Verbindungsplatine vorsichtig gerade aus ihrem Slot auf dem Logic Board "herauswandern".
-
-
-
Klappe die Verbindungsplatine ganz um, so dass das I/O Board Datenkabel sichtbar wird.
-
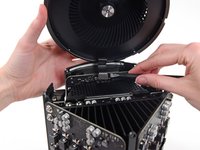
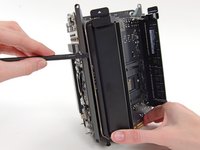
Benutze wieder das flache Ende des Spudgers und löse mit der gleichen Drehbewegung eine Seite des I/O Board Datenkabels.
-
-
-
Löse mit dem flachen Ende des Spudgers auch die andere Seite des I/O Board Datenkabels.
-
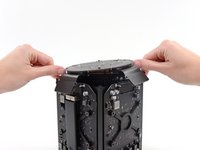
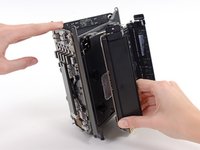
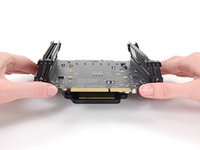
Biege das Kabel aus dem Weg und entferne die Verbindungsplatine vom Mac Pro.
-
-
-
Drehe den Mac Pro herum und lege ihn behutsam auf eine glatte Arbeitsfläche ab.
-
-
-
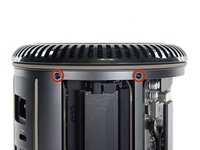
Entferne die beiden 3,6 mm Torx T5 Schraube auf den Seiten des Netzteilkäfigs (eine auf jeder Seite).
-
-
-
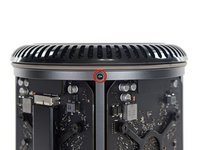
Entferne die vier 5,5 mm Torx T8-Schrauben, mit denen das Netzteil am Mac Pro befestigt ist.
-
-
-
Entferne die beiden 5,5 mm Torx T8 Schrauben.
Step 22 when reassembling, it helps not to fully tighten until you put the screws in from step 20.
-
-
-
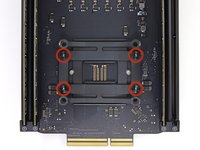
Entferne die vier 12,8 mm Torx T10 Schrauben von der Halterung des CPU-Kühlkörpers.
I cannot unscrew one of those because I appears that one of the elements in wich it is screwd underneath is loose and moving along with the screw, making this operation impossible. Anyone had this issue ?? Any solution ??
I had the same problem. These screws go into threaded inserts, which in turn are screwed into the heatsink. Both have threadlocker compound applied. So the threaded insert’s threadlocker gives up first, and the threaded insert unscrews from the heatsink. Remove all 4 screws, then with a pair of needle nose pliers, hemostat, or thin 7mm wrench, hold the insert steady and unscrew the screw from it.
Could I remove these screws and re-screw? I worry that remove them but I can’t re-use them?
timmy123 -
I had that problem, too, and I did it like Chuck Fry, with a thin wrench. Unfortunately one threaded insert was so tight that I slipped and a capacitor broke off. Can someone tell me what kind of capacitor I need? I can't find anything under the name listed above the capacitor. Thank you.
A way to avoid this situation is to ease the tension on the spring slowly and rotate the loosening of four screws a few turns at a time – when the tension is released equally the threaded inserts are more likely to stay in place.
I had 2 of those double sided screws stuck like that. I carefully removed them from the motherboard using a small vice grip to hold one side, and a torx on the other. Then reinstalled them using locktite compound. Make sure the heat sink is flush to the motherboard in the same way that you found it, or the assembly will not fit back in the case correctly, indicating the CPU may not be securely attached. The result may be that you think you killed your mac when you turn in on again and just hear the fan spinning like crazy but no chime or boot sequence. If that happens, go back in, reset the double sided screws, and make sure the heatsink is flush. Worked for me.
-
-
-
Entferne die vier inneren 12.8 mm T10 Torx Schrauben von der Klammer des CPU-Kühlkörpers.
-
Entferne die Klammer des CPU-Kühlkörpers.
On my Mac Pro (assembled mid-2017) these screws are covered with a black sticker presumably to indicate tampering. If you did not know they were screws it would not be obvious. You have to just put the T10 driver right in the center and start turning; it quickly breaks through the sticker.
Oh man. Thanks so much for that comment! I would have tried to use pliers!
Also remember to support the CPU (On the other side) while removing these screws. Mine CPU fell out from the other side while loosening.
On my MacPro there are no screws here. On the backside the place where the back of the screws should be are covered with stickers, but removing the stickers simply reveals a rivet. There’s no screw and seemingly no way to remove the CPU.
Wow, glad I clicked comments. I had no clue about the sticker. I was about to use some kind of something to get them out 😂
-
-
-
Hebe das Logic Board von der CPU und den Klammern hoch und entferne es.
-
Beim Zusammenbau musst du die alte Wärmeleitpaste der CPU beseitigen und durch neue ersetzen.
-
Unsere Anleitung für Wärmeleitpaste erleichtert dir diese Arbeit.
There is one import piece of information when replacing or upgrading these processors. There are two possible orientations and only one is correct (correct me if I’m wrong!). There’s a small arrow on one corner of the processor that needs to be aligned to the correct side. Just match the orientation of the original processor - this can be difficult or easy to overlook since the tiny alignment arrow is usually covered with thermal paste. Clean the Thermal paste off the old processor before you remove it to see the correct alignment.
-


Um dein Gerät wieder zusammenbauen, folge den Schritten in umgekehrter Reihenfolge.
Um dein Gerät wieder zusammenbauen, folge den Schritten in umgekehrter Reihenfolge.
Rückgängig: Ich habe diese Anleitung nicht absolviert.
13 weitere Personen haben diese Anleitung absolviert.
Besonderer Dank geht an diese Übersetzer:innen:
90%


Diese Übersetzer:innen helfen uns, die Welt zu reparieren! Wie kann ich mithelfen?
Hier starten ›

Ein Kommentar
The RAM/CPU board is only attached to the thermal core around the processor area. This means seating RAM modules can flex the board (which has no support under the RAM sockets) so take extra care seating RAM modules.