Einleitung
Diese Anleitung zeigt, wie das Display im MacBook Air 13" (Anfang 2020) ausgetauscht werden kann.
Was du brauchst
-
-
Wenn dein MacBook unter BigSur v11.1 oder einer späteren Version läuft, lässt sich AutoBoot möglicherweise nicht deaktivieren. Arbeite zuerst normal weiter, trenne aber den Akku sofort ab, wenn du ins Innere des Gerätes hinein gekommen bist.
-
Entferne folgende Pentalobe P5-Schrauben
-
Zwei 7,9 mm Schrauben
-
Zwei 7,1 mm Schrauben
-
Sechs 2,6 mm Schrauben
-
-
-
Zwänge deine Finger zwischen das Display und das Gehäuseunterteil und ziehe nach oben, so dass sich das Gehäuseunterteil vom Air ablöst.
-
Entferne das Gehäuseunterteil.
-
Richte es genau aus und drücke es fest, bis die versteckten Rasten darunter einschnappen. Du solltest es fühlen und hören.
When reassembling, the “snaps” are in the middle of the laptop (from top to bottom), and just to the left and right of center. I assumed it was near the hinge so it took a bit for me to hear the snaps.
Laurie, the two clips are outlined in the third photo of step two. Hope this helps—happy fixing!
-
-
-
Ziehe den Aufkleber soweit vom Akkustecker zurück, dass der darunterliegende Stecker sichtbar wird.
This image is incorrect correct for the A2179 EMC 3302 model, also doesn’t match the next image in this guide
There is other guide for the model you reffer to, I was using that one until i realize it was different, this is the one you are looking for: MacBook Air 13" Retina Late 2020
I initially thought the image was incorrect, but I was just looking for the connector in the wrong place. This picture IS correct for the A2179 EMC 3302. Note that the connector is on the left side of the heat sink (the black thing with parallel ridges in the picture and on the computer), and the connector wires gather together towards the left the side of the computer, not the back. Note that "left side" assumes the Air is upside-down, with the hinge on the side farthest away from you (I'm not doing the "right speaker is on the left side because it's upside-down" thing that iFixit does in step 5).
-
-
-
Schiebe den Akkustecker mit einem Spudger parallel zum Logic Board aus seinem Anschluss auf dem Logic Board heraus.
-
-
-
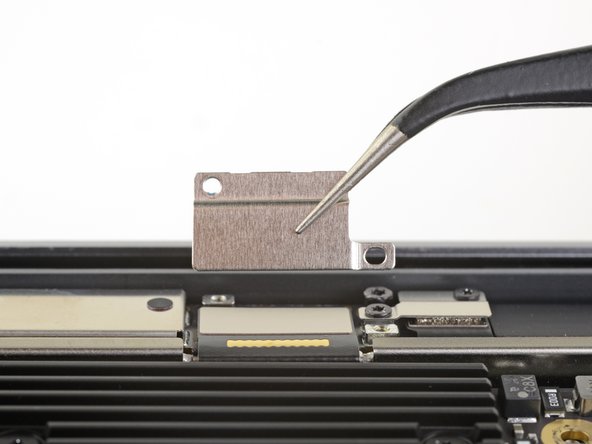
Entferne die 1,4 mm Torx T3 Schraube, mit der die Abdeckung des Antennenkabels befestigt ist.
-
Entferne die Abdeckung des Antennenkabels.
-
-
-
-
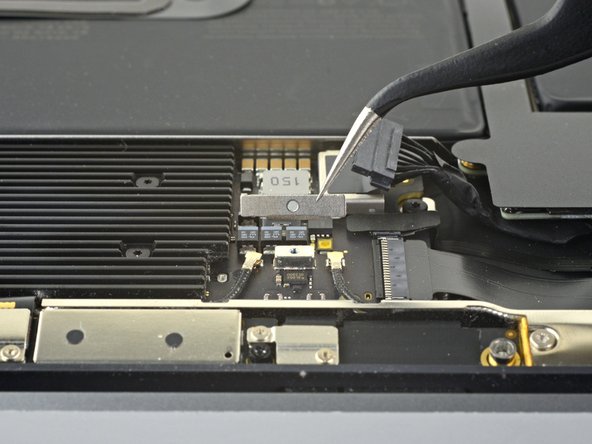
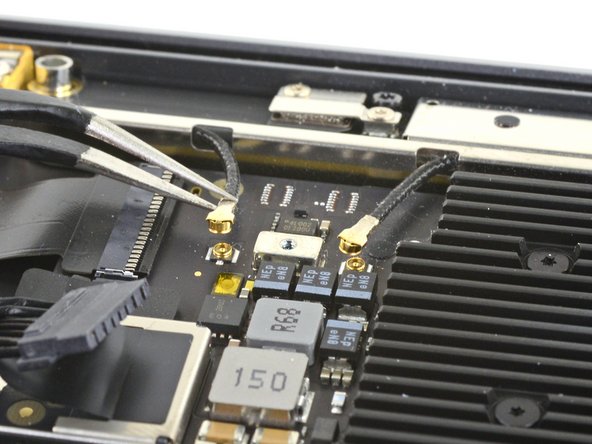
Fasse das Antennenkabel nahe am Metallstecker mit einer Pinzette an.
-
Ziehe gerade nach oben und trenne das Kabel ab
-
Wiederhole für das zweite Antennenkabel.
This connector is extremely fragile! I always apply a very fine flat screwdriver head to the connector on the system board so it does not pull out!
-
-
-
Entferne die beiden 1,5 mm Torx T3 Schrauben mit denen die Abdeckung des Displaykabelsteckers befestigt ist.
-
Entferne die Abdeckung des Displaykabelsteckers.
There are two smaller connector covers that cover a narrow ribbon connector. (One of them is visible in the Step 7 photo to the right of the display cable connector cover.) These covers don't have to be removed for disassembly. But my replacement display didn't include them, so I salvaged the covers from the broken display when I reassembled.
-
-
-
Heble den Displaystecker mit dem flachen Ende des Spudgers von der Antennenplatine hoch und trenne ihn ab.
I have noticed that replacement assemblies from Ifixit and perhaps other suppliers do not have the smaller covers for the side cables to the left and right of the main display cable installed! Remember to transfer them from your old display to the new or you will have a POF waiting to happen!
Thank you for you advisory on the connector covers. Please tell me what POF stands for?
I'm guessing POF=point of failure.
-
-
-
Drehe die sechs Torx T5 Schrauben heraus, mit denen die Antennenleiste befestigt ist:
-
Vier 7,4 mm Schrauben
-
Zwei 4,5 mm Schrauben
-
-
-
Setze die Spudgerspitze in den Spalt zwischen der Antennenleiste und dem Display ein.
-
Kippe den Spudger gegen das Scharnier, um das Ende der Antennenleiste hochzuheben.
-
Wiederhole das Ganze für das andere Ende der Antennenleiste.
-
-
-
Ziehe die Antennenleiste mit den Fingern senkrecht nach oben vom Gehäuse weg.
-
Führe die Antennenplatine durch die Öffnung in der Mitte der Antennenleiste.
-
Entferne die Antennenleiste.
this is a bit tricky - the last one i worked on was held tight by a thin black tape, similar to the stretchy tape underneath batteries. this tape is near the motherboard underneath the path of the ribbon cables to the lcd. underneath this tape is a groove cut that the antenna slips into. actually 3 grooves, the 2 underneath the black tape and a longer channel in between. this channel grabs onto a thin part of the antenna that slips into these channels and some bumps help to “wedge” it into place by a pressure type fitting. kind of reminds me of edge of the shield on some ipads and older iphones. the bumps fit into areas and “grab” onto the area next to them. trying to create a word picture. maybe ifixit can add a real picture. definitely slows you down when you encounter resistance - don’t want to force anything. saw some dude on youtube yanking and pulling and i started yelling at him.
Thanks for your advisory, Greg. I can confirm the sticky tape about 1/2" long. It's to the left of the LVDS cable and attached to board. Looks like antennae wall sticks on vertically. Gentle prodding with spudgers from all angles finally frees it. Be patient with it.
-
-
-
Entferne die drei 4,9 mm Torx T8 Schrauben an jedem Scharnier (also insgesamt sechs).
The hinge screws were a T9 on mine
It's actually easier to remove 2 of the 3 screws on each hinge and then open the laptop before then removing the final screw. This prevents the display from shifting while opening and accidentally damaging other components on the logic board. As we all know, a few mm in the wrong direction on a MacBook can cause a world of trouble.
-
-
-
Lasse das MacBook mit dem Display nach unten liegen und öffne behutsam das Gehäuseoberteil soweit wie möglich.
-
-
-
Hebe das MacBook vorsichtig hoch und schließe das Display, bis es rechtwinklig zum Gehäuseoberteil steht.
-
Halte das Display weiterhin rechtwinklig zum Gehäuseoberteil und bewege das Display senkrecht nach unten, während du das Gehäuse festhältst, so dass die Scharniere aus dem Gehäuseunterteil herauskommen.
-
Entferne das Display.
Great instructions. One note is that on re-assembly, slide base onto hinges and reattach hinge screws before closing down base onto screen.
-


Vergleiche dein Ersatzteil mit dem Originalteil. Du musst vielleicht fehlende Teile vom alten auf das neue Teil übertragen oder Schutzfolien vom Neuteil abziehen, bevor du es einbauen kannst.
Um dein Gerät wieder zusammenzusetzen, folge den Schritten in umgekehrterReihenfolge.
Entsorge deinen Elektromüll fachgerecht.
Die Reparatur hat nicht den gewünschten Erfolg gebracht? In unserem Forum findest du Hilfe bei der Fehlersuche.
Rückgängig: Ich habe diese Anleitung nicht absolviert.
38 weitere Nutzer:innen haben diese Anleitung absolviert.
Besonderer Dank geht an diese Übersetzer:innen:
100%

Diese Übersetzer:innen helfen uns, die Welt zu reparieren! Wie kann ich mithelfen?
Hier starten ›


11 Kommentare
Thank you so much for this awesome walkthrough! I can’t believe how much I saved doing this myself. Works beautifully! If I could only suggest a more comprehensive “reassembly” page. There are a couple of missteps I made (eg. trying to install the antenna bar and accidentally leaving the display cable connector under it) that would have helped. In any event, thank you so much!
Thanks for the tip! I’ve added a reminder to that step.
when starting the process of installation, make sure that at least the inside hinge screw is installed and mostly tightened. once the antenna is installed, there is almost no room for that screw to be inserted without a tight scrape against the end of the antenna. a very tight fit. i sometimes only install one hinge screw, usually the center ones, and then align the lid before adding the others and tightening everything up. in this case, would save you some concern to address this beforehand.
Definitely not. Also, there is no such thing, perhaps you meant 2020? Also no.
Have never needed to repair a Mac, but when a pen was slammed in the lid of my wife’s MBA, the screen was completely gone. So I decided to have a go myself, having followed iFixit for a number of years. So a massive thank you for a simple, clear guide, with tool specs that I can’t fault. (I bought your magnetic pad, excellent!)
The new screen is in place, the system functions perfectly. You saved me money and I had real fun and confidence doing the geeking!
Thank you for this guide. I was able to complete things as described. One thing to note: I didn't see any sign of adhesive holding down the antenna bar, but there are metal ridges/dimples on a portion of the folded edge that have to be pressed into the top case in order to prevent the antenna bar from simply springing back up. I found it fiddly to find a suitable tool and generate enough force to push this folded edge fully home, but eventually managed it with careful use of a flathead screwdriver.
Screen turns on but only Apple logo loads, nothing else happens. Thoughts?
Also how to I get the 2 small metal plates on each side of antenna? Thanks
The What you need section mentions T4 and TR8 screwdrivers, but I don't see any mention of these in the instruction steps. Are they really needed?
Conversely, Step 12 requires a T8 screwdriver (not TR8), but this is not mentioned in the What you need section.
Can these be clarified?
Just executed this procedure on a friends machine (using a new screen bought from AliExpress) and it was ridiculously easy to complete.
However, upon restarting, the machine took a little while to show signs of life. A few mins in fact, therefore I'd recommend exercising extra patience before pulling it apart again to check for assembly errors.
Much gratitude to @carsten for putting this together! Thank you!
P5 is also a PL4 (so confusing) - i like the wiha 26764 thanks to @mayer for this post. P5 pentalobe and 1.2 pentalobe screwdriver
greg - Antwort