Einleitung
Folge dieser Anleitung, um dein Trackpad auszubauen, entweder um es zu ersetzen, oder um an den Akku heranzukommen.
Entlade den Akku deines MacBook Pro aus Sicherheitsgründen auf unter 25%, bevor du anfängst. Ein geladenen Lithium-Ion Akku kann ein gefährliches und unkontrollierbares Feuer auslösen, falls er versehentlich perforiert wird.
Was du brauchst
-
-
Schalte deinen Mac ein und starte Terminal.
-
Kopiere den folgenden Befehl und füge ihn im Terminal ein (oder tippe ihn exakt so ein):
-
sudo nvram AutoBoot=%00
-
Drücke die Eingabetaste [return]. Wenn du dazu aufgefordert wirst, gib dein Administratorpasswort ein und drücke erneut [return]. Hinweis: die Return-Taste kann auch mit ⏎ oder "enter" gekennzeichnet sein.
-
sudo nvram AutoBoot=%03
-
-
-
Schließe das Display und drehe das Laptop um.
-
Entferne die sechs Schrauben, mit denen das untere Gehäuse befestigt ist, mithilfe eines P5 Pentalobe Schraubendrehers. Die Schrauben haben folgende Längen:
-
Vier 4,7 mm Schrauben
-
Zwei 6,6 mm Schrauben
So this need to replace each and every screw in its exact former position explains exactly the excruciating difficulty I am having in getting the set of four shorter screws screws back in after everything else having gone successfully. Wanna scream at the top of my lungs. Maybe this point needed to be made in all ALL CAPS and BOLD for me. So can I still just start over trying each screw in each hole or have I messed up the threads in trying to screw in screws mismatched to their holes?
The front screws are at a slight angle, pay attention when putting them back!
I did not have the magnetic project mat, but instead I stuck loops of blue painter's tape on the table, wrote the step number on them in sharpie, and stuck the screws/covers for the corresponding step on them.
-
-
-
Setze einen Saugheber zwischen die Schraubenlöcher nahe an der Vorderkante des unteren Gehäuses auf.
-
Hebe den Saugheber gerade soweit hoch, dass unter dem unteren Gehäuse ein kleiner Spalt entsteht.
-
-
-
Schiebe die Ecke eines Plektrums in den eben entstanden Spalt unter dem unteren Gehäuse.
-
Schiebe das Plektrum um die nächste Ecke und dann bis zur Hälfte der Seitenkante des MacBook Pro nach oben.
-
-
-
Wiederhole den vorherigen Schritt auf der gegenüberliegenden Seite, um mithilfe des Plektrums die zweite Klammer zu lösen.
-
-
-
Hebe die Vorderkante des unteren Gehäuses (die Kante gegenüber vom Displayscharnier) gerade soweit hoch, dass du deine Fingerspitzen darunterschieben kannst, um das Gehäuse zu fassen.
-
-
-
Ziehe das untere Gehäuse fest nach vorne (weg vom Bereich mit den Scharnier), um die letzten Klammern zu lösen, mit denen es befestigt ist.
-
Ziehe zuerst an der einen Ecke, dann an der anderen.
-
Du musst wahrscheinlich ziemlich kräftig ziehen.
I found it easier to insert a screwdriver through the hole (not too far down), and use that to pull sideways, as it was hard to get a strong grip with my fingers.
If you have a black stick, or a nylon probe tool, you can insert it at the back at the point closest to the screw holes, and use that to push the lower case forward. I’ve seen this help me quite a few times, and it makes it quite easier.
I like adrianbrown's suggestion. Spot on!
Its difficult if the side catches arent released properly, check them again if it seems too much.
I snapped one of the spring loaded logic board grounding pins. Take your time. Leverage from the back in order to push it out versus pulling on it.
Take the opening pick and stick the edge down behind the hinge all the way to one side, so it is perpendicular to the case, and give it a twist. That end should pop free. Do the same on the other side and there you go.
This step requires a lot of force to slide the back cover away. Make sure you get a good grip of the mac body and of the back panel.
I literally cut myself with the bottom case, when it finally got freed from the upper case. I have opened a lot of macs, phones, and other items in my life, this was a first. Some light duty cloth gloves next time.
I didn’t understand some suggestions above. Tried Indawg Wetrust but didn’t really get it. Now looking back, it means use the pick just on the tiny lip of the cover, close to the hinge. Not on the antenna, but just on th slip of metal I believe. If that can help others.
-
-
-
Entferne das untere Gehäuse.
-
Setze das Untergehäuse an seinen Platz und richte die Gleitklemmen nahe am Displayscharnier aus. Drücke es nach unten und schiebe die Abdeckung in Richtung Scharnier. Sobald die Klammern eingerastet sind, kann es nicht mehr weiter geschoben werden.
-
Wenn die Gleitklemmen ganz hingerastet sind und das Untergehäuse richtig ausgerichtet aussieht, kannst du es fest nach unten drücken, damit die vier versteckten Klammern einrasten. Das solltest du hören und spüren können.
I am doing a battery replacement for a client on this model. The battery has swollen more than I have ever seen before on a Mac! Roughly a ½” higher, once cover removed. Cover was so tight that one screw stripped and had to drill out one screw after trying everything else! Fortunately, I’m an exmechanic/machinist and I own a full size drill press! None of the screw extraction tools sold by ifixit worked or were applicable until I finally got the cover off. Then the small screw pliers from Japan were easier to use than anything else I own. My tools are mostly for larger nuts, bolts and screw extraction. Possibly a mini hammer driver screwdriver would work if one could be made small enough for tiny screws! Ross
-
-
-
-
Löse die große rechteckige Abdeckung über der Akku-Platine an der Kante des Logic Boards, die dem Akku am nächsten ist, ab und entferne sie.
-
Falls sich die Abdeckung nicht leicht ablösen lässt, kannst du sie mithilfe eines iOpeners, eines Föns oder einer Heißluftpistole leicht erwärmen, um den Kleber darunter aufzuweichen, und es dann erneut versuchen.
What is the though behind this step? I have replace my trackpad before, and I did not do this step. At the time, there was no guide. As a result, I’m wondering how this changes/or if it is necessary for the repair process.
It’s necessary in order to disconnect the battery. Always disconnect the battery before making repairs.
I found my one of my fan making some noise, when open the bottom of my Mac I see this piece floating over the fan. Trying to put it back where it goes but don’t seem to stick anymore and move around. Does this piece is really necessary or I can simply remove it or order a new one from you?
It should be pretty easy to reattach. Put a dab of rubber cement or a bit of double-sided tape on top of each of the screws underneath the cover, press the cover down, and close up your MacBook. It should stay put. Don’t use superglue or anything else that will harden over the screw heads and make it impossible to fit a driver in there later.
Do you know if this piece is necessary. I lost mine.
My Macbook doesn’t appear to even have this piece.
This cover is not attached to anything critical underneath, so do not be afraid that you can break anything like pulling anything from the mainboard. Just pull it out. To reattach, I removed the old double side adhesive tape and replaced with fresh one.
-
-
-
Löse das Klebeband über dem Stecker des Akkuplatinen-Datenkabels ab.
The replacement battery did not come with the “tape” in this cable so it was very difficult to reinsert the cable into the zif socket. Now I can’t get the replacement battery to charge.
I have the same issue, My battery is not charging. Did you figure out how to get your battery to charge?
In my case, the original replacement was faulty. iFixIt sent an RMA without hesitation, and I am happy to report that the new one works fine. But also recheck this step and steps 13/14.
J D -
Note that the tape covering that comes on the OEM battery is not included in the battery sent from iFixIt. I removed it from the old and attached it to the new, but it does not “re-stick” very well, so it’s rather difficult to re-insert. Be careful, the ribbon is fragile.
I broke the locking flap! Also, my original tape lost its stickiness as well. I cut out a small piece of electrical tape to keep the cable snug in place. Also will work to keep it secure since I broke the locking flap.
I was able to reinsert the cable easily a number of times with the nice Ifixit angled tweezers as the ziff connectors tiny latch came off! I ended up using a bit of Pliobond 25, contact cement to mke sure the data cable doesn’t move. A future repair will just pull off or at most need an xacato blade knife to slit the rubbery cement. Ross
REALLY important. You need to really pull this back in snug for things to work when you reassemble.
I didn’t seem to have any tape covering it, I just proceeded to the next step
My battery board connecter is broken. Let me know where can I get these cables.?
I recommend to just lift a little the right end (end of the cable side), then keep the socket in place with a spudger while removing this adhesive tape, to avoid any accident like ripping off your socket. With a little care, it is safe and easy to remove completely.
-
-
-
Heble den Sicherungsbügel auf dem ZIF-Stecker des Akkuplatinen-Datenkabels vorsichtig mit einem Spudger hoch.
Mein Sicherungsbügel ist abgebrochen, oder zumindest nicht mehr auf dem ZIF-Stecker. Ist dieser Sicherungsbügel sehr wichtig, oder kann ich das Kabel dennoch zurück stecken?
Hallo Fabio, wahrscheinlich wird das Kabel ohne den Bügel nicht mehr halten. Das Zurückstecken geht, aber es bleibt nur sehr fragil drin.
My zif connector was already open. It apparently never got closed during manufacture. Being so tiny this made it difficult to see why there was nothing to pry up with the spudger. Once I put my finger on top of it I realized the flap was already verticle.
I had no issue here but I recommend to use a second spudger to keep the rest of the socket in place while GENTLY lifting the lock. It should lift without effort.
When putting it back, be careful, there might be a little piece of transparent adhesive foil on top of the socket, gently lift it up on the side of the cable. The cable should slide in easily, but do not force it. About 0.5mm of the cable contacts will be VISIBLE on the left side, when the cable is fully it, do not force it more than that.
コネクタのプラスチックが割れたのですが、代替品を教えてもらえませんか?
-
-
-
Trenne das Akkuplatinen-Datenkabel, indem du es aus seinem Anschluss herausschiebst.
-
Schiebe es parallel zum Logic Board in Richtung des Kabels.
If this breaks, what’s the risk to the computer?
I tried powering mine on after my zif connector socket broke. It made bad electrical noises. I had water damage at one point and cleaned the unit very well but never replaced the battery. Through excesive, a hot and bad battery, or water damaged weakening the area mine came right off with the tape when i peeled it up. Im working on finding the part and will attempt to solder it back. Of course i still need a battery which ours was swollen. After water damage it worked great for over a year though.
Mine broke and now the Macbook will not power on, this was after a battery replacement, the Macbook powered up afterwards, but after transporting it, it would not power up. I removed the back cover and noticed the battery board cover was missing and the zif gate for the battery data connector was half off.
Same here, I broke the cable which was soldered on the mainboard. I tried to hold it on place with a tape, but I couldn‘t charge my macbook though. Then I tried to solder it and I also failed. I wish I had read the comments before :/
I couldn‘t find the fpc 6 pin connector with 0,5 mm grid. However I managed to connect the flex cable directly on the mother board with 0,3 mm isolation filament! It was tough but I‘m so happy that it works again :)
Would you be able to give a little instruction on how you were able to make this work? I’m super curious and need a solution to the same issue.
Tim -
Surprised by the tolerance of this little connector to my mistake of not flipping up the not very noticeable clamping element on side opposite to where the contact tip is inserted. The contact tip pulled right out without having done that. Saw in a video I should have done that before pulling the contact tip out. Remembered when reinstalling it.
The cable is stuck on the board underneath with adhesive, so it is best to first work it a little from left under (as the picture is oriented) in order to break the adhesive, and then pull it sideways. At all times, I kept the socket safe with a spudger to avoid ripping it off the board. The cable will come out with a little effort. Remember, it is the socket you need to take care of, not the cable (the cable will be thrown away with the old battery).
I had issues in reassembly - the lever for the ZIF socket was missing. I think it came off with the tape. I found the lever, but it was way too small for me to reattach (I couldn't hold it well enough with the tweezers and wasn't sure where the hinge pins went).
The computer did not recognize the battery or recognized it with errors (if I got the cable just right) without the lever.
My solution was to cut a tiny bit of electrical tape and put it on the back of the ribbon cable to make it thicker. This gave it enough traction to stay in the socket and pushed the ribbon onto the contacts.
-
-
-
Entferne mithilfe eines T5 Torx Schraubendrehers die 3,7 mm Flachkopfschraube, mit der der Akkustrom-Stecker befestigt ist.
-
-
-
Hebe den Akkustrom-Stecker vorsichtig mit einem Spudger hoch, und trenne so den Akku.
wondering if i didn’t heed this warning close enough. mac not powering on. only black screen with battery and lightning bolt beneath it. What happens if this connector makes contact?
im in the exact same boat right now.
Was everything okay in your case?
Same here until I realized that I never reconnected the tiny power button/Touch ID connector in step 31! It’s underneath the headphone cable jack from step 30. Mine was hiding under the board and I carefully fished it out with a tweezers.
ajm0824 -
I have the same issue. Followed Instructions to theT. Battery is connected properly as it fully charged however, it will not power on. If i disconnect the battery and connect the power adaptor, it powers on. How did you resolve your issue?
Ian Duff -
Hi, did you manage to fix this? Ive got the same issue sadly.
Same problem, any solution?
Lifting up to about 75 degrees is more that enough and safe, and I did also use some electrical tape to block the contact. When this goes back, there is no socket in place, it is just the screw that keeps it there.
-
-
-
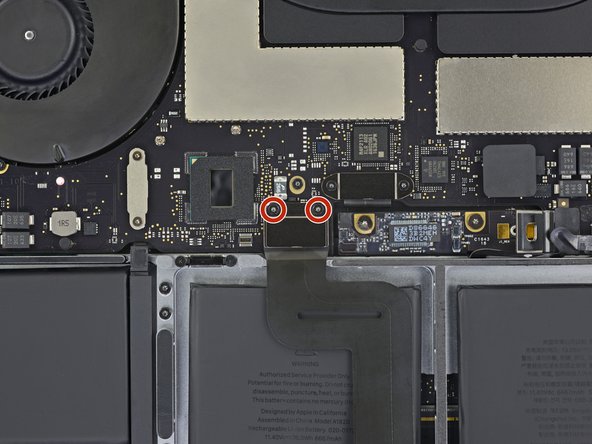
Entferne mithilfe eines T3 Torx Schraubendrehers die beiden 1,9 mm Schrauben, mit denen die Abdeckhalterung des Trackpad-Kabels befestigt ist.
-
Entferne die Halterung.
T3 doesn’t seem to fit, somehow on my a1707 the driver doesn’t grip and it just slips on the screw.
What am I doing wrong?
I don’t have a T2 to try, what can I do?
I managed to get a holt of a T2, but still no luck: there are a bunch of screws that seem to be T2 but everything I stick inside them just spins around and doesn’t grip :(
T4 worked perfectly
Indeed, a T4 worked for me, also.
-
-
-
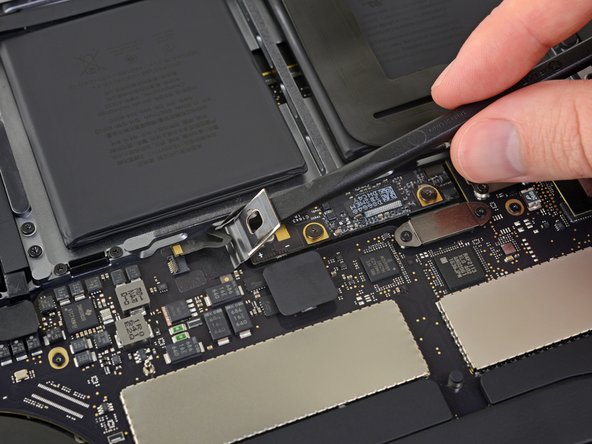
Benutze einen Spudger, um das Trackpad-Kabel zu trennen, indem du seinen Stecker gerade vom Logic Board hochhebelst.
I managed to pry the metal bit with screw holes off first. Whoops.
Make sure the spudger goes under the entire plastic connector, not just the surface metal place, as you risk damaging it like the comment above.
If you get to this point and realize that the connector isn't lining up quite as perfectly as you hoped, don't panic. Open up the lid enough to get a couple fingers under the trackpad to support it. Use your T5 to loosen all of the trackpad screws JUST A COUPLE TURNS not all the way. It will flex around a little bit in the housing and give you some slack if you need it. Then just tighten it all back up again.
-
-
-
Erwärme das Trackpad-Kabel leicht, um den Kleber aufzuweichen, mit dem es am Akku befestigt ist.
-
Du kannst einen iOpener, einen Fön oder eine Heißluftpistole benutzen, achte aber darauf, den Akku nicht zu überhitzen. Das Kabel darf sich nur warm, nicht aber heiß anfühlen.
I used a hairdrier. Barely needed to hold it there for 20 seconds before I could peel it off.
Just warming it gently made it easy to peel off. Work with care starting from the free end, lift a little, move your grip, etc. Do not lift it all at once, there is a risk of breaking it. It is safe to then move it at 180 degrees angle, completely on the other side.
All my battery packs were swollen. The trackpad ribbon cable was barely adhered to this battery pack. No heating necessary.
I didn't need to heat the ribbon, I carefully peeled it back without putting to much pressure on it. I can however, if the adhesive is stronger than on my computer, to warm it up slightly.
-
-
-
Löse das Trackpad-Kabel vorsichtig vom Akku ab und schiebe es aus dem Weg.
thin ifixit pick opener sliding gently/slowly underneath ribbon cable towards the front edge of mbp did the trick for me. no need for heat.
In my case the sticky part of the track pad ribbon remained on the battery. So after replacement the trackpad ribbon does not have a sticker to stay on the battery.
Did it work all right without the adhesive there?
That happened to me too! I thought that was what was supposed to happen, until I read your comment. I managed to peel it off the battery, but before I could catch it it rolled up into a tight ball. I got about half of it unrolled and onto the ribbon.
rileybk -
Since this step you can skip the part with removing the trackpad and logic board and just remove 7 screws (step 47, except green and blue) holding the logic board so you can lift it for a few millimetres just to take off the battery. You can find a YouTube videos where a guy is replacing the battery very easily. So waste of time and a lot of places to screw up you MacBook doing it this way.
This comment and that YouTube video saved me a lot of time - thanks!
Note that there are 8 logic board screws to remove excluding green and blue (now on step 46) and battery board screws are on step 50; the rest of these steps are irrelevant, making this a very easy replacement.
Max Z -
My logic board has 9 screws. Each fan has 3 plus the other three in the blowup. Total waste of time and effort to remove the logic board when it can be tilted up to remove the battery. As stated, no need to remove the trackpad either.
F#%K Apple for making this a difficult job when the batteries were just screwed in before. Absolutely no need for such difficult glue and hiding cables apart from sheer bastardry!
Jack -
-
-
-
Benutze einen T5 Torx Schraubendreher, um die 13 Schrauben zu entfernen, mit denen die Trackpad-Einheit befestigt ist:
-
Neun 5,8 mm Schrauben
-
Vier 4,9 mm Schrauben
Using a piece of cellophane tape can help hold the trackpad in place with with proper clearance all around.
-
-
-
Klappe das Display ein wenig auf, aber lasse das MacBook immer noch umgekehrt liegen. Die Trackpad-Einheit sollte sich lösen und flach auf dem Display aufliegen.
-
Ziehe das Flachbandkabel des Trackpads vorsichtig durch seinen Schlitz im Rahmen.
WARNING - READ THE NEXT STEP NOW OR YOU WILL LOSE THE WASHERS. Please update this with BIG RED LETTERS in the step to indicate what is about to happen, or you’ll skip forward and the washers will fly everywhere. I’m really upset right now.
Merci beaucoup vous venez de me sauver
-
-
-
Achte beim Entfernen der Trackpad-Einheit darauf, nicht die neun kleinen Metall-Unterlegscheiben auf den Schraubpfosten zu verlieren.
-
Entferne die Trackpad-Einheit.
They are not kidding about the jumping washers.
Pro Tip: put your magnetic mat under the trackpad as you slide it out to catch the tiny washers. Alternatively, a magnetic tool bowl, or a terry cloth towel so the lighter guys can’t get far if they fall.
Mine are made of aluminum or stainless or something that magnets don't attract. Flypaper, maybe? :-D
dgatwood -
Can I change the battery with out removing the trackpad and logic board?
yes
I did it, you just have you remove enough screws on the board to bend it upwards in order to pull the battery frame that’s it…
my mac is working fine
a m -
yep lost a washer in the process
One of the washer remained stuck on the body, luckily I observed it on the working table when I cleaned the dust from the trackpad casing area. Be VERY careful to not loose these tiny metal pieces!
Without the washers the clicking and moving mouse around doenst work well. very important
Ok, I have all but 1 round washer. I found the rest. Not knowing a source (not even in my extensive parts collection) I will reassemble with the middle one without a washer. If anyone knows of a parts source (other than buying a trackpad assembly) please post here, Thanks.
When you put the trackpad to the side, write a note and put it on top so you don’t forget about the washers when you come to reassemble it.
I used a clean paint brush to dust off the back of the trackpad and internals. One of the round washers flew out of the assembly and got lost. The washers are super easy to lift off the posts. BE VERY GENTLE WITH THE TRACKPAD REMOVAL AND HANDLING!
This needs to be moved WAY up higher. You are 100% guaranteed to lose one by the time you start the previous step, because the trackpad will fall the microsecond you start to open the case. Really, you shouldn't remove the last screw until you're holding the trackpad from underneath.
Also, the battery replacement kit should really come with at least one extra washer, because I can pretty much guarantee nobody will ever do this without losing one. It is darn near impossible to deal with something that lightweight. Even putting the trackpad down on the counter is enough to lose one, much less having it drop out of the bottom while you're cracking open the laptop.
I found it, and it wasn't in a place you might expect. There's a bit of metal trim on the back of the trackpad itself, and the washer was underneath that. I actually had to dump all the washers out onto the bottom case, and suddenly it peeked out from under the metal rim. Worse, these things are aluminum (or maybe metallized mylar), so you can't pick them up with magnets....
It might be a good idea to put some masking tape on the trackpad to hold it in place so that it doesn't drop out when you open the lid. Then very carefully press it down from the underside with a spudger after you have opened the lid fully and have your hand under it to catch the trackpad so that it doesn't suddenly drop.
dgatwood -
Pro tip: During reassembly, put the plastic backing from the battery down on top of your display, put the trackpad upside-down on top of that, and slowly close the top case down onto it, working the cable through the slot. Then, when it is almost fully closed, use the plastic backing to maneuver the trackpad into position so that the pins line up.
Be careful when you remove this touchpad! I followed every step from the instructions provided here and also checked some video tutorials on YouTube from time to time. Everything went well after swapping the battery, at least that's what I thought. When I started the computer, unfortunately, my keyboard and touchpad didn't work, and the fans were very loud. I used an external keyboard and mouse, searched online for the problem, and tried some solutions such as PRAM reset, but nothing worked. Anyway, I opened the computer again and found that the end of the cable attached to the touchpad was loose. After putting it back in place, everything worked flawlessly.
I had the same problem as Mercan. The touchpad and keyboard would not work. The cable on the back of the touchpad had a partial open on the connector. The only thing I can add is the connector on the back of the trackpad has a lever that must be raised, the the cable inserted and closed. (Just like the data cable on the system board) BIg shout out to Mercan. Thanks.
Dwight
-
-
-
Benutze einen Spudger, um die Halteklappe auf dem ZIF-Stecker des Trackpad-Flachbandkabels hochzuhebeln.
-
-
-
Erwärme mithilfe eines iOpener, eines Föns oder einer Heißluftpistole leicht den Kleber, mit dem das Ende des Flachbandkabels am Trackpad befestigt ist.
-
-
-
Schiebe die Kante eines Halberd-Spudgers oder eines Plektrums vorsichtig unter das Flachbandkabel und schiebe das Werkzeug vor und zurück, um das Kabel vom Trackpad abzulösen.
-
Schiebe das Flachbandkabel aus seinem Anschluss und entferne es vom Trackpad.
-


Vergleiche dein Ersatzteil mit dem Originalteil, eventuell musst du Komponenten übertragen oder Schutzfolien vom Neuteil abziehen, bevor du es einbauen kannst.
Um dein Gerät wieder zusammenzubauen, folge diesen Schritten in umgekehrter Reihenfolge.
Entsorge deinen Elektromüll fachgerecht.
Lief die Reparatur nicht wie geplant? Auf unserem Antwortenforum findest du Hilfe bei der Fehlersuche.
Rückgängig: Ich habe diese Anleitung nicht absolviert.
5 weitere Nutzer:innen haben diese Anleitung absolviert.
Besonderer Dank geht an diese Übersetzer:innen:
100%


Diese Übersetzer:innen helfen uns, die Welt zu reparieren! Wie kann ich mithelfen?
Hier starten ›


2 Kommentare
Can you perhaps Teardown the Trackpad and take a look at the coil?
It would be really helpful for me
There is really nothing you can fix within the coils, beyond that you need the schematic and boardview of the part which are not available.
Dan -
Is this step necessary? I can’t perform this step as I am attempting to repair water damage and need to remove logic board & most likely replace the battery.
Macrepair SF - Antwort
@mac_medic You definitely don’t want the power coming on while the board is wet. In your case, I think powering on the machine to disable Auto Boot would do more damage than it prevents. I agree, skip this step and be prepared to disconnect the battery quickly if the laptop automatically powers on. Good luck!
Jeff Suovanen -
Thats right! You don't want power running while working on your logic board.
Dan -
This did not work when running High Sierra.
Kyle B - Antwort
Tried this on a 2018 MBP 13” Touchbar (there’s no iFixit guide for this model yet). Need to replace a broken screen.
Luckily I managed to connect to an external screen (Cmd-Down Brightness to switch displays) and enter above command. Seems to work, but there’s another problem with this model - it powers up as soon as any key is pressed……. ffs <gnashes teeth>
Cool_Breeze - Antwort
I unscrew the battery first and wrap electrical tape over the logic board battery connector before attempting any repairs to the board. Haven’t had any problems yet and I’ve worked on about 10 of these models already. Also when you open the bottom case use a suction cup at the bottom and pull up then run a plastic spudger along the edges to disconnect the clips. Also only use a plastic spudger on the board. Saw a youtube video from a repair shop and he did not disconnect the power and used all metal tools during the entire process of removing the board. His last step was to disconnect the battery terminal.
Brian - Antwort
Is this step necessary if my mac can turn on? Battery fully dead(
Nursat b - Antwort
BEFORE YOU START: The included torx head stripped off before I was done (and you might need an additional T4) so stop now and go buy a good one. Also they fail to warn you above to get some blue threadlocker ahead of time.
Jason Sherron - Antwort
This command did not work for me and I read that sometime in later 2020 Apple stopped this command from working…any ideas on a work around?
Patrick Machacek - Antwort
Not able to do that with damaged screen
richardjgreen - Antwort
If you have a damaged screen you can still use a converter from thunderbolt (USB 3) to HDMI and plug your Macbook Pro to your TV as monitor display. Just make sure to chose the right Source (HDMI IN) in your TV. I did it and to make it work I unplug and plug again in my Macbook and so I could disable the Auto boot
Roberto Sanchez Bustos -
Hi. This does not work on 2018 13” MacBook Pro with Touch Bar. I did exactly this to disable auto boot. But when I check by using nvram -p it says: auto-boot true. Am I doing something incorrectly? I did everything step by step. Copied and pasted the sudo command, pressed enter and then entered my password. I have Big Sur 11.1 installed. Is there any other way since I need to replace the screen. Thank you. Adrian
Adrian Vizik - Antwort
Hi everyone. This is also a little pointless if you can’t see anything on the screen, and you don’t have a display adapter to USB C to display it. I agree with Brian about removing the back and disconnecting the battery cable before you even think about opening the lid of the MacBook. Applying the insulation tape is also a handy little tip that just makes sure there is no way to discharge from either the board or battery.
Roberto Enrieu - Antwort
running `nvram -p | grep 'AutoBoot'` in terminal verifies that it was accepted
result: `AutoBoot %00`
Marek Polák - Antwort
Running Big Sur 11.6.7 on a 2019 16" MBP, it's "auto-boot". So it's:
nvram -p | grep 'auto-boot'to display the current state, the default istrue- and then to change it,sudo nvram auto-boot=falsewhich turns it off.Ed Mechem -
This step is completely unnecessary if you follow the guide to disconnect the battery properly. Just put some tape between the battery and logic board connection to prevent it from accidentally touching and therefore powering on the laptop.
Grant Ormsby - Antwort
It took me a few tries to make this command work, as I was able to copy and paste the command into Terminal, but could not type in my laptop’s password. I finally typed my password into a text document, copied it (command C), and then pasted it into Terminal and it worked.
tommy404 - Antwort
I didn’t do this. Mine never auto-booted before I replaced the battery. Now it does.
hatuxka - Antwort
BEFORE YOU DO ANYTHING - CHECK THE BATTERY!
I-fixit sent me a bad battery, which I didn’t realize until it was already install. They sent me a new one, but I wasted hours uninstalling and reinstalled.
Get a volt meter and measure the voltage on the output of the battery pack. If it reads 0 V, SEND IT BACK. It should read over 2 V.
bcardanha - Antwort
I've just received my replacement battery and it reads 0,042V between the two main connectors. Do you think it's dead?
peter sussex -
When I did this from Terminal.app within Recovery Mode, the “sudo” was not recognized but I could invoke it without the sudo part. It seems to have been accepted when looking at “nvram -p”
johann beda - Antwort
When in Recovery Mode, you already have superuser powers. So you don't need to prefix commands with the sudo command to invoke them with root privileges; you already have them. Do a
pwd(print working directory) after opening Terminal in Recovery Mode, and you'll see that you're in the root user's directory.Ed Mechem -
I received the battery kit for my 2018 MacBook Pro and as per the above comment from bcardanha - Oct 12, 2021, I checked the voltage on the pads marked + and - . It was zero volts so I panicked a bit.
I sent a message on the iFixiT Facebook page and I got no reply. I finally found the customer service email for Ifixit Europe and sent them an email voicing my concern as I was not keen to work for couple of hours just to discover that the battery is faulty. I had an almost instant reply on the email (kudos to them) and they adviced me to go ahead and install the new battery as the voltage measured when battery is not connected is not relevant.
I took a leap of faith and after two hours… the new battery showed 50% charge and everything seems to be working just fine. I am happy it worked.
Mircea Comanici - Antwort
After removing the old battery and installing the new battery I powered up the MBP before screwing the bottom on. I discovered the my keyboard would not function. It took a few hours of investigation and frustration that I discovered the track pad power ribbon had become partially dislodged from the trackpad. I was able to see that this through the little machined slot where the battery sat. I had to remove the trackpad to reinsert the power ribbon back into the connector in the trackpad. after reassembling and reinstalling the battery etc the keyboard worked. Just food for thought if your run into the keyboard issue.
Ed Mease - Antwort
This should be the default. IMO I tell you to power on - not the lid.
G Sena - Antwort
Est ce que cela fonctionne sur un macbook pro 2017 sans touchbar ?
maël muzelet - Antwort
Bonjour Maël, oui, ce tutoriel concerne "les MacBook Pro 2016 (et plus récents) et les MacBook Retina 12" 2017 (et plus récents)"
Claire Miesch -
Excellent instructions. I was able to follow and install the new screen. I recommend that you get a good set of tools before you begin. I started with an inexpensive repair kit bought online. The Penta and torx bits failed. I bought an IFIXIT kit with quality bits and I was able to do everything I needed.
Tom Markham - Antwort
If you're not running an admin account the sudo command won't work (which honestly, you should not be running admin). Rather than logging in to your admin amount via the OS, in the terminal type "login [admin username]," then the password and you'll be able to do the sudo command as described above. Once you're complete, type "logout [admin username]" and you'll be good to go. Obviously replace [admin username] with whatever the account name for your admin user is.
arichard2401 - Antwort
For those unable to complete this step because the screen is too damaged I recommend leaving your macbook on until the battery dies.
Nicholas R Licato - Antwort
Just replaced my 2018 15" MBP battery. Running Sonoma.
I found no way to disable AutoBoot (The status can be checked in the Power section of system report).
Anyway, i left my battery completely drain before opening the MBP, and had no issues during the process.
Cédric Bontems - Antwort
After sending this command in terminal when I checked what happens if I now open the lid, instead the screen lit slightly up (still black) then a battery symbol showing the charging state showed up.
Now, after replacement of the battery, this is all I get to see.
No reset of NVRAM nor PRAM helped.
Currently the new battery charges (58% atm) and it feels like it‘s mocking me.
webrockers - Antwort
I suspected the keyboard or TouchID sensor wouldn’t work, so I went on and checked every connector.
I missed connecting the left TouchID sensor from step 31.
webrockers -
Read the comments section at the bottom of the article before proceeding with the repair. It is unnecessary to remove the logic board. I actually removed the 45mm plastic bar to enable the cables to slip out then in. It is only there to frustrate repairers!
Jack - Antwort