Diese Anleitung enthält neuere Änderungen. Wechsel zur neuesten unüberprüften Version.
Einleitung
Anhand dieser Anleitung kannst du die gesamte Display-Baugruppe deines MacBook Pro auswechseln, wenn sie beschädigt oder defekt ist. Diese Baugruppe beinhaltet auch die integrierten Flachbandkabel, die als Teil des "FlexGate"-Defekts bei früheren Modellen bekanntermaßen ausfallen, so dass ein Austausch auch den "stage light"-Effekt und andere Probleme aufgrund von Flachbandkabelschäden beheben wird.
Obwohl wir dieses Verfahren erfolgreich an 2018er Modellen mit originalen Apple Ersatzdisplays getestet haben, kann es vorkommen, dass der T2-Chip von Apple verhindert, dass Aftermarket-Displays einwandfrei funktionieren'''', und dein MacBook Pro dadurch möglicherweise nicht startet.
Zu deiner Sicherheit empfehlen wir dir, den Akku deines MacBook Pro auf unter 25% zu entladen, bevor du anfängst. Ein geladener Lithium-Ion-Akku kann zu einem gefährlichen und unkontrollierbaren Feuer führen, falls er versehentlich perforiert wird.
Was du brauchst
-
-
Schalte deinen Mac ein und starte Terminal.
-
Kopiere den folgenden Befehl und füge ihn im Terminal ein (oder tippe ihn exakt so ein):
-
sudo nvram AutoBoot=%00
-
Drücke die Eingabetaste [return]. Wenn du dazu aufgefordert wirst, gib dein Administratorpasswort ein und drücke erneut [return]. Hinweis: die Return-Taste kann auch mit ⏎ oder "enter" gekennzeichnet sein.
-
sudo nvram AutoBoot=%03
-
-
-
Entferne mit einem P5-Pentalobe-Schraubenzieher die sechs Schrauben, mit denen das untere Gehäuse befestigt ist:
-
Vier 4,7 mm Schrauben
-
Zwei 6,6 mm Schrauben
I miss a printable template to leave the screws and removed parts on it for future identification when reassembly, linked maybe with the location in the Macbook, or with the number of the step.
-
-
-
Drücke den Saugnapf in der Nähe der Vorderkante auf das untere Gehäuse zwischen den Schraubenlöchern.
-
Ziehe den Saugnapf gerade so weit nach oben, bis eine kleine Lücke unter dem unteren Gehäuse entsteht.
Throw away this suction cup and get another. It just doesn't work! Luckily I had one that does work in my tool kit.
-
-
-
Schiebe die eine Ecke eines Plektrums in die entstandene Lücke.
-
Schiebe das Plektrum um die nächste Ecke und dann zur Hälfte über die Seite des MacBook Pro.
-
-
-
Wiederhole den vorherigen Schritt auf der anderen Seite und verwende das Plektrum, um den zweiten Clip zu lösen.
-
-
-
Hebe die Vorderkante des unteren Gehäuses (die dem Displayscharnier gegenüberliegende Seite) so weit an, dass du mit den Fingerspitzen darunter gleiten und es gut greifen kannst.
-
-
-
Ziehe das untere Gehäuse fest in Richtung der Vorderkante des MacBook (vom Scharnierbereich weg), um die letzten Clips zu lösen, mit denen das untere Gehäuse gesichert ist.
-
Ziehe zuerst an einer Ecke und dann an der anderen.
this step must require a lot of force. I tried to pull it with the plastic hookie thing from the ifixit set by hooking it in one of the screw holes — the tip of the hookie thing broke.
The amount of force required for removing the bottom cover is absolutely ridiculous. Almost feels like i'm about to push my MacBook towards the wall the second it comes off.
Be careful, I ended up breaking 2 grounding pins on the motherboard last time I tried opening my computer up.
PLEASE DON'T PULL!!!
Instead just gently push with plastic pick from the other side (where vents outputs are) towards the center... Cover will very easily open that way.
I hope iFixit will correct this step.
Came here to share exactly this.
Robert -
That's definitely how this step should be done. Thanks!
VovS -
If someone has a photo to share regarding this comment, it might be very useful. Thanks.
I used a screwdriver at 45 degrees angle and pushed the cover from the hinges, it worked really smooth. I had it close to the corners.
Yeah, definitely don't pull; if you do, wear protective gloves. Mine was stuck so strongly that I just cut my palm quite deep.
You would think ifixit would investigate why the last step required them to pull with great force to remove the bottom case lid as the solution.
It's counter-intuitive to use an excessive method to remove a part.
There's always an easier way. It's frustrating because you can't see inside.
Using the iFixit opening Tool in the hinge opening required close to no force to open.
Ah... after attempting to 'pull' this rear cover off, to no avail, I tried to coax the cover off with a nylon pry tool. MUCH better! iFixIt will do well to amend it's recommendation to 'pull' this cover in any way. All I wanted to do was a little house cleaning and exorcize the dust bunnies that took up residence in my MBP's fans. Today is much quieter. Thank you all for pointing out the obvious.
-
-
-
Entferne das untere Gehäuse.
-
Lege es in Position und richtedie Clips in der Nähe des Displayscharniers aus. Drücke die Abdeckung nach unten und schiebe sie zum Scharnier. Es sollte nicht mehr rutschen, wenn die Clips einrasten.
-
Wenn die Clips vollständig eingerastet sind und das untere Gehäuse korrekt ausgerichtet ist, drücke fest auf das untere Gehäuse, um die vier verdeckten Clips darunter einzurasten. Du solltest fühlen und hören, wie sie einrasten.
If I had it all to do over, again, I would blow out the dust with compressed air at this point. During the disassembly, I kept encountering little dust bunnies, and I was very worried that one would get caught in one of the connectors when I plugged everything back up (which wouldn’t get discovered until I put it all back together and tried out all of the components).
-
-
-
Ziehe den isolierenden Aufkleber auf der Akkuplatine an der der Akku nächstgelegenen Kante des Logic Board ab und entferne ihn.
-
Wenn sich die Abdeckung nicht leicht ablösen lässt, erwärme sie mit einem iOpener, einem Haartrockner oder einer Heißluftpistole, um den darunter befindlichen Klebstoff aufzuweichen, und versuche es erneut.
-
-
-
Ziehe das Klebeband vom Anschluss des Datenkabels der Akkuplatine ab.
-
Heble mit einem Spudger vorsichtig die Verriegelungsklappe am ZIF-Anschluss für das Datenkabel der Akkuplatine auf.
-
-
-
Trenne das Datenkabel der Akkuplatine, indem du es aus der Buchse auf dem Logic Board ziehst.
-
Schiebe parallel zum Logic Board in Richtung des Kabels.
-
-
-
-
Heble die Verriegelungsklappe am Stecker am gegenüberliegenden Ende des Datenkabels der Akkuplatine auf und trenne sie.
-
-
-
Schiebe das Datenkabel der Akkuplatine aus der Buchse auf der Akkuplatine und entferne es vollständig.
Bonjour, super Tuto, petite question elle sert a quoi cette nappe , et quesqui se passe si elle est pas branché ?
-
-
-
Entferne mit einem T5-Torx-Schraubendreher die 3,7-mm-Flachkopfschraube, mit der der Akkustecker befestigt ist.
-
-
-
Verwende einen Spudger, um den Akkustecker anzuheben und den Akku abzuklemmen.
Put a little bit of insulating tape over the terminal to be safe.
-
-
-
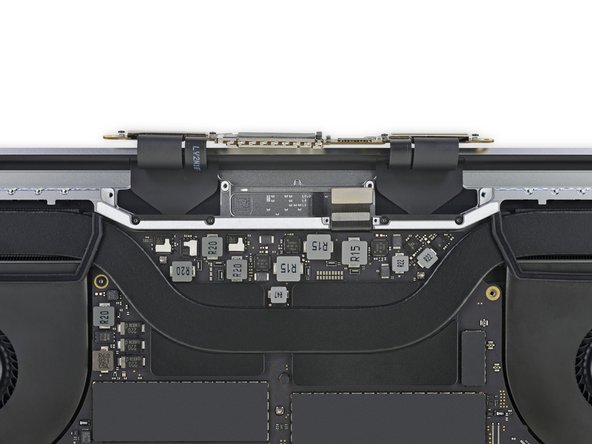
Verwende einen T3 Torx Schraubendreher, um die beiden 3,5-mm-Schrauben zu lösen, mit denen die Abdeckung auf dem Flexkabel des Displays befestigt ist.
-
Entferne die Abdeckung auf dem Flexibel des Displays.
T3 or T4? I almost damage the screw trying with the T3.
I’d say T4 as T3 was definitely too small
-
-
-
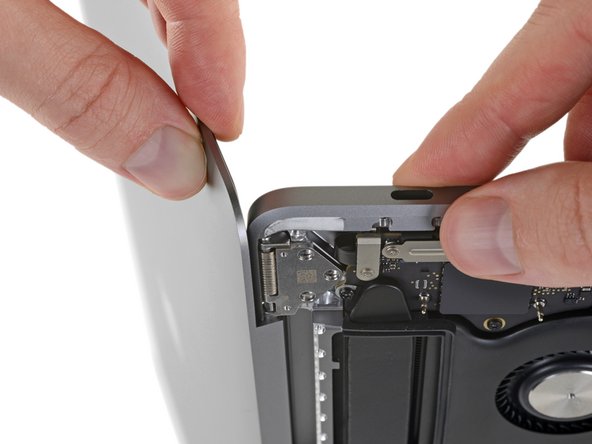
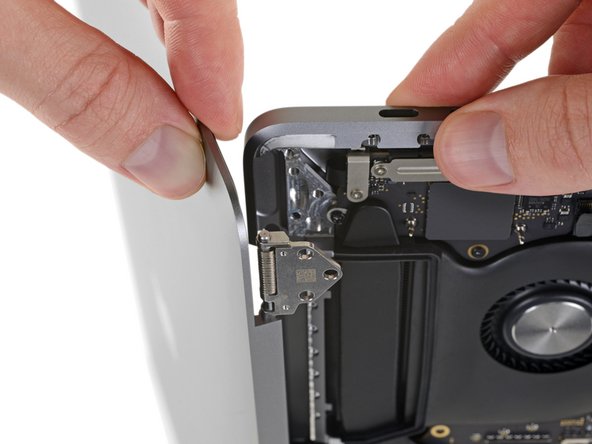
Verwende einen T3 Torx Schraubendreher um die zwei 1,7 mm Schrauben zu lösen, mit denen die Klammer für den Displayboardanschluss befestigt sind.
-
Entferne die Klammer für den Displayboardanschluss.
-
-
-
Heble das Display Board Flexkabel gerade aus seiner Buchse, um es vom Display Board zu trennen.
-
-
-
Verwende einen T3 Torx Schraubendreher um die vier 2 mm Schrauben von der Scharnierabdeckung zu entfernen. (Zwei Schrauben auf jeder Seite).
-
-
-
Verwende einen T5 Torx Schraubendreher um die eine 2,9mm Schraube zu lösen, mit der das Antennenkabel-Set befestigt ist.
-
-
-
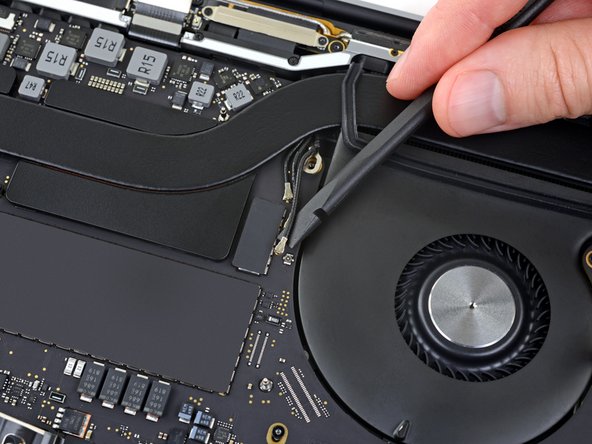
Trenne alle drei Antennenkabel, indem du sie gerade nach oben abhebelst.
-
Schiebe eine Pinzette oder das flache Ende deines Spudgers unter jedes Kabel bis du nahe genug an der Buchse bist. Dann kannst du dein Werkzeug drehen oder leichten Druck nach oben geben.
-
-
-
Verwende einen T5 Schraubenzieher um die vier 3,3 mm Schrauben zu entfernen, mit denen das Display Board befestigt ist.
-
Achte darauf, dass das Displayflexkabel an der Oberseite des Boards liegt und nicht eingeklemmt wird.
When reassembling, I found that I had to press in on the outer edge of the antenna (top edge when looking at the picture) at the midpoint between the left 8 screws and the right 8 screws as I screwed the display board screws in. I found that the outside antenna edge would otherwise rub against the display halfway through opening it making a pop sound. Installing this way fixed the problem.
-
-
-
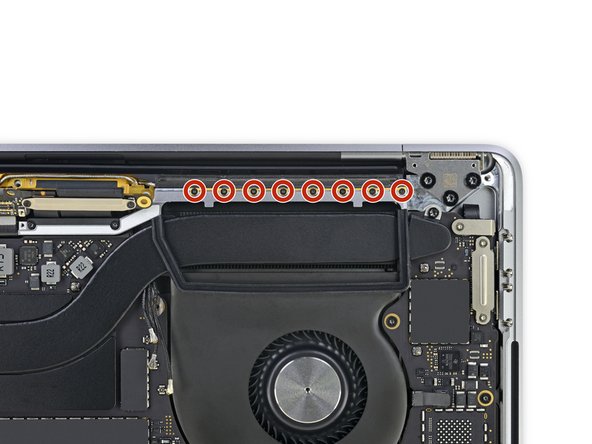
Verwende einen P2 Pentalobe Schraubendreher um die 16 1,5 mm Schrauben zu lösen, mit denen die Antenneneinheit befestigt ist.
I’m having difficulty removing the screws. I’m not sure if the p2 screwdriver is defective but I am now stuck at this step.
We had 4 MBP's that I removed the displays from. On this step, I stripped a 'middle' screw on each side.
On the second one, I also noticed the middle screws didn't exactly want to easily come loose as I worked my way down the row.
I wound up putting all screws back in, loosened then tightened the screw on the opposite end, then removed the two in the middle (without issue), then an outside screw going back and forth, until I just had one on each end. Since I had already removed and replaced them, they came out without issue.
I used this method on the remaining 2 MBP's and had no further issues.
YMMV and it may not even be necessary. Just seemed removing the screws from end to end put enough pressure on the remaining ones that they were harder to remove. Whereas a patterned removal seemed to resolve that 'issue'.
-
-
-
Nimm ein Plektrum zur Hand und heble damit die Antenneneinheit aus dem MacBook Pro.
-
-
-
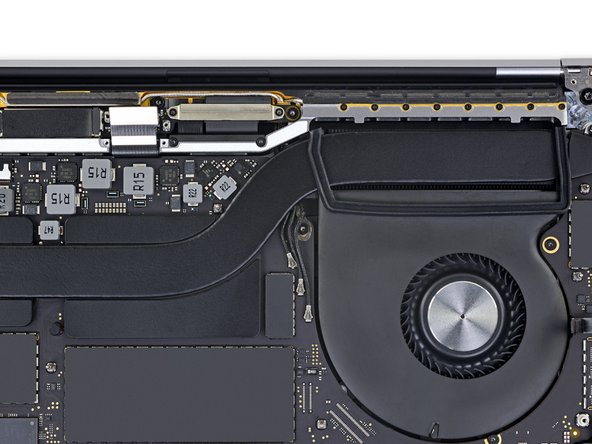
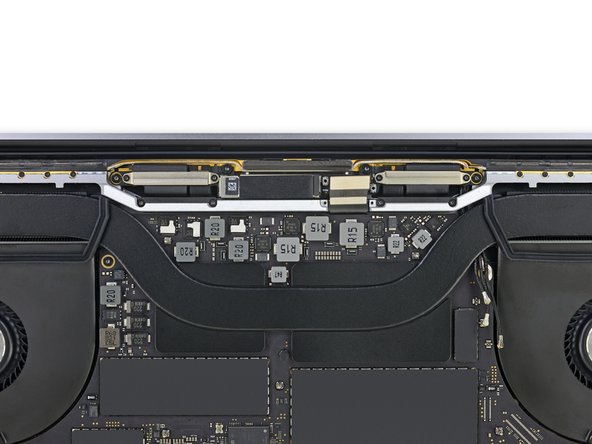
Entferne vorsichtig die Antenneneinheit und ziehe gleichzeitig den Antennenkabelstrang aus dem Kühlkörper, der darunter liegt.
-
-
-
Verwende einen T3 Torx Schraubendreher um die vier 3,9 mm Schrauben zu lösen, mit denen die Displaykabelabdeckung befestigt ist.
-
-
-
Verwende einen T8 Torx Schraubendreher um die zwei 4,9 mm Schrauben an jedem Scharnier zu lösen (also insgesamt vier Schrauben).
-
-
-
Solltest du planen, dein Display weiter zu verwenden, klebe das Glas direkt oberhalb des Scharniers auf beiden Seiten mit einem Stück Klebeband ab. So kannst du es vor Beschädigungen schützen, bevor du weitermachst.
-
Mach dein MacBook Pro jetzt ganz auf und stelle es auf die Seitenkante.
-
-
-
Verwende einen T8 Torx Schraubendreher, um die beiden verbleibenden 4 mm Scharnierschrauben zu entfernen. (Eine auf jeder Seite).
-
Entferne zuerst die untere und dann die obere Schraube. Du musst dabei das MacBook festhalten, damit die beiden Hälften dann nicht auseinander fallen.
-
-
-
Schiebe beide Hälften des MacBook Pro zusammen, damit die Scharniere aus ihren Aussparungen im Gehäuse herausgehoben werden können.
-
Drücke das untere Gehäuse des MacBook Pro weg von dir und das Display zu dir hin, so dass sie voneinander getrennt werden.
-
Vergleiche dein neues Ersatzteil mit dem Originalteil. Möglicherweise musst du einzelne Komponenten übertragen oder Klebebeschichtungen vom neuen Teil entfernen, bevor du es einbaust.
Folge dann den Schritten in umgekehrter Reihenfolge, um dein Gerät wieder zusammenzubauen.
Entsorge deinen Elektroschrott fachgerecht.
Die Reparatur verlief nicht wie geplant? In unserem Antwortenforum hilft man dir sicher gern bei der Fehlersuche.
Rückgängig: Ich habe diese Anleitung nicht absolviert.
33 weitere Nutzer:innen haben diese Anleitung absolviert.
Besonderer Dank geht an diese Übersetzer:innen:
100%
Diese Übersetzer:innen helfen uns, die Welt zu reparieren! Wie kann ich mithelfen?
Hier starten ›
18 Kommentare
where can I purchase an lcd screen for this computer?
hai jeff. Is that possible I can revive my screen not to buy a new one, instead of replacing 3 pairs of flexible cable? thanks
To reiterate Ron’s request - you’ve shown me how to fix the screen (thank you!) without showing me where/how to purchase the replacement?
Banggodd or AliExpress but ta
Apple sry to get a genuine Apple screen as ‘compatibles’ may not pass in built Apple security- more expensive but can save a lot of heartache and later expense.
For everyone looking for screen replacements the short story is you cannot get them. Apple has prohibited their source from selling the assemblies to third parties. 3rd parties attempting to make their own have had them seized by customs. The only way to get one at this current time is from another device. However you may have issues using a display from another laptop even if it is the exact same model as apple will notice it is an unauthorized repair. This is a textbook example of apple’s illegal practices in regards to right to repair. You can read more about this here https://uspirg.org/feature/usp/right-rep...
Does anyone know if you can remove the MacBook screen and just use the keyboard mouse pad etc and connect to a monitor screen without attaching back a new screen? Thanks!
I changed the screen following this guide. The screen works but the camera of the new screen does not work and the backlight of the keyboard its not working (when turning on the computer the lights of the keyboard works but after login in with my password the backlight stops working). I tried nvram reset and pram reset and the problem is still there. If someone knows something about this please help me!
what is the part number for the screen?
Hi, I tried to repair/check my 2018 mac 15”screen and when I finished i cant get the mac to charge… have I broken the dam thing? battery flat?
Hi,
Great guide thank you. Unfortunately during reassembly, 1 of the 3 antenna cable's conector broke. It's the long one. the machine itself works perfect, wifi and Bluetooth still work. Does anyone know what that longer antenna cable does?
Just wondering if it's really necessary for me to purchase and replace the antenna assembly all together.
Thank you













Is this step necessary? I can’t perform this step as I am attempting to repair water damage and need to remove logic board & most likely replace the battery.
Macrepair SF - Antwort
@mac_medic You definitely don’t want the power coming on while the board is wet. In your case, I think powering on the machine to disable Auto Boot would do more damage than it prevents. I agree, skip this step and be prepared to disconnect the battery quickly if the laptop automatically powers on. Good luck!
Jeff Suovanen -
Thats right! You don't want power running while working on your logic board.
Dan -
This did not work when running High Sierra.
Kyle B - Antwort
Tried this on a 2018 MBP 13” Touchbar (there’s no iFixit guide for this model yet). Need to replace a broken screen.
Luckily I managed to connect to an external screen (Cmd-Down Brightness to switch displays) and enter above command. Seems to work, but there’s another problem with this model - it powers up as soon as any key is pressed……. ffs <gnashes teeth>
Cool_Breeze - Antwort
I unscrew the battery first and wrap electrical tape over the logic board battery connector before attempting any repairs to the board. Haven’t had any problems yet and I’ve worked on about 10 of these models already. Also when you open the bottom case use a suction cup at the bottom and pull up then run a plastic spudger along the edges to disconnect the clips. Also only use a plastic spudger on the board. Saw a youtube video from a repair shop and he did not disconnect the power and used all metal tools during the entire process of removing the board. His last step was to disconnect the battery terminal.
Brian - Antwort
Is this step necessary if my mac can turn on? Battery fully dead(
Nursat b - Antwort
BEFORE YOU START: The included torx head stripped off before I was done (and you might need an additional T4) so stop now and go buy a good one. Also they fail to warn you above to get some blue threadlocker ahead of time.
Jason Sherron - Antwort
This command did not work for me and I read that sometime in later 2020 Apple stopped this command from working…any ideas on a work around?
Patrick Machacek - Antwort
Not able to do that with damaged screen
richardjgreen - Antwort
If you have a damaged screen you can still use a converter from thunderbolt (USB 3) to HDMI and plug your Macbook Pro to your TV as monitor display. Just make sure to chose the right Source (HDMI IN) in your TV. I did it and to make it work I unplug and plug again in my Macbook and so I could disable the Auto boot
Roberto Sanchez Bustos -
Hi. This does not work on 2018 13” MacBook Pro with Touch Bar. I did exactly this to disable auto boot. But when I check by using nvram -p it says: auto-boot true. Am I doing something incorrectly? I did everything step by step. Copied and pasted the sudo command, pressed enter and then entered my password. I have Big Sur 11.1 installed. Is there any other way since I need to replace the screen. Thank you. Adrian
Adrian Vizik - Antwort
Hi everyone. This is also a little pointless if you can’t see anything on the screen, and you don’t have a display adapter to USB C to display it. I agree with Brian about removing the back and disconnecting the battery cable before you even think about opening the lid of the MacBook. Applying the insulation tape is also a handy little tip that just makes sure there is no way to discharge from either the board or battery.
Roberto Enrieu - Antwort
running `nvram -p | grep 'AutoBoot'` in terminal verifies that it was accepted
result: `AutoBoot %00`
Marek Polák - Antwort
Running Big Sur 11.6.7 on a 2019 16" MBP, it's "auto-boot". So it's:
nvram -p | grep 'auto-boot'to display the current state, the default istrue- and then to change it,sudo nvram auto-boot=falsewhich turns it off.Ed Mechem -
This step is completely unnecessary if you follow the guide to disconnect the battery properly. Just put some tape between the battery and logic board connection to prevent it from accidentally touching and therefore powering on the laptop.
Grant Ormsby - Antwort
It took me a few tries to make this command work, as I was able to copy and paste the command into Terminal, but could not type in my laptop’s password. I finally typed my password into a text document, copied it (command C), and then pasted it into Terminal and it worked.
tommy404 - Antwort
I didn’t do this. Mine never auto-booted before I replaced the battery. Now it does.
hatuxka - Antwort
BEFORE YOU DO ANYTHING - CHECK THE BATTERY!
I-fixit sent me a bad battery, which I didn’t realize until it was already install. They sent me a new one, but I wasted hours uninstalling and reinstalled.
Get a volt meter and measure the voltage on the output of the battery pack. If it reads 0 V, SEND IT BACK. It should read over 2 V.
bcardanha - Antwort
I've just received my replacement battery and it reads 0,042V between the two main connectors. Do you think it's dead?
peter sussex -
When I did this from Terminal.app within Recovery Mode, the “sudo” was not recognized but I could invoke it without the sudo part. It seems to have been accepted when looking at “nvram -p”
johann beda - Antwort
When in Recovery Mode, you already have superuser powers. So you don't need to prefix commands with the sudo command to invoke them with root privileges; you already have them. Do a
pwd(print working directory) after opening Terminal in Recovery Mode, and you'll see that you're in the root user's directory.Ed Mechem -
I received the battery kit for my 2018 MacBook Pro and as per the above comment from bcardanha - Oct 12, 2021, I checked the voltage on the pads marked + and - . It was zero volts so I panicked a bit.
I sent a message on the iFixiT Facebook page and I got no reply. I finally found the customer service email for Ifixit Europe and sent them an email voicing my concern as I was not keen to work for couple of hours just to discover that the battery is faulty. I had an almost instant reply on the email (kudos to them) and they adviced me to go ahead and install the new battery as the voltage measured when battery is not connected is not relevant.
I took a leap of faith and after two hours… the new battery showed 50% charge and everything seems to be working just fine. I am happy it worked.
Mircea Comanici - Antwort
After removing the old battery and installing the new battery I powered up the MBP before screwing the bottom on. I discovered the my keyboard would not function. It took a few hours of investigation and frustration that I discovered the track pad power ribbon had become partially dislodged from the trackpad. I was able to see that this through the little machined slot where the battery sat. I had to remove the trackpad to reinsert the power ribbon back into the connector in the trackpad. after reassembling and reinstalling the battery etc the keyboard worked. Just food for thought if your run into the keyboard issue.
Ed Mease - Antwort
This should be the default. IMO I tell you to power on - not the lid.
G Sena - Antwort
Est ce que cela fonctionne sur un macbook pro 2017 sans touchbar ?
maël muzelet - Antwort
Bonjour Maël, oui, ce tutoriel concerne "les MacBook Pro 2016 (et plus récents) et les MacBook Retina 12" 2017 (et plus récents)"
Claire Miesch -
Excellent instructions. I was able to follow and install the new screen. I recommend that you get a good set of tools before you begin. I started with an inexpensive repair kit bought online. The Penta and torx bits failed. I bought an IFIXIT kit with quality bits and I was able to do everything I needed.
Tom Markham - Antwort
If you're not running an admin account the sudo command won't work (which honestly, you should not be running admin). Rather than logging in to your admin amount via the OS, in the terminal type "login [admin username]," then the password and you'll be able to do the sudo command as described above. Once you're complete, type "logout [admin username]" and you'll be good to go. Obviously replace [admin username] with whatever the account name for your admin user is.
arichard2401 - Antwort
For those unable to complete this step because the screen is too damaged I recommend leaving your macbook on until the battery dies.
Nicholas R Licato - Antwort
Just replaced my 2018 15" MBP battery. Running Sonoma.
I found no way to disable AutoBoot (The status can be checked in the Power section of system report).
Anyway, i left my battery completely drain before opening the MBP, and had no issues during the process.
Cédric Bontems - Antwort
After sending this command in terminal when I checked what happens if I now open the lid, instead the screen lit slightly up (still black) then a battery symbol showing the charging state showed up.
Now, after replacement of the battery, this is all I get to see.
No reset of NVRAM nor PRAM helped.
Currently the new battery charges (58% atm) and it feels like it‘s mocking me.
webrockers - Antwort
I suspected the keyboard or TouchID sensor wouldn’t work, so I went on and checked every connector.
I missed connecting the left TouchID sensor from step 31.
webrockers -
Read the comments section at the bottom of the article before proceeding with the repair. It is unnecessary to remove the logic board. I actually removed the 45mm plastic bar to enable the cables to slip out then in. It is only there to frustrate repairers!
Jack - Antwort