Einleitung
Wenn der Akku deines Samsung Galaxy A3 schwächelt, verwende diese Anleitung, um den Akku zu ersetzen. Wenn dein Akku aufgebläht ist, dann treffe entsprechende Vorsichtsmaßnahmen.
In dieser Anleitung werden Glasrückabdeckung und Mittelrahmen entfernt. Du benötigst neue Klebestreifen, um die Rückabdeckung wieder zu befestigen.
Bevor du das Gerät auseinandernimmst, solltest du den Akku auf unter 25 % entladen. Akkus können Feuer fangen und/oder explodieren, falls sie versehentlich perforiert oder beschädigt werden. Im entladenen Zustand wird diese Gefahr auf ein Minimum reduziert.
Was du brauchst
-
-
Schalte zuerst dein Handy aus.
-
Nimm einen iOpener, um den Klebstoff hinter der Rückabdeckung zu erhitzen und aufzuweichen.
-
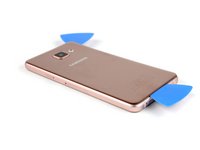
Habe den unteren Bereich mit einem Saugheber an und schiebe ein Opening Pick in den Spalt.
-
-
-
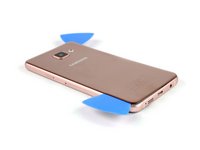
Fahre mit dem Opening Pick nach oben bis zur Rückkamera, um die Rückabdeckung vom Rahmen zu lösen.
-
-
-
-
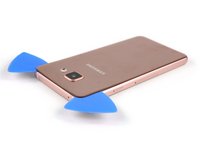
Gehe mit dem Pick entlang der linken Seite, um den Klebstoff zu lösen.
-
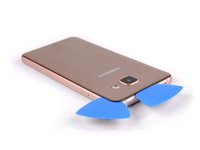
Fahre um die obere linke Ecke und löse den Kleber oberhalb der Rückkamera lösen.
-
Nachdem der Kleber an allen Seiten gelöst ist, nimmst du einen iOpener oder eine Heißluftpistole und erwärmst den restlichen Klebstoff unter der Mitte der Rückabdeckung.
-
-
-
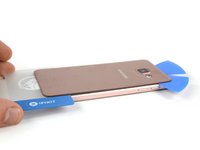
Führe eine Plastikkarte von der Unterseite her unter die Rückabdeckung ein.
-
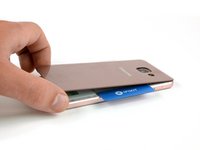
Trenne den Kleber bis du zur Rückkamera kommst.
-
Nun kannst du die Rückabdeckung langsam nach oben hin weg klappen und abnehmen.
-
-
-
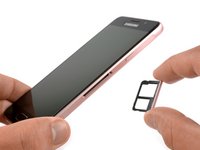
Nimm den SIM-Kartenhalter heraus.
-
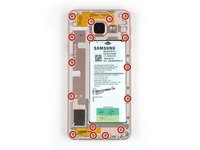
Entferne die 16 Kreuzschlitzschrauben #00 am Mittelrahmen.
-
-
-
Verwende einen iOpener, um den Klebstoff um den Mittelrahmen herum aufzuweichen.
-
-
-
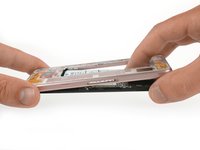
Drücke den offenliegenden Bereich des Akkus vom Mittelrahmen weg, um die beiden Teile voneinander zu lösen.
-
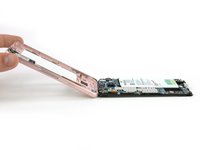
Entferne den Mittelrahmen.
-
-
-
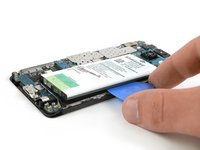
Schiebe ein Opening Pick zwischen Akku und den Rahmen. Schiebe ihn am Akku entlang, um den Kleber zu lösen.
-
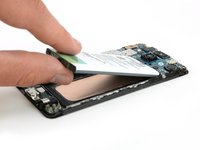
Entferne den Akku.
-


Arbeite die Schritte in umgekehrter Reihenfolge ab, um dein Gerät wieder zusammenzubauen. Bringe, wo nötig, neue Klebestreifen an.
Arbeite die Schritte in umgekehrter Reihenfolge ab, um dein Gerät wieder zusammenzubauen. Bringe, wo nötig, neue Klebestreifen an.
Rückgängig: Ich habe diese Anleitung nicht absolviert.
44 weitere Personen haben diese Anleitung absolviert.
Besonderer Dank geht an diese Übersetzer:innen:
100%


Diese Übersetzer:innen helfen uns, die Welt zu reparieren! Wie kann ich mithelfen?
Hier starten ›


8 Kommentare
Nice post on Samsung phone. People are courageous about Galaxy phones and there is lot of hype about Samsung.
I bought a budget j7 for my wife and I am sure this will have good review.
not sure why they are not talking about.
Thanks
Rakesh Birchi
Owner of http://www.birchi.in
Thank you so very much! I'm an ageing priest working in Transylvania and The Republic of moldova with victims of child trafficking. My battery has suffered extensive use and I believe it still should have lasted longer. I have limited resources to use for myself and feel attempting to replace the battery myself far more economical and funds conscious. Thanks to you I shall endeavour to replace it myself…thanks to your instruction.
May all your journeys be ones of discovery!
Fr Bill+
Projectnewlife.org
PNLMoldovaPrisons.blogspot.com
BigWorldSmallBoat.blogspot.com
ScmMoldova.blogspot.com
DogDogma.blogspot.com
Assolutamente insufficiente. L’iOpener non scioglie l’adesivo posteriore e quindi il vetro posteriore si rompe facilmente. Il tutorial indica una parte assolutamente inutile, ovvero lo smontaggio del telaio. Non serve basta estrarre la batteria con un piccolo cacciavite. I tutorial fateli scrivere a chi lavora sui device. Grazie
Hello axlduri,
thanks for your feedback. In case you weren’t able to loosen the adhesive beneath the back cover with an iOpener, you can use a heat gun to do so. However the iOpener should do the job and should be applied for at least 2 minutes to the back cover. Repeat this step several times until the adhesive is loose. Additionally the battery sits super tight in the mid frame and it’s nearly impossible to remove it safely, without removing the mid frame. You should never work or pry on batteries with metal tools like a screwdriver. If you accidentally puncture them, they can explode or catch fire. Thats the reason why we advise to remove the mid frame. It’s the safest way to remove the battery.
Merci pour ces instructions. J’ai essayé de démonter la batterie, mais me suis arrêté à l’étape 6. Je ne comprends pas pourquoi il y a toute cette colle! A quoi servent les vis si tout est collé? Remplacer la batterie était un jeu d’enfant dans les anciens modèles Samsung. Maintenant on a l’impression que les constructeurs font tout pour qu’on désespère et rachète un nouveau mobile! C’est honteux dans un monde où on essaie de minimiser les déchets!