Einleitung
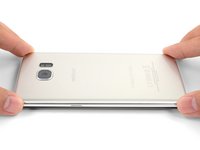
Weißt du nicht so genau, was du mit all den Klebestreifen in deinem Reparatur-Kit anfangen sollst? Hier bist du richtig! In dieser Anleitung wird gezeigt, wie man das Klebestreifen-Kit für Samsung Smartphones mit Glasrückseite (S7 und neuer) benutzt. Es wird ebenfalls beschrieben, wie man die verschiedenen Komponenten der Rückabdeckung überträgt und einbaut, wie zum Beispiel die Kameraeinfassung und den Fingerabdrucksensor.
Unter Umständen brauchst du nicht alle im Kit enthaltenen Klebestreifen. Wenn du den Fingerabdrucksensor überträgst, brauchst du doppelseitiges Klebeband, wie zum Beispiel Tesaband.
Eine Liste der einzelnen Klebestreifen für das Galaxy S Smartphone findest du hier.
Beim Anbringen von Klebestreifen wie diesen hier, sind ein paar allgemeine Tipps hilfreich:
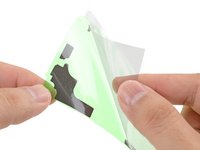
- Im Allgemeinen haben Klebestreifen eine farbige und eine farblose Seite (aus Papier oder durchsichtiger Plastikfolie). Die farblose Seite zeigt an, auf welcher Oberfläche der Streifen zuerst angeklebt werden soll.
- Du kannst dir das Aufkleben erleichtern, indem du zuerst den noch geschützten Klebestreifen an der vorgesehenen Klebefläche im Smartphone ausrichtest. Klebe dann den Streifen an einer Kante fest. Jetzt kannst du die Schutzfolien abziehen, ohne dass der Klebestreifen verrutscht.
Was du brauchst
-
-
Um die Akku-Klebestreifen anzubringen, folge dieser Anleitung.
-
Um den Fingerabdrucksensor und die Dichtung zu übertragen und einzubauen, beginne mit dem nächsten Schritt.
-
Um die rückseitige Blende zu übertragen und einzubauen, gehe zu Schritt 5.
-
Um die Stützstreifen der Rückabdeckung anzubringen, gehe zu Schritt 9.
-
Um die Klebestreifen am Rand der Rückabdeckung anzubringen , gehe zu Schritt 13.
-
-
-
Wenn sich dein Fingerabdrucksensor und die Kamera in einer einzigen Blende befinden (wie z.B. im S9), kannst du die gesamte Blende übertragen, ohne sie in Einzelteile zu zerlegen.
-
Erwärme einen iOpener und lege ihn eine Minute lang auf den Fingerabdrucksensor.
-
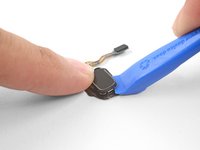
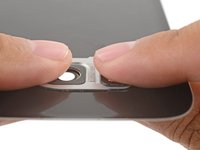
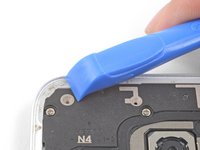
Heble den Fingerabdrucksensor vorsichtig an der unteren Naht, wo er die Rückabdeckung berührt, mit einem Öffnungswerkzeug hoch.
-
Heble nicht an der oberen Naht, das ist die Naht der Fingerabdruckdichtung.
-
-
-
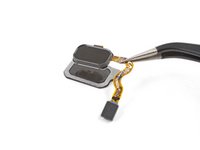
Heble den Fingerabdrucksensor mit einem Öffnungswerkzeug von der Dichtung ab.
-
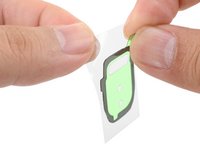
Entferne die farbige Plastik-Schutzfolie von der Ersatz-Dichtung, um den Kleber freizulegen.
-
Richte den Fingerabdrucksensor sorgfältig aus und lege ihn auf die klebrige Seite der Dichtung.
-
Drücke ihn, wenn er richtig ausgerichtet ist, mit dem Finger fest, damit der Kleber gut anhaftet.
-
-
In diesem Schritt verwendetes Werkzeug:Tesa 61395 Tape$5.99
-
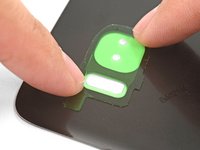
Um den Fingerabdrucksensor an der neuen Rückabdeckung zu befestigen, benutzt du entweder einen extra dafür vorgestanzten Klebestreifen, oder du befestigst doppelseitiges Klebeband wie zum Beispiel Tesa Klebeband um den Sensor.
-
Richte den Fingerabdrucksensor im Ausschnitt in der Rückabdeckung aus und drücke ihn fest mit deinem Finger hinein, damit der Kleber gut anhaftet.
-
-
-
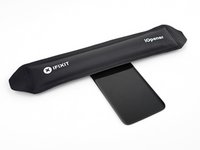
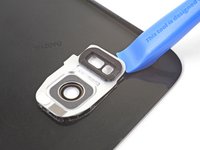
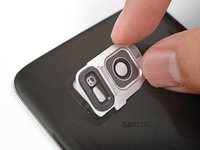
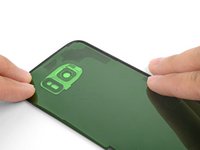
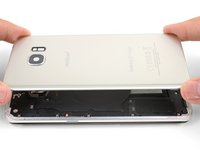
Erwärme einen iOpener und lege ihn eine Minute lang auf die rückseitige Blende.
-
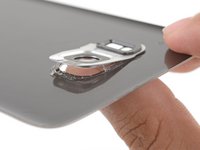
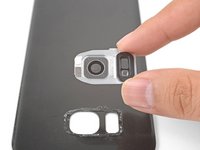
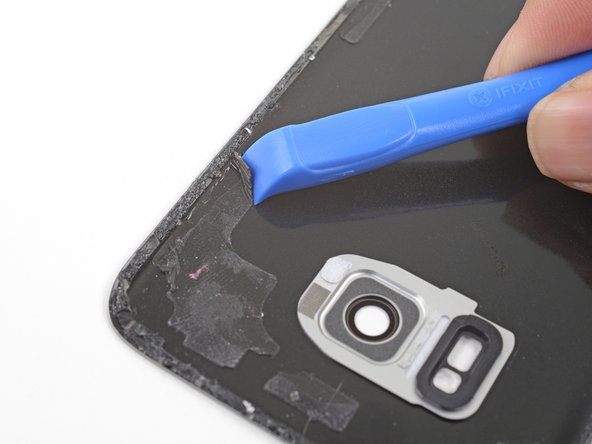
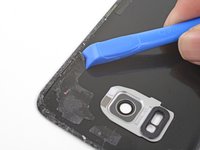
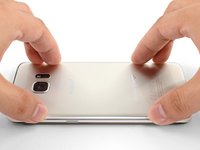
Beginne an der nach außen zeigenden Seite der Rückabdeckung die Blende mit einem Finger nach innen zu drücken, um die Blende aus ihrem Ausschnitt zu lösen.
-
Alternativ kannst du auch mit einem Öffnungswerkzeug um die Blende herumhebeln, um sie von der Rückabdeckung abzulösen.
-
-
-
-
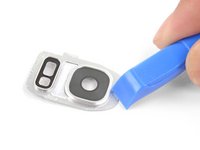
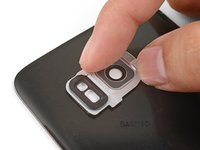
Entferne die Blende.
-
Entferne alle Klebereste auf der Blende mithilfe eines Öffnungswerkzeugs und hochkonzentriertem Isopropylalakohol.
-
-
-
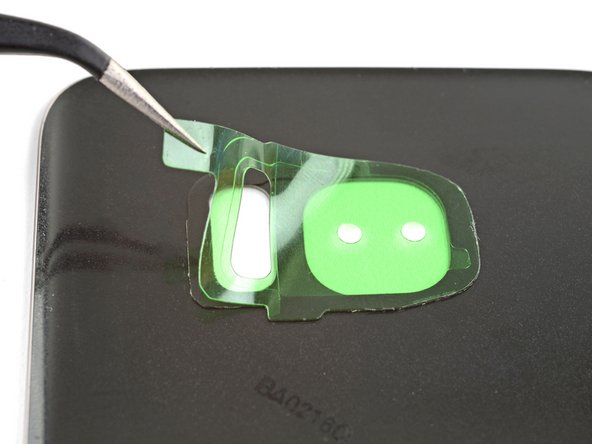
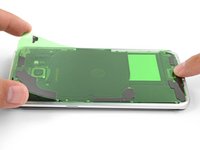
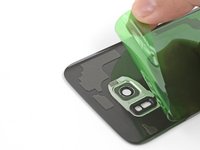
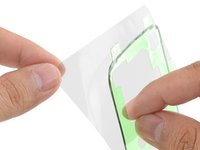
Ziehe die durchsichtige Plastikfolie vom Klebestreifen der Blende ab, um den Kleber freizulegen.
-
Richte den Klebestreifen sorgfältig mit dem Ausschnitt in der Rückabdeckung aus.
-
Drücke ihn dann mit deinem Finger fest.
-
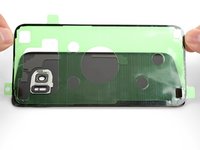
Ziehe die farbige Plastikfolie vom Klebestreifen ab, um den Kleber freizulegen.
-
-
-
Richte die Blende sorgfältig aus und setze sie auf den Klebestreifen.
-
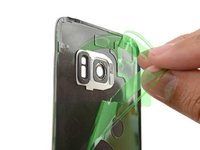
Drücke die Blende rundherum mit deinen Fingern fest, damit der Kleber gut anhaftet.
-
Reinige das Glas der Blende mit einem Mikrofasertuch.
-
-
-
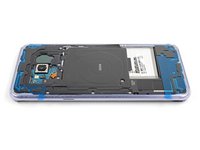
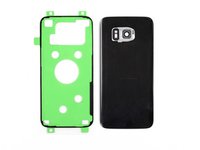
Finde heraus, wie die Stützstreifen an den Klebeflächen verlaufen, indem du sie an den Klebstoffresten und dem Rahmen des Smartphones ausrichtest.
-
Benutze ein Öffnungswerkzeug und hochkonzentrierten Isopropylalkohol, um alle Klebereste vom Rahmen zu entfernen.
-
Wenn du die Rückabdeckung wieder benutzen willst, dann musst du auch hier alle Klebereste sorgfältig entfernen.
For my Galaxy S7, it appeared to me there were some minor placement inconsistencies (a millimeter or two) where the Back Cover Support adhesive pads (support strips) were on the backing sheet versus the actual phone. Difficult to know for sure since it is hard to tell where the original pads were after the back cover is pried off. I removed the clear backing to expose the strips and blocks, but placed the clear backing covering 80% of the phone as I transferred one portion of the unconnected adhesive strips at a time where they best appeared to be needed. This falls in the category of tweaking.
The adhesive sheet for the back cover was 100% accurate.
You should be very careful with isopropyl alcohol when removing the glue from the NFC antenna part. I did this on my Galaxy S9 and because the glue is very strong i put on a lot of IPA, and unfortunately it also dissolved the coating that is on top of the NFC antenna or whatever that trace is. So be careful to only get the IPA on the hard plastic and not on this trace with what looks like it's a black sticker on it or any other parts really.
-
-
-
Ziehe die durchsichtige Folie vom Stützklebstreifen ab, um den Kleber freizulegen.
-
Lege den Streifen sorgfältig mit der klebrigen Seite nach oben auf den Handy-Rahmen, und achte dabei darauf, die klebrige Oberfläche nicht zu berühren.
-
Richte den Klebestreifen so auf dem Rahmen aus, das die Kontouren des Klebestreifens mit denen des Rahmens übereinstimmen.
-
Wenn du zwei kleine Stützklebestreifen hast, wiederhole diesen Vorgang für beide Streifen.
This process of putting the colored plastic with adhesive onto the phone and then sandwiching the back panel on top seemed counter-intuitive so I decided to remove the colored plastic and place the adhesive + clear plastic onto the back of the phone’s guts.
DON’T BE ME!
Follow the instructions and save yourself close to an hour of hassle. The adhesive loves the colored plastic way more than the clear.
It actually worked!!!
-
-
-
Lege die Rückabdeckung vorsichtig auf die freiliegenden Stützklebestreifen ab. So wird sichergestellt, dass die Klebestreifen richtig auf der Rückabdeckung positioniert sind.
I found it easier to lower the back cover onto the support strips using a suction cup. I felt like this gave me more control over placement and my fingers didn't get in the way on the edges.
-
-
-
Entferne die Rückabdeckung.
-
Drücke die Stützklebestreifen gut mit den Fingern an der Rückabdeckung fest.
-
Ziehe die farbige Schutzfolie ab, um den Kleber freizulegen.
-
-
-
Entferne mit einem Plastiköffnungswerkzeug und hochkonzentriertem Isopropylalkohol alle Kleberreste vom Rahmen des Smartphones.
-
Wenn du die alte Rückabdeckung wieder einbauen willst, musst du auch bei ihr alle Kleberreste beseitigen.
Scrape and peel the adhesive, using goo gone only after systematically scraping the adhesive as much as possible. The goo gone should only be used to clean up residue once manual scraping has been completed, otherwise the adhesive will become tacky and only scrape off in microscopic layers at a time, which takes forever to remove.
-
-
-
Ziehe die durchsichtige Schutzfolie vom Randklebestreifen ab, um den Kleber freizulegen.
-
Halte den Streifen an seinen Laschen fest und richte die lange Kante des Klebestreifens sorgfältig mit der Kante der Rückabdeckung aus.
-
Lege den Klebestreifen auf die Rückabdeckung ab und drücke ihn mit den Fingern an der Abdeckung fest.
-
Ziehe die farbige Schutzfolie vom Randklebestreifen ab, um den Kleber freizulegen.
(Galaxy S7 kit): I peeled away the clear liner (Step 1), aligned it to the cover edge (Step 2) and pressed it down (Step 3).
When I peeled off the tabbed "coloured" liner (Step 4), it turned out to be two layers: a clear, tabbed one that came away and a green one consisting of a central part and a thin, outer strip that still covered the adhesive.
This thin strip had been partially lifted by the removal of the clear tabbed layer, so I started to remove it all. As I slowly and carefully pulled it, it tried to lift the adhesive strip itself off the cover so I held that down with the tweezer points. That still left the main green part in the centre of the case, but that was easily removed.
However, when I turned the back cover over I saw that where the adhesive strip had lifted slightly it had detached some of the cover's coloured film, leaving it buckled and a bit of a mess.
When I tried to pull away the cover strip, the adhesive stuck to it. I also have no idea why the clear liner and green liner are attached to each other.
The pictures don’t match what is received for the Galaxy S8+. It’s also not clear where to attach the perimeter adhesive. On the lip of the back cover or just inside the well area. In addition, after exposing the adhesive (after removing the clear side), no matter how weel you pre-align the position, you can’t count on the adhesive to stick to whichever method questioned above, without some of it not releasing cleanly from the colored backing. Yes. firm pressure was applied before moving a little further down. At times the adhesive stuck so strongly to the colored backing, it stretched the adhesive out of shape.
I have repaired hundreds of laptops and all in ones, so I understand there are subtleties in a repair, and I found it quite confusing replacing the battery and fingerprint sensor and other necessary parts related to doing that repair with the either inaccurate, outdated, or lack of detail provided (but much needed) in this guide.
If you're like most people and the original back glass (S8) cracked upon removal, and you've ordered and received a plastic replacement from iFixit, remove the adhesive that comes on the replacement plastic back panel, and use the adhesive in this kit. The back panel adhesive in this kit is THICC and seems like it would create a much better seal than what comes preinstalled on the replacement back panel.
-
-
-
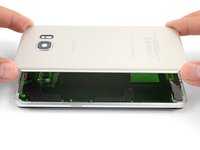
Richte die Rückabdeckung mit dem Smartphone-Rahmen aus und lege sie darauf, um das Smartphone wieder zu verschließen
-
Drücke das Smartphone ringsherum mit den Fingern fest.
-
Lege ein paar Bücher etwa eine halbe Stunde lang auf die Rückabdeckung, damit sich der Kleber gut verbindet.
I kind of wonder if any of the adhesive is even necessary, depending on what kind of case you have. My case slides over the phone and holds everything in place very securely. Considering that I'll have to replace the battery again at some point, I'm not looking forward to dealing with the adhesive again.
-


Rückgängig: Ich habe diese Anleitung nicht absolviert.
135 weitere Personen haben diese Anleitung absolviert.
Besonderer Dank geht an diese Übersetzer:innen:
100%


Diese Übersetzer:innen helfen uns, die Welt zu reparieren! Wie kann ich mithelfen?
Hier starten ›


16 Kommentare
The flex cable for the fingerprint sensor is so short and delicate that it’s fiendishly difficult to locate and snap in. You only have a very narrow gap between the back cover and the phone, it wants to jump out of position if you misalign at all, and you can’t reach under there with normal size fingers. Not only that, it’s done with the rear cover adhesive in place so if that touches, it sticks.
I got it snapped on, and the flex cable broke at the same moment. So, no fingerprint sensor for me. Also, the new back cover arrived broken. If it was usable, the way to do it IMHO is to attach the flex cable first, then push the fingerprint sensor assembly on to the new back cover adhesive (it goes on from behind), then close the back cover.
Hey William,
If you bought the back cover from iFixit, please contact our support team here and we will get a replacement sorted out for you!
P.S. I got the battery and cover because the old cover was warped and separated, figured may as well replace the battery in a 2-year-old phone. Turns out, the battery was swollen and huge and it had pushed the back cover open. Not a good situation. So if your back cover is coming off, suspect that battery.
P.P.S. The fingerprint sensor flex cable connector probably could be manipulated into position with the tweezers from the tool kit and pressed down into place with the plastic screwdriver thingy, Just hover the back cover over it with your third hand (or a helper).
Will the phone still be water-resistant after this repair?
Hi Shai,
The phone won’t be as water resistant compared to when it is brand new. However, this is true even if you didn’t repair the phone—adhesive seals break down and lose water resistance over time.
There are also WATERPROOF phone covers you can buy. Why just settle for water resistant GLUE?
Ben -
Do you have custom-cut adhesive strips for Samsung galaxy s9+? Can’t find it in store.
Hi Michael,
We are currently in the process of sourcing the adhesive. Please check back in the future!
where i can buy the adhesive
It’s a little confusing going through the battery removal for the Samsung S10+ and then being sent to the Samsung S10 installation process instead of the Samsung S10+ install. Although moderately intuitive, it would be nice to have a specific article for a specific phone that identifies the actual process with the physical parts involved since The S10 and the S10+ are not the same back covers and the same parts involved.
Additionally, the inner wireless connector plate NEEDS to be connected to validate a connection otherwise the battery will not power the phone. This is a Requirement on the S10+.
I need to do the front gasket...is there an article for the front, I'm replacing my screen. Also, my child lost the earpiece mesh, is there something else I can use? Thanks
I got the S9 battery kit and all of the precut adhesive pieces had been cut backwards. The stiff green/blue plastic was on the wrong side. I had to remove the adhesive pieces entirely and try to use the clear plastic backing as the transfer agent instead of the stiffer, cut plastic pieces. I eventually did get it installed but it took a lot longer than planned.
Galaxy S7: I found the descriptions a bit confusing (for the different devices), but I got it right. I hope it holds now! :-)
The tip about the alcohol and the charging coil and that the alcohol is NOT compatible with the soft plastic parts is extremely important! In my case, some of it dissolved too, so I hope the phone wasn't damaged. Be sure to add it!