Einleitung
Ersetze mit Hilfe dieser Anleitung die Festplatte deines iMacs. Dazu musst du das Display ablösen und den linken Lautsprecher verschieben.
Bei dieser Reparatur wird in einigen Schritten auch beschrieben, wie du die Festplatte durch eine SSD aufrüsten kannst. Insbesondere wird gezeigt, wie der Temperatursensor der SSD installiert wird, so dass der Lüfter des iMac mit der richtigen Drehzahl arbeitet.
Bevor du am iMac arbeitest: Ziehe den Stecker heraus, drücke und halte dann den Einschaltknopf 10 Sekunden lang, um die Kondensatoren im Netzteil zu entladen.
Sei sehr vorsichtig! Berühre keine Kondensatorleitungen und offenliegenden Lötstellen auf der Rückseite des Netzteils.
Ersetze mit Hilfe dieser Anleitung die Festplatte deines iMacs. Dazu musst du das Display ablösen und den linken Lautsprecher verschieben.
Bei dieser Reparatur wird in einigen Schritten auch beschrieben, wie du die Festplatte durch eine SSD aufrüsten kannst. Insbesondere wird gezeigt, wie der Temperatursensor der SSD installiert wird, so dass der Lüfter des iMac mit der richtigen Drehzahl arbeitet.
Bevor du am iMac arbeitest: Ziehe den Stecker raus, drücke und halte dann den Einschaltknopf 10 Sekunden lang, um die Kondensatoren im Netzteil zu entladen.
Sei sehr vorsichtig! Berühre keine Kondensatorleitungen und offenliegenden Lötstellen auf der Rückseite des Netzteils.
Was du brauchst
-
-
Reparaturen sind relativ schwierig, wenn der iMac aufrecht steht und man keine iMac Reparaturhilfe verwendet. Man kann den iMac zwar auch für Reparaturen hinlegen, jedoch ist es einfacher und schneller den iMac in aufgerichtetem Zustand zu reparieren.
-
Wenn du die Reparaturhilfe aus Karton von iFixit hast, dann baue sie erst mit Hilfe dieser Anleitung zusammen.
-
-
-
Beginne an der linken Seite des Bildschirms, auf der Seite der Ein-/Aus-Taste, und schiebe das iMac Opening Tool zwischen Bildschirm und Gehäuse.
-
-
-
Benutze das Werkzeug wie einen Pizzaschneider - rolle es entlang der Fuge zwischen Bildschirm und Gehäuse und es wird den Schaumstoffkleberstreifen durchschneiden.
-
Fahre mit dem Werkzeug entlang der linken Displayseite.
-
-
-
Fahre mit dem Werkzeug um die obere linke Ecke.
-
-
-
Schneide den Rest des Klebers an der rechten Seite des Gehäuses bis ganz nach unten durch.
-
-
-
Lege den iMac mit der Oberseite nach oben auf einen Tisch.
-
Beginne an der oberen rechten Ecke des iMacs und schiebe eine Kunststoffkarte zwischen Bildschirm und Gehäuse.
-
-
-
Verdrehe die Plastikkarte leicht, um den Abstand zwischen Bildschirm und Gehäuse zu vergrößern. Trenne allen Kleber in der Nähe der Ecke auf.
-
-
-
Schiebe die Karte in Richtung der Bildschirmmitte, um den Rest des Klebers durchzutrennen.
-
-
-
Schiebe die Karte zurück in die Ecke des Bildschirms und lasse sie dort stecken, um zu verhindern, dass der Kleber wieder anhaftet.
-
-
-
-
Schiebe eine zweite Karte in den Spalt zwischen Bildschirm und Gehäuse in der oberen linken Ecke.
-
-
-
Drehe die Karte leicht, um den Abstand zwischen Bildschirm und Gehäuse zu vergrößern.
-
-
-
Schiebe die Plastikkarte in Richtung Mitte und höre wieder vor der Mitte auf, um die iSight Kamera nicht zu beschädigen.
-
-
-
Setze die Karten, wie im Bild gezeigt, nahe an den Ecken ein und drehe die Karten leicht, um den Abstand zwischen Gehäuse und Bildschirm zu vergrößern.
-
Wenn Teile des Bildschirms sich nicht zu lösen scheinen, dann nimm eine weitere Karte, um in diesen Bereichen den Kleber ein weiteres Mal durchzutrennen.
-
Beginne, die obere Seite des Bildschirms vom Gehäuse abzuheben.
-
-
-
Während du den Bildschirm mit einer Hand nach oben hältst, trenne mit der anderen Hand das Versorgungskabel ab, welches zum Bildschirm führt.
Der Stecker muss seitlich wie die meisten anderen Stecker in diesem Modell komprimiert werden, um ihn aus der Buchse auf dem Logicboard zu ziehen. Die Zugrichtung ist parallel zum Logicboard in Richtung Oberkante des iMac. Ziehen ohne seitliches Zusammendrücken der Backen am Stecker könnte den Stecker oder die Buchse beschädigen.
These instructions are unclear. They imply the cable can just be pulled out but this step had me stuck for a bit. Searching the webs, I discovered that there are little tabs on either side of the connector. I used my prod tool and poked one side and the connector came out a little. I poked the other side the connector came out without a fight.
As others have mentioned later on, it is not necessary to fully remove the screen or disconnect these cables. I managed with just the screen held wedged open with a small cardboard box.
-
-
-
Klappe die Metalllasche am Anschluss des Bildschirm-Datenkabels um.
-
Trenne das Displaydatenkabel ab.
-
-
-
Hebe den Bildschirm soweit an, dass er fast senkrechte ist.
After rocking the display back and forth a bit, I found it helpful to use my iMac opening tool to gently slide ever so slightly underneath the bottom of the glass to cut the adhesive. This was with the display lowered back into it its normal position. I just worked about 1 millimetre deep at a time and eventually cut through the ~8” adhesive strip at the bottom centre.
It's possible to skip this step and go to step 24, leaving the display attached. You'll want to open the display just enough to replace the drive, with the machine upright and supported so the display doesn't swivel (I fold up a small pillow and wedge it in there). This way you don't have to worry about damaging the display when removing it, or aligning it when replacing it (which can be difficult to do solo as it's big and heavy).
Using a T8 with a short handle is helpful here, and make sure it's well magnetized so you don't drop the screws for the hard drive (just leave the other ones in the speakers).
-
-
-
Fasse die kleine Lasche am Ende eines der Klebestreifen am unteren Displayrand an und ziehe sie zur Oberkante des Displays hin, so dass er sich ablösen.
-
Wiederhole diesen Schritt für den anderen Klebestreifen und entferne ihn.
-
-
-
Hebe den Bildschirm aus dem Rahmen nach oben und entferne ihn anschließend aus dem iMac. Lege das Display auf eine flache und weiche Oberfläche mit dem Bildschirm nach unten.
-
Möglicherweise musst du an einer Seite anfangen, den Bildschirm langsam anzuheben, um den Rest des Klebebandes zu lösen.
-
-
-
Entferne die beiden 10 mm Torx T10-Schrauben, mit denen der linke Lautsprecher befestigt ist.
-
-
-
Schiebe den abgelösten linken Lautsprecher soweit nach links, dass die Schrauben der Festplattenhalterung sichtbar werden.
-
-
-
Ziehe das SATA-Kombokabel gerade nach oben, um es von der Festplatte abzulösen.
-
-
-
Entferne die beiden 7,3 mm Torx T8 Schrauben, mit denen die linke Festplattenhalterung am Rückgehäuse befestigt ist.
-
-
-
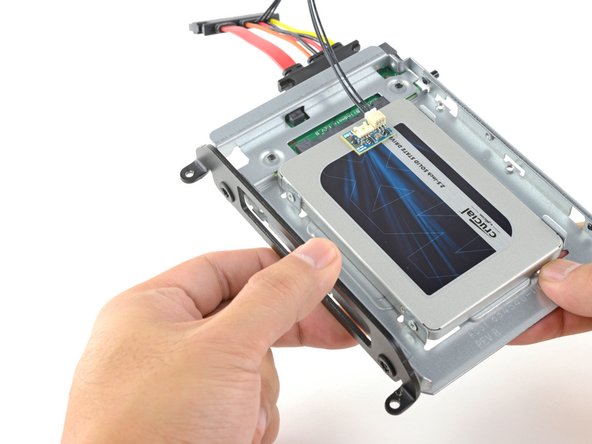
Fasse die Festplatte und die linke Festplattenhalterung zusammen an.
-
Kippe die linke Seite vom Rückgehäuse weg und schiebe die Einheit nach links.
-
Entferne die Festplatte und die linke Festplattenhalterung vom iMac.
-
-
-
Entferne die vier 8,1 mm Torx T8 Einschraubstifte von der Festplatte und übertrage sie auf die neue Festplattenhalterung.
-
-
-
Richte die Steckkontakte der SSD mit den Anschlüssen des Metall-Einschubs aus.
-
Drücke das Laufwerk fest gegen die Anschlüsse des Einschubs, bis die SSD gut sitzt.
what if I’m installing a hard drive?
Didn’t bother with the SSD caddy. Some 3M sticky pads did the trick!
Been using them for years...works great.
Two thoughts on SSD replacement/upgrade:
1) It would help if some references were made to help us determine what we need in terms form factors. I’ve never used an SSD and see a 2.5” one that would work, but I don’t know if 2.5” SSDs are different (in form factor) from 2.5” HDs. A lot of us are still learning about SSDs and isn’t that what this site is about? (Learning new things about hardware and using hardware?)
2) I’m not clear if I definitely need a new temperature sensor if I put in an SSD or if
Can I buy the kit without the SSD. I'm thinking of replacing my 3TB hard drive with a 4TB SSD.
Also, would you happen to know what the maximum hard drive dimension that can fit inside of this iMac? I may try a 14TB hard drive instead.
A 14Tb HDD does not represent any problem. But I will care about rising temperature. Must attach a heat sensor. If rise to high, it will suddenly shutdown to protect it.
-
-
-
Benutze einen Kreuzschlitzschraubendreher, um die vier silbernen Schrauben (zwei auf jeder Seite) an den Kanten der SSD einzusetzen, um sie am Einschub zu befestigen.
-
-
-
Stecke das sensorfähige Kombo-Kabel in den Anschluss am Einschub ein.
Is the thermal sensor needed? I fitted a replacement SSD and it’s all back together and the iMac’s fans are fine. They don’t go into full max speed mode.
If you have a problem with the fans, you can always use Macs Fan Control (free) to set the speed. The sensor is not needed.
-
-
-
Ziehe die weiße Schutzfolie von der kleinen Platine des Thermosensors ab, so dass die Klebefläche frei wird.
-
Bringe die Platine an einer freien Stelle der Metalloberfläche der SSD nahe beim SATA-Anschluss an.
-
Biege die überschüssigen Kabel des Thermosensors aus dem Weg, so dass sie den Einbau des Einschubs nicht behindern.
Great pics ! Is that “temp sensor board” is already on my HDD IMAC ?? Or must I buy one ?
Don’t bother with the thermal sensor. I didn’t fit one and the iMac is working fine and no fans are kicking in.
Instructions say to attach sensor to the SSD, but all pictures show it being attached to the SSD carrier. This may not represent accurate SSD temp as much of the carrier dissipates the heat absorbed from the SSD
Confirmed, no need for the extra temp sensor on Mid-2015 iMac. (EMC 2806, Mid-2015 27" iMac). Just changed the old 1TB HDD to SSD, no extra fan RPM after power on.
-
-
-
Übertrage die Montagestifte der alten Festplatte mit Hilfe eines Torx T8 Schraubendrehers auf die Seiten des Einschubs.
-
-
-
Übertrage alle Halterungen, die an der alten Festplatte angebracht waren, auf den Einschub.
i don't have a combo cable.i also didn't have asata drive. just a blade ssd. i don't see wwhere i could add a cable
-
-
-
Verbinde das Kombo-Kabel des iMacs mit dem neuen thermosensorfähigen Kombo-Kabel.
-
-
-
Schiebe den SSD-Einschub anstelle der alten Festplatte ein.
-
Führe die Kabel so, dass sie keine anderen Bauteile stören.
The SATA cable on my Late 2012 was not long enough to comfortably attach to the end of the temperature sensor array after it was plugged into the new SSD. I had to fold the array and slide it under the SSD and housing. There was much resistance to the folding so I took it slowly to let the wires adjust gradually to the fold so they would not break.
Unfortunately, the adapter that comes with it isn't long enough to avoid pushing against the screen in the front. One week after upgrading to SSD my screen fell off shattering and breaking the power connector on the systems board. A new screen is ordered but I'm hoping the power connector isn't damaged beyond repair. I'm going to try to adhere the HD adapter to the back inside of the case with 3m adhesive to avoid pressure against the screen.
As a newbie, the only other upgrade I have done is to replace my iPhone 7 battery. I had trouble on reassembly.
This is a great upgrade guide, but it would be important to me to see the reassembly instructions including the cautions.
For example, I had issues with reattaching the plugs in the phone. I could see having an issue with them here, as well as repositioning the display back into the cabinet.
I do PCB board repair work and repair pinball machines. But I won’t try this.
Try 3m double sided tape from Amazon, it available in 3mm width which is ideal for iMac screen. It has a very thin foam and is much better quality than the cheap Chinese kits available on Amazon. You will have to trim it to size with a sharp craft blade as you fit. Don’t risk your screen falling off from using cheap tape in the so called fitting kits!
In my Late 2012 27" iMac I Scotch-taped the SATA connector to the case to stop it from pushing against the screen after reassembly.
Only 39 steps!
Is it possible to clone the internal disk and have the imac boot off the external SSD?
The extension cable is too long. I folded it over carefully & stuck it down to the case using a double sided sticky pad. Photo here
-


Vergleiche dein Ersatzteil mit dem Originalteil - möglicherweise musst du fehlene Bauteile übertragen oder Schutzfolien abziehen, bevor du es einbauen kannst.
Um dein Gerät wieder zusammenzusetzen, folge den Schritten in umgekehrter Reihenfolge.
Entsorge deinen Elektromüll fachgerecht.
Hat die Reparatur nicht ganz geklappt? In unserem Forum findest du Hilfe bei der Fehlersuche.
Rückgängig: Ich habe diese Anleitung nicht absolviert.
47 weitere Nutzer:innen haben diese Anleitung absolviert.
Besonderer Dank geht an diese Übersetzer:innen:
100%

Diese Übersetzer:innen helfen uns, die Welt zu reparieren! Wie kann ich mithelfen?
Hier starten ›

10 Kommentare
What’s the difference with this guide? iMac Intel 27" Retina 5K Display Festplatte Austausch
Hello, I have an iMac (Retina 5K, 27-inch, 2017) and I would like to change my hard disk, which is a 3.5GHz 1TB Fusion Unit, for an SSD disk, would you recommend doing it? And if so, what reference or brand do you recommend to do it?
I can confirm the OWC thermal sensor cable is not needed for HDD to SSD upgrade. I successfully upgraded my 2017 5k iMac fusion drive’s HDD to WD blue 2TB SATA3 ssd without it and the fans speeds don’t ramp up at all. Anyhow thanks for your guides Ifixit on how to DIY. I successfully upgraded my 128gb NVME to a 1TB NVME and to a SATA3 ssd for storage. Transfer speeds are insane and my boot up time now only takes 12 seconds compared to 32 seconds previously. I also upgraded my cpu from the i5-7600k to the i7-7700k. My 2017 5k iMac is blazing fast now. Thanks again ifixit.
Successfully upgraded to a 2TB SSD from the 2TB Fusion drive. As soon as I turned on Bootcamp, the Fusion drive went nuts for a few weeks I think because it prioritized the Windows side onto the SSD and the Mac side onto the spinning drive. It eventually corrected itself but it was a helluva time. And it was time for a fresh hard drive anyway. $500 is much cheaper than a new iMac. Highly recommend this one. This was way easier than my upgrades to the 2009 and to a Mac Mini.
Excellent instructions. The process is straightforward - the only tricky bit is reinstalling the screen accurately. There seems to be some conflicting views on the internet about the best way to do it and which adhesive strips to use - the 2012-2015 strips now seem to be supplied for later models, and they worked fine on my 2017 iMac.
My advice is just to take take it all very steadily and always read one stage ahead before you start on your next stage just to know where you are going next. I installed a 2TB Crucial SSD and the results are very good.
ive been looking for info on the blade drive as wiping a newly installed SSD and installing OS works, but what is best practice for this? what do we use the blade for after, is it just wiped and left redundant? - as for the temp control, just install Macs Fan Control.
i did this but then my imac showed a folder with a question mark on it
Great guide! Amazing work here.
Noch nie zuvor hatte ich so eine professionelle Anleitung gelesen.
EINFACH SUPER
What’s the point of this? You run the wheel around the outside, and then you lay it down anyway to pull the glass and do the rest. The wedge is not needed.
ebay - Antwort
I have a story to tell about this teardown. It all went wonderfully well until after I completed the process and attempted to format my new SSD drive only to discovery that the capacity of the drive was 256GB… not the 2TB I was sure I had ordered. iFixit was very supportive and helpful in sending me a new set of sticky tape strips and and RMA to return the SSD and some of the other parts.
I finally had received my new set of strips and the 2TB SSD…. I figured, piece of cake… I already know how to do this… but I watched the video again and started following the teardown…
…apparently the new sticky tape strips was way more powerful that the original tape and while using the pizza cutter tool and not advancing much, I proceeded to use one of the iFixit credit card style wedges…. I now have 2 pretty severe cracks on the glass of my display, which as clearly explained by @mayer can only be replaced by an entire display… which runs at about $500. Cosmetically it looks horrible, but it works… for now.
Erich Hentschel - Antwort