Diese Übersetzung enthält möglicherweise noch nicht die neuesten Änderungen der Original-Anleitung. Hilf mit, die Übersetzung zu aktualisieren oder sieh dir die Original-Anleitung an.
Einleitung
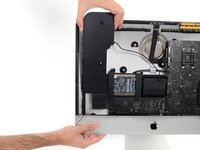
Hier wird der Austausch des linken Lautsprechers gezeigt.
Was du brauchst
-
In diesem Schritt verwendetes Werkzeug:iMac Intel 21.5" Cardboard Service Wedge$4.99
-
-
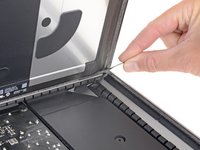
Beginne an der linken Seite des Displays, auf der Seite der Ein-/Aus-Taste, und schiebe das iMac Opening Tool zwischen Das Glaspanel und das Rückgehäuse.
-
Arbeite vorsichtig! Das Glas bricht leicht, wenn es zu stark belastet wird. Erwärme die Kanten mit einem Haartrockner und löse das Klebeband ab, wenn die Raumtemperaturen niedrig sind.
A thin razor blade works well, but be careful to angle the sharp edge AWAY from the glass. Whatever tool you use you can easily scratch the paint on the back of the glass, which will show up when you look at he reassembled Mac on an angle later.
This was a great guide!
-
-
-
Benutze das Werkzeug wie einen Pizzaschneider - rolle es entlang des Schlitzes und es wird den Schaumkleber in der Mitte durchschneiden.
-
Fahre mit dem Werkzeug entlang der linken Displayseite.
-
-
-
Schneide den Kleber entlang der oberen Displayseite durch.
-
Du solltest mit dem Gerät immer etwas durch den Teil vor- und zurückrollen, den du bereits durchgeschnitten hast, um so viel wie möglich von dem Kleber zu lösen.
-
-
-
Schneide den Rest des Klebers an der rechten Seite des Gehäuses bis ganz nach unten durch.
-
-
In diesem Schritt verwendetes Werkzeug:Plastic Cards$2.99
-
Beginne an der oberen rechten Ecke des iMacs und schiebe eine Kunststoffkarte zwischen Display und Rahmen.
So sorry. Thanks for that caution.
Using suction cups (the ones that were made for removing the magnetic front glass on the 2011 and earlier iMacs) work well too. Place one in each top corner, while the Mac is lying face up on a table, and gently pull and it will separate the display from the main body. You might need to do a little more slicing around the edges if you did not get all the way through the first time with the roller. Then you can lift the display up at an angle to disconnect the cables.
This was a great idea, worked well for me. Thanks!
Florin -
-
-
-
Drehe die Plastikkarte leicht, um den Abstand zwischen Display und Rahmen zu vergrößern.
-
Bewege die Karte vorsichtig und langsam, und beanspruche das DIsplayglas nicht übermäßig. Eine Lücke von einem halben Zentimeter ist ausreichend.
-
-
-
Schiebe die Karte in Richtung der Mitte des Displays, um den Rest des Klebers an der oberen rechten Ecke durchzutrennen.
-
-
-
-
Schiebe die Karte wieder in die obere rechte Ecke und lasse sie dort stecken, um zu verhindern, dass der Kleber das Display wieder festklebt.
-
-
-
Schiebe eine zweite Karte in den Spalt zwischen Display und Rahmen an der oberen linken Ecke des iMacs.
-
-
-
Drehe die Karte vorsichtig nach oben, um den Abstand zwischen Display und Rahmen leicht zu vergrößern.
-
-
-
Schiebe die Plastikkarte in Richtung Mitte und höre wieder vor der iSight Kamera auf.
-
-
-
Schiebe beide Plastikkarten zwischen Display und Gehäuse und fange an, sie leicht zu drehen, um den Abstand zwischen Gehäuse und Display zu vergrößern.
-
Beginne, die obere Seite des Displays vom Rahmen hochzuheben.
-
-
-
Während du das Display mit einer Hand nach oben hältst, trenne mit der anderen Hand das Stromkabel des Displays. Achte darauf, dass du das Kabel nur an der Plastiklasche herausziehst, und nicht an den farbigen Drähten.
-
-
-
Klappe die Metalllasche am Anschluss des Display-Datenkabels mit einem Spudger hoch.
-
Ziehe das Display-Datenkabel vorsichtig aus seinem Sockel auf dem Logic Board.
-
-
-
Hebe den Bildschirm an, bis er fast senkrecht ist.
-
-
-
Fasse die kleine Lasche am Ende einer der Klebestreifen an der Unterkante des Displays, ziehe sie zur Oberkante des iMacs hin und entferne sie.
-
Wiederhole das Ganze für den anderen Klebestreifen.
The roller tool for slicing open the display works great for this step. Get in there like using the card and roll across the bottom to slice through the remaining adhesive.
-
-
-
Hebe den Bildschirm nach oben aus dem Rahmen heraus und entferne ihn aus dem iMac .
-
Möglicherweise musst du an einer Seite den Bildschirm anheben, damit sich der Rest des Klebebandes ablösen lässt.
After removing the display, I also removed the 3 screws for the processor fan, disconnected the power connector for it and set the fan shroud aside. Disconnecting the remaining cable (similar style to 1 of the cables for the display) that is in the way of the RAM chips is all that's left to do. I was then able to access and quickly remove the two Apple-provided RAM chips, and replace them with 3rd party RAM. Turning the iMac on its side, so that it's in a position where you're physically putting the RAM chips DOWNWARD into their respective slots is the best way to go about uninstalling and reinstalling the chips. Using a narrow but long'ish plastic spudger tool is the best way to defeat the spring-tabs which hold the RAM chips in place. After removing the LCD display, changing the RAM is about a 10 minute process!! And I'd SURE prefer not to remove all the parts and risk damage to the iMac via the standard procedure listed. As per usual, take your time and work gently :-)
Teardown the whole machine just to change RAM? While preparing to comment on this procedure I just noticed the comment made by Mitch K above. I ran pretty much the same procedure that he describes this afternoon (steps 1-23, 43-45, and step 55). Then I swapped out the original 2x4GB RAM chips for 2x8GB chips by reaching behind the logic board, releasing the spring retaining clips one chip at a time (starting with the chip further away from the logic board), pivoting the RAM towards the back of the machine, and then carefully sliding it out of the slot. I easily slid in the new chips and then pivoted them to lock them down. No hassle, no time lost. As Mitch K states above, not only is this “shortcut” method much quicker and easier, but it provides less risk of damaging cables, sockets and other delicate components during a total teardown. Why mess with the power supply board just to change RAM? I do not advise to follow the current iFixit.com procedure written by Sam Lionheart, regardless of user skill-level.
THAT sounds one !&&* of a lot easier than the full tear down. I wonder if there’s a video of the process described by Mitch K? Adding that to these verbal instructions would really help relieve the apprehension and anxiety around the process! I do sometimes find the additional warnings, though appreciated from a “safety first” perspective, are somewhat overstated. It’s been a very long time since I shorted out RAM, or fried a PCB, or broke a connector, regardless of how finicky, fragile or awkwardly designed and positioned. I may have WANTED to break something, and the air might be blue for a few seconds, but inevitably, things go back together, the start button gets pressed, the startup chime sounds, and we’re in business. Practice DOES make as close to perfect we are likely to get.
Mitch has the exact method that works a treat. You don’t need to follow steps 24-37 and also 40-63. Step 51 is the step to remove the camera cable and is needed. Steps 38 and 39 are for the Fan. That is all that is needed. Done quite a few like this.
Be careful not to drop the RAM down the back of the logic board!
By NOT removing all the other stuff you can avoid either damaging it or forgetting to plug in a cable.
I just trued this shortcut and it was not successful. I was not able to seat both RAM chips with this shortcut, and managed to slightly damage one of the retainer clips. I simply could not manipulate the chips into and out of the slots effectively without taking everything apart as described in the full set of steps.. I ended up retracing my steps and following the entire procedure, carefully, and that worked without incident. So, bottomline, it is definitely more work to follow all the steps but from my experience, it is decidedly safer. Your mileage may, of course, vary. It was successful in the end, and I swapped out the hard drive with an ssd during the same procedure and my machine is very, very much faster.
I have completed by following the Mitch K post and it is much easier than stripping down the whole thing, just be aware that to remove and replace the ram chips means working in a tight space, you need slim fingers and don’t be tempted to use force, take your time.
Well, I have slim fingers, but they are 60 years old, and they don’t work like they used to! LOL.
Agree with Mitch K’s procedure. The only added tip I would throw in is to use two 45 degree tweezers with their plastic covers still installed to easily pop loose the RAM. I couldn’t get the plastic spudger tool to work myself, but the tweezers easily reach the RAM clips. Just make sure the plastic covers are installed and you won’t be in danger of scratching or shorting anything out.
So thankful I discovered these comments. Saved me a TON of time! Thank you!!
These comments were very useful. Thank you. I just needed to modify a pair of tweezers to allow me to seat the new RAM more easily. The ifixit screwdriver wasn't able to turn some of the screws as they were installed too tightly, and I didn't want to wait to order and reveive a pair of right angled Torx screwdrivers that would give me more leverage to get those boards off.
-
-
-
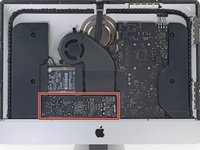
Entferne folgende fünf Kreuzschlitzschrauben, welche die untere Displayhalterung befestigen:
-
Vier 3,2 mm Schrauben
-
Eine 1,7 mm Schraube
-
-
-
Entferne die untere Displayhalterung von der Gehäuseöffnung.
Of all the parts of this entire procedure, replacing this one piece is the hardest part! The screws are tiny and they just don’t seem to want to grab the support piece. Also it seems to perform no function which is also annoying.
I left mine out. LOL
Line up the screw holes and press on the bracket from the back to help the screws grab. If your fingers are too big, press with the flat side of your spudger. As long as there’s no gap between the bracket and the iMac’s frame, the screws should grab easily.
I put it in at a slight angle lining up the right hand side holes, screwed in the two screws and gently pressed my finger behind it on the rest
If you only want to replace the HD and RAM, take a big shortcut and leave the logic board in, as well as all the parts needed to remove it (speaker, power supply etc). Once the display is removed, just take out the fan and the top two logic board screw. There is than sufficient space to gently remove and insert the two ram modules. HD can easily be replaced with an SSD by just removing the HD mounting brackets...
Voces mudaram de modelo iMac, desta foto para proxima, esse modelo desta foto nao tem slot nvme. O da proxima foto sim. Voces me fizeram comprar un nvme por engano...
-
-
-
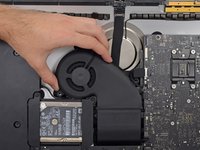
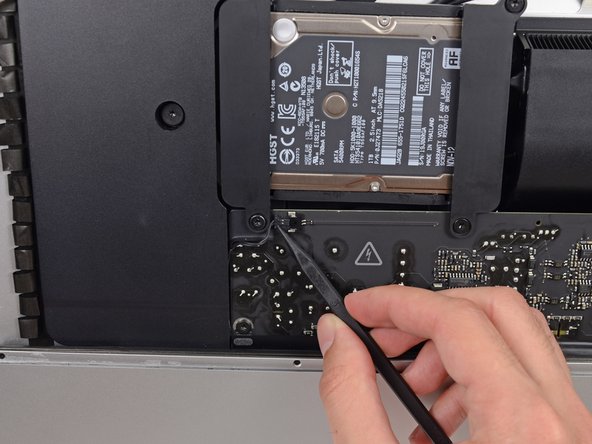
Löse den Stecker des Lüfterkabels aus seinem Sockel auf dem Logic Board.
-
-
-
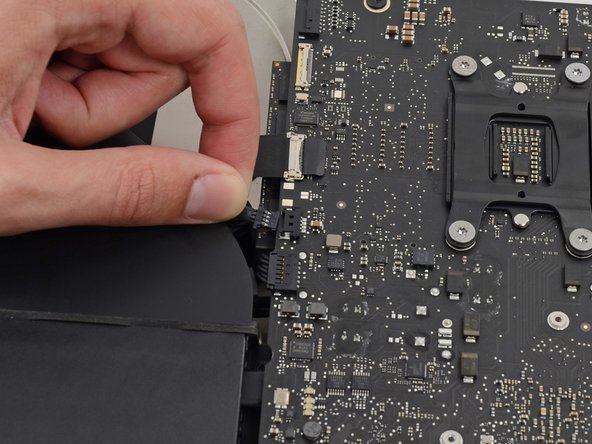
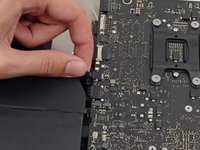
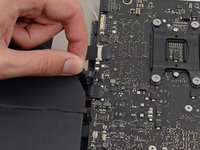
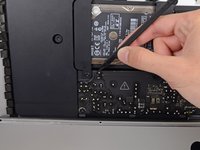
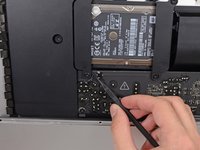
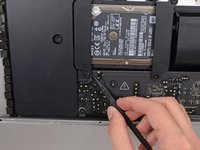
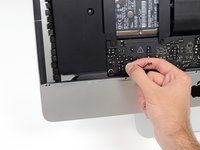
Ziehe das Kabel zum linken Lautsprecher vorsichtig aus seinem Sockel auf dem Logic Board.
-
-
-
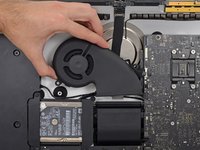
Fädle das Kabel zum linken Lautsprecher aus, indem du es gerade aus der Halteklammer hinten am Rückgehäuse herausziehst.
-
-
-
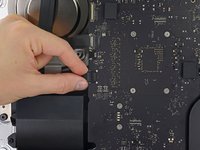
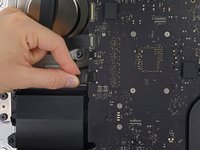
Löse mit der Spudgerspitze den Stecker der Einschalttaste aus seinem Sockel auf dem Logic Board.
-
-
-
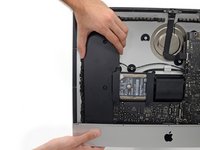
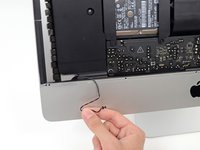
Entferne die beiden 10,0 mm Torx T10 Schrauben, welche den linken Lautsprecher am Rückgehäuse befestigen.
-
-
-
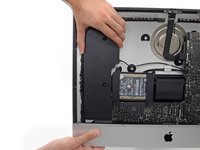
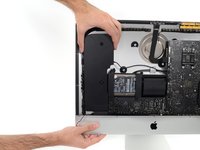
Hebe den linken Lautsprecher etwas mehr als einen Zentimeter hoch, bis das Kabel zur Einschalttaste sichtbar wird.
-
-
-
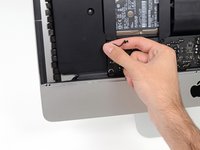
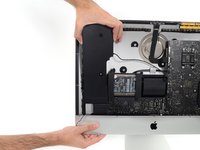
Fädle das Kabel zur Einschalttaste vorsichtig aus seiner Nut im linken Lautsprecher.
-


Um dein Gerät wieder zusammenzusetzen, folge den Schritten in umgekehrter Reihenfolge. Benutze unsere Anleitung für Klebestreifen, um das Displayglas wieder einzukleben.
Um dein Gerät wieder zusammenzusetzen, folge den Schritten in umgekehrter Reihenfolge. Benutze unsere Anleitung für Klebestreifen, um das Displayglas wieder einzukleben.
Rückgängig: Ich habe diese Anleitung nicht absolviert.
Eine weitere Person hat diese Anleitung absolviert.
Besonderer Dank geht an diese Übersetzer:innen:
90%

Diese Übersetzer:innen helfen uns, die Welt zu reparieren! Wie kann ich mithelfen?
Hier starten ›


2 Kommentare
Looks like an thow away product. !@#$ what an desaster. I saw an film on arteTV with the fownder of ifixit an the fight against the throwaway. I use my powerbook 10 years and repair it. my son got an ipod with a bad battery, i thought now problem just open and put a new in, but !@#$ where are the screws ...
I have (21.5 inch, mid 2017, 2.3 ghz) base model same as this but not 4k. How much max ram can I install in my iMac??
Narendra Verma - Antwort
This guide contains many extra steps for what should be a straight forward, simple parts replacement without disturbing more than the display, left hand speaker and removal of 4 logic board screws for play. Nothing else except for the left hand speaker wire & iSight cable from logic board, the lower support bracket and loosening the speaker so as to move it around a bit.
For the ram, I bent a pair of cheap tweezers long ago supplied with these replacement kits to the perfect angle for holding, locating and inserting the ram into the slots under the logic bd after moving each retainer w/spudger and popping out the old. Pay attention to the orientation of the ram when removing/inserting the ram! An automotive mirror is handy along with a small flashlight for closeups. Once the ram is aligned properly substitute your fingers for the tweezers, ease it into the slot, push up & engage! Reinstall screws and all else. I have done this job successfully this way countless times. For a tweezers pic contact me!
Ross Elkins - Antwort
Additionally, if a blade is present, I install the OSx system on the blade and everything else, apps and home folders on the new SSD. You get the very fast boot off of the blade and the full ssd for all else!
Ross Elkins - Antwort