Einleitung
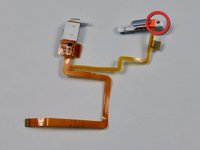
Hast du keinen Ton mehr? Dann tausche die Kopfhörerbuchse aus!
Kannst du deinen iPod nicht mehr entriegeln? Tausche die Sperrtaste aus, die Teil der Kopfhörerbuchsen-Baugruppe ist.
Was du brauchst
-
-
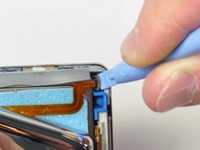
Setze ein Plastic Opening Tool in dem Spalt zwischen Vorder- und Rückseite des iPod an.
AWESOME!!!! Couldn't b happier,1 hour and 10 mins to switch out headphone jack (had music through one speaker) and battery since I had it open. Really only had to use plastic spudger,metal spudger and 1.5 inch puddy knife. Plastic separators didn't really help,for 3 bucks I'm not complaining. Already had a 00 screwdriver. All told,$43.00 for parts and I have my 120 gig iPod back.
what jim says. that pic of the clips should be up here so you can visualise what you’re trying to do, before you trash the rails.
I agree with Hwyman. I spent quite a bit of time trying to open the case with the plastic opening tools but could never get it into the joint. Then I went tried the iFixit Jimmy tool along with the metal spudger for the rest of the steps. It made is so much easier. I completed the entire job within an hour.
I used a watch back removing tool, it is thinner and made of metal and opening my 5th generation classic iPod was a cinch …. really ….. and I am usually quite clutzy. I inserted it and moved it slightly to the left very gently to separate the back and front and those clips just popped open.
It must have been okay because it all popped back together again after I replaced the battery. No issues with bent seam, back or anything I had read here.
Thank you original poster, these instructions were great.
I also ended up putting a small piece of electrical tape over the Hold switch as I kept bumping it with my fingers. That worked really well but it did leave a residue that I then needed to clean up with isopropyl alcohol afterwards.
What happens if you do it without the hold button switched? Because I just did that.
-
-
-
Führe ein anderes Plastic Opening Tool in den Spalt zwischen der Vorder- und der Rückseite des iPods ein, wobei du mindestens 4 cm Platz zwischen den beiden Werkzeugen lässt.
鍵ヘラの小はこじ開けには使わないほうが良い。これは内部のコネクタを外すのに必要です。こじ開けに使うと簡単に曲がるので、コネクタのロックを外すのに使えなくなる。こじ開けはステンレスナイフや金属ヘラ、マイナスドライバーで。
-
-
-
Führe einen Spachtel schräg von oben etwa 3 mm weit in den Spalt zwischen den beiden Plastic Opening Tools ein.
-
Sobald du die Clips mithilfe des Spachtels gelöst hast, schwenke den Spachtel bis er senkrecht zum Gehäuse steht und "schlängle" ihn in kleinen Hin- und Herbewegungen vorsichtig in die Lücke zwischen den Opening Tools.
The plastic tools are fine for holding the tabs open or for prying open partially open sides, but you're much better off using the metal spudger to open em
I couldn't agree more about the plastic opening tools! The metal spudger worked loads better when it came to actually opening the device. Yes, the metal tool's tip was much sharper than the plastic (and hence, easier to cut your fingers on if your grip slips) but it was substantially more effective in the end. :)
At my local hardware store they offer stiff and flexible putty knives - which kind is better for this purpose?
Don’t do this! The putty knife is too wide and will damage the inside of the case. You can see in the photo for step 19 how the metal clip rail has been bent out of shape. You need to use a narrower tool the will fit between the protrusions on the clip rail (which is where the clips actually are). This video shows a better, albeit more dangerous, method using an x-acto knife. I used the method shown in the video but with a #18 chisel blade on the x-acto knife. With the iPod on its back, I inserted the blade with the beveled side down. Then I pried the side out slightly and peeked through the crack with a flashlight to make sure that the blade was positioned between the protrusions, readjusting as necessary. I used multiple knives to prevent released clips from reengaging. Use this technique at your own risk, and wear adequate hand and eye protection as the blades are very sharp and somewhat brittle.
I used the iFixit Jimmy instead of a putty knife. I also watched the x-acto knife video that Robert Watkins linked to in order to find where the clips are located. I slid the Jimmy into those locations until the tool bottomed out and then move on. I only used the metal spudger (to initially open a gap), the Jimmy (to open the clips), and occasionally a plastic spudger (to hold open gaps while I relocated the metal tools to a new section). Pro tip: Use the Jimmy as a letter opener after you fix your iPod.
I used two small putty knives manufactured by a company called Albion Engineering. They make caulk spatulas in multiple sizes. Took me less than 2 minutes to get the back cover off, with no damage to the sides or clips. And - it was my first time! Highly recommend these, especially if you are in the business.
What size(s) did you use?
-
-
-
Drücke mit deinen Fingern unterhalb des Spachtels gegen das hintere Gehäuse, um zu vermeiden, dass es sich allzu sehr verformt. Biege den Spachtel langsam, um so den Großteil der Metallhäkchen auf dieser Seite des iPods zu trennen.
I disagree with the “theory” here. You don’t have to bend the case at all. Watch the x-acto blade video on youtube (it’s linked above in the Step 4 comments). The idea is to slide whatever wide flat tool (putty knife, x-acto blade, iFixit Jimmy, etc…) in between the clip and the body. Setting the iPod flat on the table instead of holding it will help and you won’t cut yourself if a tool slips out. As you disengage clips, you will find that the body will start coming out on it’s own without having to flex your wide tool and bending the case in the process.
-
-
-
Löse den Spachtel aus dem iPod und führe ihn etwas näher an der Ecke des iPods mit denselben kleinen Hin- und Herbewegungen wieder ein.
-
-
-
Setze mit einem Plastic Opening Tool an der Spalte zwischen Vorder- und Rückseite zwischen dem Hold-Schalter und der Kopfhörerbuchse an.
-
-
-
Setze in der Mitte der oberen Kante mit einem Metall-Spudger in der Lücke, die durch das Plastic Opening Tool entstanden ist, an.
-
Löse mit dem Metall-Spudger den einzelnen Clip oben am iPod.
-
-
-
Setze mit dem Opening Tool bei der anderen oberen Ecke in der Spalte zwischen Vorder- und Rückseite des iPods an.
-
-
-
Führe auch auf der anderen Seite der Ecke ein Plastic Opening Tool in die Lücke zwischen Vorder- und Hinterteil des iPods ein.
-
-
-
Entferne das Plastic Opening Tool von der oberen Ecke und führe es in die entstandene Lücke zwischen Vorder- und Rückseite des Panels ein, wobei du mindestens 4 cm Platz zwischen den beiden Werkzeugen lassen solltest (wie auf der anderen Seite).
-
-
-
-
Führe einen Spachtel schräg von oben etwa 3 mm weit in den Spalt zwischen den beiden Plastic Opening Tools ein.
-
Sobald du die Clips mithilfe des Spachtels gelöst hast, schwenke den Spachtel bis er senkrecht zum Gehäuse steht und "schlängle" ihn in kleinen Hin- und Herbewegungen vorsichtig in die Lücke zwischen den Opening Tools.
-
Drücke mit deinen Fingern unterhalb des Spachtels gegen das hintere Gehäuse, um zu vermeiden, dass es sich allzu sehr verformt. Biege den Spachtel langsam, um so den Großteil der Metallhäkchen auf dieser Seite des iPods zu trennen.
-
-
-
Setze vorsichtig mit einem Metall-Spudger im Bereich der störrischen Metall-Clips an.
-
-
-
Drücke den Metall-Spudger nach unten, so dass er soweit wie möglich im hinteren Gehäuse steckt.
-
-
-
Fange vorsichtig an, den Clip vom Front Panel zu lockern.
What can i do if unintentionally removed the retaining flap connector from the logic board?
-
-
-
Drücke das Front Panel mit einem Metall-Spudger weiter nach oben, bis sich die Clips lösen.
Συνεχίστε να πιέζετε προς τα επάνω το μπροστινό πάνελ με το spudger μέταλλο έως ότου ελευθερωθεί το μεταλλικό κλιπ.
-
-
-
Halte das Front Panel mit einer Hand und den hinteren Gehäuseteil mit der anderen Hand.
-
Trenne die verbleibenden Clips vorsichtig (VORSICHTIG) voneinander, indem du den vorderen und hinteren Gehäuseteil auseinander bewegst (stell dir vor, die Unterkante des iPods ist eine Drehachse) und gebe darauf acht, die beiden Flachbandkabel nicht zu beschädigen.
-
-
In diesem Schritt verwendetes Werkzeug:Tweezers$3.99
-
Benutze eine gebogene Pinzette oder ein Öffnungswerkzeug, um die braune Verriegelung um 1 mm gerade nach oben zu heben. Achte darauf, dass du von beiden Seiten her an dem Riegel ziehst.
-
Fasse das Flachbandkabel mit deinen Fingern oder einer Pinzette und ziehe es gerade nach oben, um es zu abzutrennen.
Attention. "Lift the brown lock latch straight up by 1 mm" is wrong IMHO, at least totally misleading!
Wether or not he brown thingy goes "up" depends on the orientation of the iPod, how you are holding it.
Clearer would be "... push brown lock latch away from the back of the iPod" rather "towards you", then "up".
Also the image/illustration wit the red arrows is somewhat misleading in that sense.
Got stuck at this point trying to push it "up" (= towards the top of the iPod), which didn't work, of course...
Luckily no damade done :)このコネクタは上に引き上げることで外れる仕組み。説明にある通り1mmだけです。
-
-
-
Lege das hintere Gehäuse neben dem iPod ab, wobei du darauf achten solltest, das orangene Ohrhörer-Lautsprecher Kabel nicht zu überdehnen.
-
-
-
Hebe die Festplatte mit einer Hand an, so dass das Flachbandkabel des Ohrhörer-Lautsprechers darunter zugänglich ist.
-
Klappe die Kunststofflasche, die das Ohrhörer-Lautsprecher Kabel in Position hält, mit einem Spudger um. Die Lasche dreht sich um 90 Grad nach oben und gibt so das Flachbandkabel frei.
-
Hole das orangene Ohrhörer-Lautsprecher Kabel aus seinem Anschluss.
-
Das hintere Gehäuse ist nun losgelöst.
I recommend not doing this. I couldn't figure out how to reattach and broke the jack in process. There is no need to do this step, just be careful not to strain this connector.
This is probably the most difficult part because the jack is so tiny and it's not obvious that it contains a "flip up" retainer. A very difficult step.
How do I get that little 90° clip to stay back down with the new ribbon in it
Nar -
How do I get the little clip to stay down holds the year Jack ribbon to the motherboard
Nar -
コネクタは茶色いちっちゃなプラスチックのロックで固定されている。写真でいうと左から右に起こし上げる。
-
-
-
Nun müssen wir den Schaden beheben, der im Verlaufe der letzten Schritte entstanden ist. Es ist wahrscheinlich, dass mindestens einer der Metallclips im hinteren Gehäuseteil nach oben gebogen wurde. Die Clips müssen alle nach unten gebogen sein, bevor das hintere Gehäuseteil wieder aufgesetzt wird.
Right, I thought the way that this was phrased is a tad confusing. Basically, once you've separated the front and back panel, insure all the prong-like-clips around the sides of the back panel are all down - not sticking up after opening the ipod. I skipped the step because it was confusingly put. I ended up successfully swapping the battery, however when I went to put the ipod panels back together, they wouldn't clip back properly. This made it very fiddly. Anyway, hope that helps.
Please post a picture of what they are supposed to look like? I think you mean bent outward.
-
-
-
Drücke mit der breiteren, flachen Seite eines Metall-Spudgers den Clip nach unten und achte dabei darauf, dass du dabei nicht die dünne Metallschiene vom hinteren Gehäuseteil beschädigst. Alternativ kann auch eine Zange verwendet werden, um das Risiko auszurutschen und dabei den Ohrhörer-Lautsprecher zu beschädigen, zu minimieren.
-
-
-
Lege den hinteren Gehäuseteil auf die Seite auf einer sauberen, harten Unterlage. Übe vorsichtig, aber stetig Druck aus, bis der Rand wieder in der ursprünglichen Position und Form ist.
My iPod wasn’t closing very well, then I noticed that I didn’t do this. Thanks!
I ended up used a set of squeeze clamps with soft rubber jaws to very carefully apply pressure to either side of the case and top and bottom all around the perimeter in order to square it back up.
-
-
-
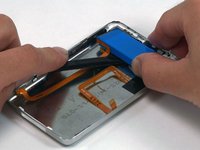
hebe den Akku mit dem angebrachten orangenen Kabel mithilfe einem Spudger nach oben und aus dem iPod heraus. Wenn du einen 160 GB iPod hast, ist der Akku dicker als der auf dem Bild.
Just wanted to say THANK YOU to whoever made this tutorial!! Kinda unclear in some areas, but I got it! Thanks so much!!!
I do this and my ipod works now!
All very easy to do. Ive just "frankensteined" a 100Gb classic and working all fine. Very simple and clear instructions.
Been using iFixit for almost 10 years in my data recovery company and always been informative in getting Macs opened easily and with great results
Within the first minute, I pushed a plastic opener through the flesh of my opposite index finger. Within the second minute I peeled back about 3/16" of my index finger nail. Within the third minute I broke the tips off of first one and then the other of the supplied plastic openers. On the fourth minute, I threw the entire kit -- brand new replacement battery included -- in the trash. Thanks for absolutely nothing!! Ken Queale
Sounds like you're just clumsy...
Absolute waste of money. I have been working on it for an hour and half. Blue tools wore out the first 1/2hour
My hold button ribbon was in the battery glue and tore when I pried the battery loose. I 'm going to try to replace that part with luck that will be all I have to do.
I just did the exact same thing. In retrospect, it strikes me that if I would’ve warmed the iPod’s back with a hair dryer to soften the glue holding the battery, this would’ve been a lot easier. Learn from my mistakes people. :-)
My Hold Button Ribbon was glued between the case and the battery too. Should have chanced more heat on the back of the case to totally free it from the battery before prying off the battery.
Ahtishoe -
I have been trying unsuccessfully to get into my ipod to replace the duff battery for a long while. Now, armed with your instructions and the right tools I have done it! (not without considerable frustration with those pesky clips I might add). The plastic spudgers are useless by the way. It took a while to work out how to release the battery ribbon cable and larger picture of the clip action would help. I too found the battery glued to the ribbon cable beneath it. Perseverance, patience and a steady handed are a must for this one. Well done and thank you!
Battery replaced. MB spooled up when I plugged the unit in. Now waiting for it to charge. This process was actually pretty easy with the help of this tutorial. A lot easier than an iPad repair with all the glue. No way could I have done it without the help. So far: every iFixit! repair I have done has been a success. Thanks!
When finish replace battery, need to restore?
No you do not
The instructions were great! I completed the repair with an hour. I can’t ay enough about the parts, tools, and repair guides from iFixIt. I recently replaced my hard drive with an SSD drive on my iMac and the repair guide for that was spot on as well. Thank you, iFixIt!
Any luck fixing the hold button ribbon Greg? Mine ripped too.
My experience? The first battery I ordered turned out to be a dud. (not from Ifixit). The ipod would not charge even though I disconnected and reconnected the battery twice. The second battery worked OK straight from the off. My tip? Don’t put the back of the device fully on before you try to charge up the battery. There is room to get a charging lead into place without the back being fully on. Saves a lot of trouble if your new battery turns out to be faulty.
-
-
-
Halte mit einer Hand die orangenen Flachbandkabel fest und ziehe mit der anderen Hand das schwarze Klebeband ab, mit dem die Kabel am Rückpanel befestigt sind.
I saw some YouTube videos where they were able to reuse the black tape on the new backplate, so I took some time to carefully remove it, without success. However, since I was replacing my iPod 7th Gen with a 240GB disk (thicker than the original), the new thicker back plate did not need the tape since the cables are separated form the case.
-
-
-
Entferne die beiden schwarzen Kreuzschlitzschrauben, mit denen die Kopfhörerbuchse am Rückpanel befestigt ist.
-
Die sind wirklich KLEIN! Achte darauf, einen Kreuzschlitzschraubendreher #00 zur Hand zu haben.
One tip when reassembling. These screws are very tiny and difficult to handle even with magnetized drivers, so I used the PH000 tip of the iFixIt kit to pick the screws and screw the first turns. Then switch to a PH00 to tighten them. Actually, using a PH00 of a cheaper set I bought to open the iPod, worked better since the length of the screwdriver was shorter than the case.
You can also use a Phillips 000 for these. I also accidentally picked up the wrong screwdriver and got one out with a Phillips 0, but I think there's a definite risk of stripping your screws if you're not careful with this one.
When re-assembling, if you dip the tip of the screwdriver a couple of mm into a pot of vaseline, then place the screw onto the tip, it will hold the screw nicely in place until you tighten the screw (ie it will stick to the tip without dropping off)
-
-
-
Entferne die beiden folgenden Schrauben:
-
Eine schwarze Kreuzschlitzschraube, mit der der Sperrschalter in der Nähe der Ecke des iPods befestigt ist.
-
Eine silberfarbene Kreuzschlitzschraube, mit der der Sperrschalter auf der anderen Seite befestigt ist.
-
-
-
Hebe den Sperrschalter aus seiner Fassung im Rückpanel heraus. Entferne den Sperrschalter jetzt noch nicht ganz, da er am gleichen Kabel wie die Kopfhörerbuchse angeschlossen ist.
-
-
-
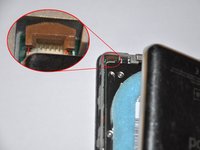
Schiebe die Kopfhörerbuchse aus ihrer Fassung im Rückpanel heraus.
-
Hebe die Einheit aus Kopfhörerbuchse und Sperrschalter aus dem iPod heraus.
-
-
-
Wenn dein Ersatzteil den Plastiksperrschalter nicht enthält, dann folge den nächsten Schritten. Hier wird der gezeigt, wie du den Plastiksperrschalter auf deine neue Kopfhörerbuchse übertragen kannst.
-
Entferne die einzelne Kreuzschlitzschraube gleich neben dem Sperrschalter.
-
Hebe den Kunstoffteil des Sperrschalters weg vom orangenen Flachbandkabel.
-
-
-
Löse das orangene Flachbandkabel mit dem daran angeschlossenen Sperrschalter vorsichtig mit einem kleinen Plastiköffnungswerkzeug von der Metallhalterung ab.
-


Bevor du das Gehäuse zuschnappen lässt, solltest du erst alle Funktionen überprüfen.
Um dein Gerät wieder zusammenzusetzen, folge den Schritten in umgekehrter Reihenfolge.
Bevor du das Gehäuse zuschnappen lässt, solltest du erst alle Funktionen überprüfen.
Um dein Gerät wieder zusammenzusetzen, folge den Schritten in umgekehrter Reihenfolge.
Rückgängig: Ich habe diese Anleitung nicht absolviert.
227 weitere Personen haben diese Anleitung absolviert.
Besonderer Dank geht an diese Übersetzer:innen:
100%

Diese Übersetzer:innen helfen uns, die Welt zu reparieren! Wie kann ich mithelfen?
Hier starten ›

39 Kommentare
This worked a charm for me! If you take it slow and steady, and keep all the warnings in mind, you shouldn't have too much trouble :)
check this guy I used dollar store xacto blades you got to be careful you can easily cut yourself but this method wont damage the clips or anything,
This is the third time I've used one of Ifixit's guides and the third time I have been successful
in fixing one of my faulty Apple products. HUGE THANKS for having this forum and offering help that would otherwise cost far much more! Power to the people and those who help each other to help themselves!
Yes this guide does work. The plastic tools are pretty useless. They break. I used a paint scraper and small flat head screw drivers. Top tip is to test the headphones before you re-close it. I did this and found that the left headphone was not working. I found the problem was the connection at step 20. The lead is pre-bent to fit snug. Once I taped it flush to the wall of the case I had both speakers working. To find out how to re-close the ipod watch this video https://www.youtube.com/watch?v=dmEVVLSR....
I was able to follow this tutorial without too many issues. The problem is that, once it was apart and "repaired," there weren't really any instructions on reassembly. "Follow these steps in reverse order" doesn't quite seem sufficient. In trying to reattach the ribbons, the orange battery ribbon came unattached, and the pictures aren't enough to make it clear where it should go. Any suggestions?
Hi ! Mine was almost impossible to open but once I manage to get in everything worked very well. Thank you ifixit for transforming a 350 CHF reparation into a 40$ one you guys rocks. (only thing is that all the border of the ipod now look like he fell from a plane but he works well so ....)
i just replaced mine and still no audio and no hold
i did everything acording to what i watch online like this tutorial is there a bug?
how do you know if its a thick or thin ipod? and does it matter
You're better off with the metal spudger when taking out the battery. My plastic one broke while attempting to remove it, however it came right out once used the metal one
Very straightforward process when you follow the instructions carefully. Thanks for the step-by-step, as well as the quick shipping of the parts.
I'm just wondering how to decipher/ID my iPod for the thick and thin headphone jack/switch part options that are available to purchase. My iPod looks like the one in the image, but I'm uncertain which of those two choices (thick) or (thin) that would be. Anyone have any ideas for me? Thank you much for any help
Hi, you need to check the serial number in this website (http://www.everymac.com/ultimate-mac-loo...), all you need to do is copy the serial number and it will tell you which iPod Classic you have. Then, just go to ebay and type "iPod Classic (whatever gen it is) headphone jack" and you'll be good to go!
Since you guys seem to rarely have any of the parts in stock, is this headphone jack and switch the right kind? https://www.amazon.com/gp/product/B00QSI...
Thanks for a nice and clear guide! Had it done in about 45 minutes. A set of little craft knives had the case off straight away with no clips bent :)
Hi everyone ! I changed the jack connector and the hold button both with the rear panel (because i have a second broken iPod classic) and after that an error display on the screen. If someone have same problem and probably an issu to fix that i'm interesting ! Thanks a lot for this tutorial !
Well I successfully change the battery and my iPod classic but I don't think I plugged the headphone jack in properly so I will need to go back in tomorrow and figure that out. I have no volume through my headphones.
I did a great job replacing my Battery. A few little marks from the putty knife i used but managed to just file down a bit. Smooth as ever. Took it apart today to attach the headphone jack ribbon because i had it upseide down on accident. I went from no sound to sound only in my left ear. Even with glasses, i have a really hard time getting the headphone ribbon in place. I need a really clear image close up that can help me. Any suggestions, guys?
The instructions were great. I also had no issues. I did take my ipod apart prior to getting the part. That way I had an idea of how things would go apart and together. I also ordered the ifixit kit of tools so I wouldn't be running around to find the exact tools. Also having the kit enables me to fix some other ipods and whatever. So Bravo on the instructions. It is nice to have an ipod that is not locked up..!!
Excellent guide! Luckily my Ipod was super worn and old, so taking off the casing was easy peasy! one word of advice though : MAKE SURE YOU HAVE THE RIGHT SCREWDRIVER! I stripped one of those tiny interior screws and it was a huge hassle to pry it out.
Hi
really great guide and everything has worked perfectly… however I’m Having trouble reattaching the orange headphone jack ribbon to the flip up plastic tab. It won’t attach like I’ve seen on YouTube nor as easily as suggested here. To disconnect I followed the instructions, lifting the tab then gently pulling it away.
any suggestions please on how to secure the ribbon in place on the contacts as I’m worried it will be too loose.
many thanks
martin
Great tutorial! I was able to follow it and managed to replace the headphone port on my 160GB iPod Classic.
I don’t know if I did something wrong, but for some weird reason, the hold button doesn’t work?? Did I get the wrong one by accident?? I bought the thin version, should I have bought the Thick version instead? What is the difference between the two?
Great tutorial! Worked well. Only thing is the plastic opening tools I got with the replacement jack didn’t work worth with a $@$*. They snap and smudge. Precision screwdrivers that come in an eyeglasses repair set work better. The flat head ones are more durable and thin enough to pop the sides open better. They also work well to use in the internal components as well. You can get a set for a dollar at a Dollar General store.
IPOD 60GB classic… been stuck in drawer for years…. needed new headphone jack…$10 on walmart.
This tutorial was the shiznit. THANKS! Used wifes wooden cuticle thing as the spudger…… its ok.
I've worked in many small electronic devices but this tops them all. I'm going to give it a try but I need to download all my music first ….in case I mess up terribly. Great presentation and I hope I can do it proud! Stephen
I just changed my headphone jack and my battery ! The opening wasn’t succesful with this tutorial, but i followed Elite Obsolete’s one on youtube and it worked ! Thanks Ifixit ! Ipod is working fine now !
Fantastic! My Ipod classic headphone jack started to show its age and wear, and at some point was outputting only on the right side… luckly enough ifixit has this spare part! Opening the ipod was a task of inifinte patience and care, but after the unit was open, replacing the headphone jack/hold switch block was super easy and uncomplicated.
Now the Ipod is back in shape, and music is blasting again both my eardrums!
I have part of a head phone jack stuck in the Headphone jack port.
Can this be repaired? Is this s repair job for Apple engineers?
I have an I pod Classic.
I have managed to get part of a head phone jack stuck in the headphone jack port.
Can this be repaired/ Is it a job for Apple engineers?
The "HOLD" function on my iPod Classic (7th Gen.) kept being stuck in the hold position. So I ordered a new (well refurbed) parts, replaced it (successfully) and STILL get the same problem. Could this somehow be related to the "mother board"? Any tips or suggestions would be much appreciated. Thanks!
Actually, there are only 11 metal clips. From the face side:
On the top, only 1 clip centred 35mm from LHS. Avoid the first 30mm on the LHS, and the last 20mm on the RHS
On the RHS there are 4 tabs centred at 20mm, 40mm, 65mm and 85mm from the top. Take great care to avoid the topmost 15mm
On the LHS there are 4 tabs centred at 20mm, 40mm, 65mm and 85mm from the top
On the bottom, there are 2 tabs, each one 10mm in from the edge.
Also, I bought 2 spudger bars with the battery, and found them invaluable. The plastic ones supplied are nearly useless
astutebs - Antwort
Okay, I’m a noob, what’s an LHS…I assume it’s “Left..H…S" and RHS is “Right…H…S”, but please elucidate.
Miguel FC - Antwort
Left Hand Side
Right Hand Side
darren_chalk -
take your time, be patient, it’s hard but you can do it. Watch other videos from youtube for battery replacement for your model to supplement this written procedure - particularly with regard to releasing the battery ribbon connector. I have the hardest one to crack open I and got it done and I’m 63 years old with bad hands…..my ipod classic now works good as new!!!!!!
Donald Diebold - Antwort
Hold Switch in locked position....What is it...What is hold switch? what is locked position? Pl.explain
Alagappan Natarajan - Antwort
The hold switch is on the top.When you see the color on the hold switch. It's either locked or not.
Paul wortman -