Einleitung
Das Google Pixel 3 XL hat sich in Schale geworfen, und zwar in die, die bei den Flaggschiff-Smartphones grade so in ist: Glas auf der Rückseite und ein Notch auf der Vorderseite. Aber wir halten uns nicht lang mit der glänzenden neuen Fassade auf: Wir wollen rein und uns das Innenleben anschauen – los geht's mit dem Teardown!
Du willst die besten, neuesten Teardown-Updates? Auf Facebook, Instagram oder Twitter findest du alle aktuellen Neuigkeiten. Wenn du die Teardowns lieber direkt in deinen Email-Eingang geliefert bekommen willst, melde dich für unseren Newsletter an.
Was du brauchst
-
-
Erst mal die Technik anschauen, die sich unter der neu gestalteten Oberfläche des Pixel 3 XL befindet:
-
6,3" OLED Display mit QHD+ 1440 × 2960 Auflösung (523 ppi) und Gorilla Glass 5
-
Octa-core, 64-bit Qualcomm Snapdragon 845 Prozessor (2,5 GHz + 1,6 GHz) mit 4 GB LPDDR4x RAM
-
12,2 MP, ƒ/1.8, OIS Hauptkamera mit Dual-Pixel Phasendetektion Autofokus; duale 8,1 MP Selfie-Kameras
-
64 GB oder 128 GB eingebauter Speicher
-
Qi Drahtloses Laden
-
Wasserdicht nach IP68
-
Android 9.0 Pie
-
-
-
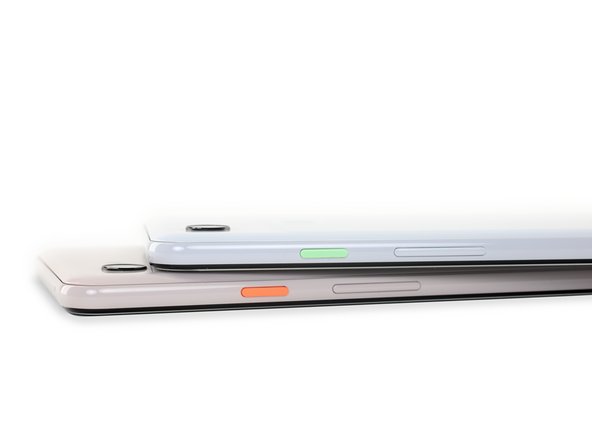
Bevor wir richtig eintauchen jetzt noch ein rein äußerlicher Vergleich des Pixel XL mit seinem kleinen Bruder.
-
Die neue Rückseite dieser Smartphones sieht ähnlich aus wie die Hybridabdeckung der letzten beiden Generationen, aber diesmal ist es nur ein einziges Stück Glas (mit einer teilmattierten Oberfläche).
-
Auf der Vorderseite entdecken wir eine zusätzliche Kamera über den beiden Displays.
-
Ja, du hast richtig gehört - während alle anderen mehr Kameras auf der Rückseite angebracht haben, hat Google genau das Gegenteil gemacht und eine Ultraweitwinkelkamera (entspricht 19 mm) neben die bereits existierende Weitwinkelkamera (entspricht 28 mm) gesetzt.
-
Ganz exklusiv gibt es beim Pixel 3 XL einen trendigen kleinen
RoboterNotch, der uns beim Einschalten des Smartphones begrüßt.
-
-
-
Durch die Lautsprecher auf der Vorderseite der beiden Pixel 3 gibt es keine Lautsprechergitter auf dem Aluminiumrahmen.
-
Beim Übereinanderstapeln der zwei Smartphones wird klar, dass eines der beiden etwas mehr XL ist als das andere, aber das ist auch schon der einzige Unterschied.
-
USB-C Ladeanschluss, SIM Kartenslot und Einschalttasten im 80er Jahre Stil sind bei beiden Smartphones vorhanden.
-
-
-
Die Außeninspektion ist abgeschlossen, jetzt können wir uns ans Innere begeben.
-
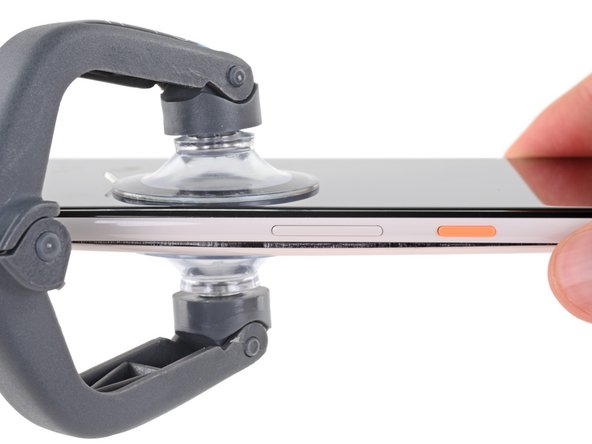
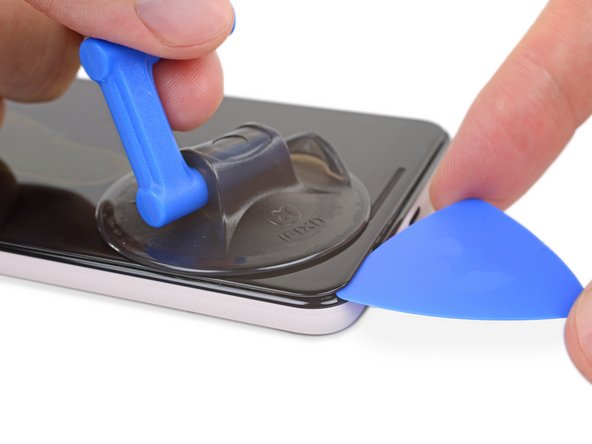
Aus Erfahrung wissen wir, dass ein Saugheber und etwas Schneiden ausreicht, um das Display zu öffnen. Sollte das nicht reichen, können wir immer noch die großen (Heißluft-) Geschütze auffahren.
-
Scheinbar wird auch im Pixel 3 XL wieder Schaumkleber benutzt, aber dieses Jahr ist dieses Zeug irgendwie sehr viel hartnäckiger.
-
Wir holen unseren zuverlässigen iSclack heraus und gehen davon aus, dass wir damit das Display trennen, aber stattdessen löst sich zuerst die Rückabdeckung ab!
-
-
-
Nachdem wir uns jetzt also durch etwas mehr Kleber durchgekämpft haben als erwartet, sind wir endlich drin!
-
Vielleicht dachte Google, dass mehr Kleber für den zusätzlichen Punkt auf der IP Bewertung notwendig wäre, aber wir haben andere Smartphones mit IP68 Bewertung gesehen, die einfacher zu öffnen waren.
-
Zum Glück ist das Kabel des Fingerabdrucksensors lang genug, damit es beim Öffnen des Gerätes nicht von übereifrigen Bastlern zerrissen werden kann.
-
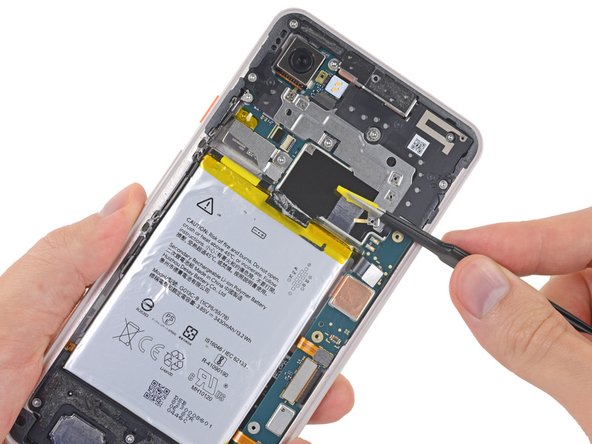
Der Blick ins Innere ist so ziemlich das, was wir erwartet hatten: ein glänzendes neues drahtloses Ladepad, ein Akku, eine Platine, ein paar Kameras und ein Fingerabdrucksensor auf der Rückseite.
-
Was wir weniger erwartet hätten, sind die Metallabdeckungen über dem Motherboard sowie ein SIM-Fach, das irgendwo unter der Lautsprechereinheit versteckt ist.
-
Google dachte wohl, sie könnten uns mit ein paar Schrauben abschrecken? Weit gefehlt, denn wir sind mit einem Torx Bit und 111 anderen Bits für alle Fälle gut vorbereitet.
-
-
-
Der Trend zum hartnäckigen Kleber setzt sich fort, denn die NFC Spule ist fest ans Energiezentrum des Pixel angeklebt. Aber eine Verschnaufpause ist in Sicht!
-
Der Akku ist mit relativ reparaturfreundlichen dehnbaren Klebestreifen befestigt. Mit der richtigen Technik hast du so wenigstens die Chance, ihn leicht auszubauen!
-
Wir greifen auf die Zahnseiden-Methode zurück, um den Akku herauszuholen, und durchtrennen dabei ein empfindliches Flachbandkabel, das sich unter dem Akku versteckt hat! Gefahr erkannt, Gefahr gebannt - eine Reparaturanleitung wäre hier echt hilfreich gewesen.
-
Der Kleber ist weg und der Akku ist draußen: Das Pixel 3 XL verfügt über 13,2 Wh. Das ist ein kleines bisschen weniger als die 13,6 Wh des Pixel 2 XL und etwa genauso viel wie die 13,28 Wh des originalen Pixel XL.
-
Das Pixel 3 XL schlägt immer noch das iPhone XS Max (12,08 Wh) und kommt dem Galaxy S9+ (13,48 Wh) ziemlich nahe.
-
-
-
-
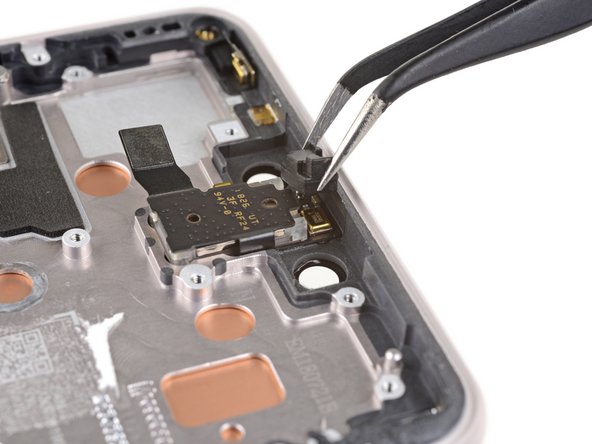
Über dem Krater, in dem sich vorher der Akku befunden hat, lösen wir eine Antennen-Abschirmung vom Motherboard.
-
Am südlichen Ende des Smartphones kämpfen wir mit noch mehr Kleber, um etwas abzulösen, das nur wie eine weitere Abschirmung aussieht.
-
Eine weitere Falle! Diese Abschirmung ist in Wirklichkeit das Lautsprechergehäuse, dass wir gerade beim Versuch, an die darunterlegenden Komponenten zu kommen, aus Versehen zerbrochen haben.
-
-
-
Die Abschirmungen sind nun alle entfernt, und wir können endlich einen Blick auf das Motherboard des allerneuesten Pixel werfen.
-
Beim Ausbau der Platine sind die Unmengen an Wärmeleitpaste auf der Unterseite nicht zu übersehen. Sie dient dazu, die Wärme der hart arbeitenden Chips auf den Metallrahmen zu übertragen.
Step 7 shows an antenna plastic near the top of the phone and Step 8 shows the two coax that run to the bottom of the handset. Looks like part of that plastic antenna shown in Step 7 near the top is for BT/Wifi on the button side of the PCB, then there are 4 antennas on the other side of the board (two coax, two gold contacts up to that plastic antenna part). I’m wondering if there is any indicators what antennas are used for what inside the handset. Thoughts?
-
-
-
Dieser ganze Kleber hat uns ziemlich fertig gemacht, also setzten wir uns erst mal einen Moment hin und studieren in aller Ruhe die Chips:
-
Micron 8JE77G9WGH 4 GB LPDDR4X DRAM geschichtet über einen Qualcomm Snapdragon 845
-
Skhynix H28S7Q302BMR 64 GB Universal Flash-Speicher
-
Google SR3HX Pixel Visual Core (wie auch im Pixel 2 XL)
-
Qualcomm SDR845 RF Transceiver
-
Qualcomm QPM2622 und QPM2642
-
Qualcomm QET4100 40MHz Envelope Tracker
-
Qualcomm PMI8998 PMIC
-
-
-
Und vielleicht noch ein paar mehr ...
-
Google H1C2M Titan M Security-Chip
-
IDT P9221 Qi kabelloser Ladeempfänger
-
Qualcomm WCD9340 Aqstic Audio Codec
-
Qualcomm QDM3620, QDM3670, QDM3671 Diversity Empfänger-Module
-
Qualcomm PM845 Power Management IC
-
Murata 1QB SS8601001
-
Qualcomm QPM2635
Can you identify which audio amplifiers they use?
Can any one tell where i get wifi ic
-
-
-
Wir holen vorsichtig
den linken Augapfeldie Weitwinkelkamera heraus, die leicht am Rahmen festgeklebt ist. -
Auf der Rückseite setzt Google mal wieder darauf, dass AI einem einzelnen Sensor dabei helfen kann, die Arbeit von zweien zu erledigen.
-
Wenn man sich auf frühe Berichte beruft, haben sie vielleicht sogar recht. Man munkelt, dass es sich um einen leicht verbesserten Sony IMX363 Sensor handelt, der Rest liegt beim Pixel Visual Core.
What is that component that’s left in the middle? Looks like there’s a flex on it, too, so wouldn’t that also need to be removed?
-
-
-
Das Daughterboard kommt ohne große Umstände heraus und nimmt gleich den USB-C Anschluss, den SIM Einschub sowie etwas Antennen-Hardware mit sich.
-
Der Vibrationsmotor verlässt seinen Platz eher etwas wiederwillig, aber unser Halberd Spudger kann sehr überzeugend sein.
-
Die Dehnungsmessstreifen kommen heraus und sehen so knuddelig aus wie eh und je.
-
-
-
Im Namen der Wissenschaft haben wir entschieden, unser Display ganz auseinanderzunehmen, um seinen Geheimnissen auf den Grund zu gehen. Es leistet starken Widerstand, aber der Hitze, unserer Geduld und unserer positiven Einstellung ist es nicht gewachsen.
-
Bitte einen Trommelwirbel ... es ist ein Samsung! Es hat überall Gerüchte gegeben, aber es sieht so aus, als ob Google dieses Jahr die zuverlässigen AMOLED Bildschirme von Samsung benutzt.
-
Die Samsung Bildschirme sollten etwas zuverlässiger sein als die vom letzten Jahr, aber leider bringen sie auch eine Samsung Reparatur Prozedur mit sich.
-
Und zu guter Letzt befindet sich noch ein einsamer Chip auf dem Displaykabel:
-
Samsung S6SY761X Touch Controller (wie beim S9+)
-
-
-
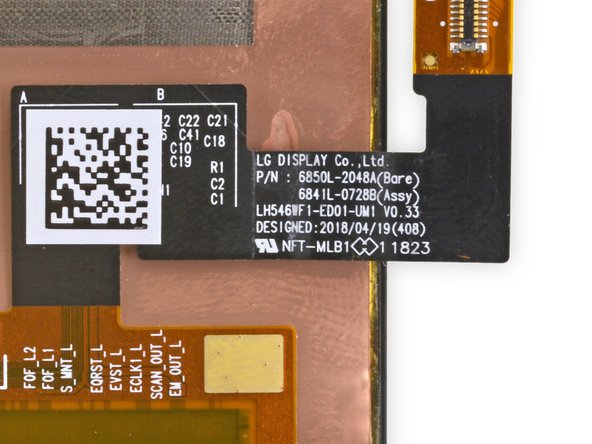
Teardown Update: Aufgrund Eurer Nachfragen haben wir in der Zwischenzeit auch das Display des kleineren Pixel 3 zerlegt und wisst ihr was? Dort haben wir ein LG Display gefunden!
-
Gerüchten zufolge hat LG hart daran gearbeitet, seine OLED-Mobiltechnologie zu verbessern – wir sind gespannt, wie es mit dem neuen Display in diesem Jahr läuft.
That mesh speaker cover looks like a major weak point. Not a lot of extra material or glue holding it in place.
-
-
-
Hier sind all die hübschen Einzelteile des
GalaxyPixel! -
Bist du heiß auf weitere Teardowns? Das Videoteam hat einen Video Teardown des Pixel 3 gemacht!
-
Anscheinend ist das Pixel ein bisschen zu viel mit dem Störenfried Galaxy herumgehangen und die uns vertrauten Antennen-Baugruppen, einen bockigen Akku und ein schwer zu ersetzendes Display von Samsung übernommen!
-
Nicht genug damit, dass man das ganze Smartphone auseinandernehmen muss, um ein kaputtes Display zu tauschen, jetzt musst du auch noch an die Rückseite denken. Das Rückglas des Pixel 2 XL bedeckte 20% der Oberfläche, beim Pixel 3 XL ist die Rückabdeckung zu 100% zerbrechlich. Was die Reparierbarkeit angeht ist das eher schlecht...
-
- Die einzigen verwendeten Schrauben sind T3 Torx Schrauben.
- Der Akku wird mit reparaturfreundlichen dehnbaren Klebestreifen befestigt.
- Runde Dichtungsringe und Kleber für die Wasserdichtigkeit erschweren Reparaturen, allerdings verringern sie das Risiko einer Reparatur durch Wasserschäden.
- Displayreparaturen sind wesentlich komplizierter als bei vorherigen Modellen, man muss dazu das ganze Smartphone auseinandernehmen.
- Um egal welche Komponente zu warten, musst du mühselig die gläserne Rückabdeckung ablösen (und hinterher wieder ankleben).
- Durch eine Vorderseite und eine Rückseite aus Glas ist bei einem Sturz das Risiko eines Bruchs wesentlich höher.


Fazit
Reparierbarkeits-Index


(10 ist am einfachsten zu reparieren)
Besonderer Dank geht an diese Übersetzer:innen:
75%


Diese Übersetzer:innen helfen uns, die Welt zu reparieren! Wie kann ich mithelfen?
Hier starten ›
43 Kommentare
It’s been rumored that the front stereo speakers are louder and more crisp than the 2XL. Is there a visual size difference in the speakers themselves?
The new speaker housing looks a little bigger and might be sealed better than the old one. I’m no speaker expert though, so I’m not sure how much of a difference the new design makes, or if the driver is just better.
To be clear, are BOTH the Pixel 3 and 3XL using Samsung screens? Please say yes.
I came to ask the same question, so I'm subscribing to hear the answer!
Surprise: it’s a LG panel! We’ve added step 14 to reflect this. Thank you for all your patience!
FingerprintCard FPC 1075 fingerprintsensor in a Crucialtec modul…No chance to get a Goodix sensor in a Pixel mobil.
is there a notification led?
Unfortunately, no.
Parker, are you with ifixit? I was hoping to hear from the horses mouth so to speak, since there have been conflicting reports. Some reported around the 10th that people from google said there was, then as of the 14th everyone has been saying no. this is our best chance of getting a reliable answer.
There's no LED. Been using it for a few days now, no sign at all of any LED indicators. I'd really suggest using the always on display for notifications.
Are both front facing speakers the same size on the Pixel 3 XL?
It definitely doesn't feel like it based on normal usage. The bottom one is more bass heavy/responsive and louder, while the top one is quieter and sounds different. Definitely not the same speaker.
NFC comments are completely wrong
-step 6: this is not a NFC antenna, but wireless charging
-step 5: you can see NFC antenna on upper part with two pins connection to motherboard, around “swiss cross”
-step 10: NFC IC NXP PN81B03, between yellow and red IC
Tom,
You are totally right! We definitely bungled that. Thank you for catching the mistake!
Can you tell which audio amplifiers are used?
There is no mention of eSIM MCU as in Pixel 2 or in iPhone Xs whereas the tech spec mentions eSIM support?
Yup, there's esim support because Google wants to support their own Project Fi service.
Got my xl last Friday was working good, I wasn’t having the problems others are. So last night I decided to charge it using a wireless charger that I used on my Samsung S9+ , It showed charging and was working fine wake up and my pixel is now dead! WTF plugged it into charger that comes with it nothing, try reset process nothing. Anyone else with this problem?
I can’t answer to your troubles with it not coming on, but while the Samsung chargers show it’s charging, they do not in fact actually charge the device to my disappointment, and probably many others that are switching from Samsung. Best guess is that the Qi chips are requiring something specific found in the Google Pixel Stand and without it, it doesn’t charge correctly. I tried my Samsung Wireless Charger with the same indication of charging that you got but the device was still losing power so I just set up the Pixel stand for charging. I would recommend, if you haven’t yet, just leave it plugged in for an hour and see if you can get it to turn on, if not, take it back to the store you got it from and replace it.
Does the pixel have video out via USB c?
Yup! You'll need a compatible adapter though.
is the pin hole on the top of the phone a mic? and could I have done damage if they put the sim card tray pin into that hole or is the mic off set from the hole?
The pinhole on top is a mic. I actually did the same thing and stuck the SIM tool inside!! Embarrassing to admit… The microphone seems to still function, however when I look into the hole it looks like I tore the foam dust shield.
Would be great to know how much damage we did, anyone have info on this? It's hard to see what the microphone design is from the teardown.
I did exactly the same looking for a clue on here as to what I have damaged. All seems to be working fine, but there was a definite pop sound as the tool went in
Thanks! I've been curious what's going on inside my phone
My top speaker grill is dented. Based on the teardown, does a dented speaker grill affect the IP rating?
It depends on if the seal around the speaker grille is torn. As a reality precaution, the older the phone gets, the less it’s likely to retain its IP rating.
Dear all, would it be possible to have a higher resolution picture on the Murata chipset (Murata 1QB SS8601001)? Is this the part number or the serial number? I have been trying to look up the specs but I could not find them in the Murata web site. If there are someone that could help me find a brochure or web page with the specs it would be very much appreciated. Best
Wallpaper for 3 XL?
The earpiece speaker is affixed in place with adhesive, but is removable.
Any chance you all would be able to identify the fpc connector on the motherboard for the fingerprint sensor?
Hi Benjamin,
This is the FPC connector for the fingerprint sensor. It’s actually a ZIF socket. Also, Pixel 3 XL guides are in progress and will be available within the next few weeks!
how you dismantle the display of pix 3xl? it has aa thick adhesive on the back?
Hi Kevin,
We have a guide for the display—you can find it here.