Zum Hauptinhalt wechseln
ASUS ROG G46VW Screen Replacement

ASUS ROG G46VW Screen Replacement

Ryan Riley

Ryan Riley und 3 weitere Mitwirkende

Zuletzt aktualisiert am May 7, 2024

30 Minuten
Mittel
Action Shots
Fehlende Angaben

Pay attention to your device as you disassemble so that you can successfully reassemble later.

Was du brauchst

Werkzeuge

Mehr anzeigen …

iFixit erhält eine Provision, wenn du über diese Links etwas kaufst.
  1. ASUS ROG G46VW Screen Replacement, Speaker Cover: Schritt 1, Bild 1 von 1
    • Gently pry the back hinge cover piece away from the device.

  2. ASUS ROG G46VW Screen Replacement: Schritt 2, Bild 1 von 1
    • Disconnect the speaker cable from the motherboard.

  3. ASUS ROG G46VW Screen Replacement, RAM: Schritt 3, Bild 1 von 2 ASUS ROG G46VW Screen Replacement, RAM: Schritt 3, Bild 2 von 2
    • Lift the screw cover and remove the screw using a Phillips #0 screwdriver.

  4. ASUS ROG G46VW Screen Replacement: Schritt 4, Bild 1 von 1
    • Remove the RAM cover by lifting the screw cover and pulling away firmly.

  5. ASUS ROG G46VW Screen Replacement: Schritt 5, Bild 1 von 2 ASUS ROG G46VW Screen Replacement: Schritt 5, Bild 2 von 2
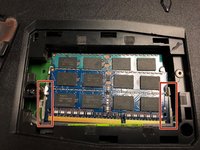
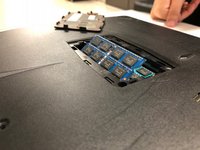
    • Push outwards on the clips to release the RAM stick. The stick should pop up at an angle.

  6. ASUS ROG G46VW Screen Replacement: Schritt 6, Bild 1 von 1
    • Pull out the RAM stick carefully.

    • Do not use a prying motion as this will damage the hardware. Be careful not to damage the gold section of the RAM stick.

  7. ASUS ROG G46VW Screen Replacement: Schritt 7, Bild 1 von 1
    • Repeat steps 3-4 to remove the second RAM stick.

  8. ASUS ROG G46VW Screen Replacement, Keyboard: Schritt 8, Bild 1 von 1
    • Remove the two screws from underneath the RAM cover.

  9. ASUS ROG G46VW Screen Replacement: Schritt 9, Bild 1 von 1
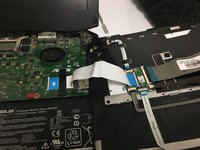
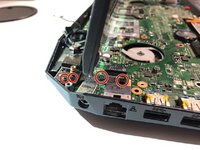
    • Remove all of the screws from the bottom of the case.

    • If replacing the screen, remove the rubber feet to reveal two more screws.
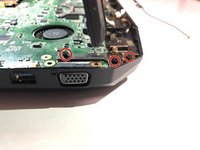
  10. ASUS ROG G46VW Screen Replacement: Schritt 10, Bild 1 von 1
    • Turn the laptop over and remove the screws as shown

  11. ASUS ROG G46VW Screen Replacement: Schritt 11, Bild 1 von 1
    • Carefully pry the keyboard away using your spudger and the opening tools.

    • Be sure not to damage the clips holding the keyboard to the bottom case.

  12. ASUS ROG G46VW Screen Replacement: Schritt 12, Bild 1 von 2 ASUS ROG G46VW Screen Replacement: Schritt 12, Bild 2 von 2
    • Detach the ribbon cable by releasing the clip

  13. ASUS ROG G46VW Screen Replacement, Screen: Schritt 13, Bild 1 von 2 ASUS ROG G46VW Screen Replacement, Screen: Schritt 13, Bild 2 von 2
    • Remove screws from silver braces.

  14. ASUS ROG G46VW Screen Replacement: Schritt 14, Bild 1 von 1
    In diesem Schritt verwendetes Werkzeug:
    Tweezers
    $4.99
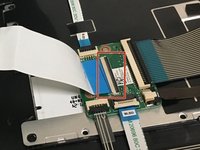
    • Use tweezers to remove golden screw caps.

  15. ASUS ROG G46VW Screen Replacement: Schritt 15, Bild 1 von 1
    • Remove tape and gently pull up on golden cap connectors to disconnect them.

  16. ASUS ROG G46VW Screen Replacement: Schritt 16, Bild 1 von 1
    • Gently pull the white connector until it comes loose.

Abschluss

To reassemble your device, follow these instructions in reverse order.

2 weitere Personen haben diese Anleitung absolviert.

Ryan Riley

Mitglied seit: 09/21/18

154 Reputation

1 Anleitung geschrieben

Team

0 Kommentare

Kommentar hinzufügen

Seitenaufrufe:

Letzte 24 Stunden: 0

Letzte 7 Tage: 0

Letzte 30 Tage: 5

Insgesamt: 550