
Acer Nitro 5 AN515-53-55G9 Battery Replacement
Einleitung
Zu Schritt 1 der AnleitungUse this guide to replace the Battery in the Acer Nitro 5 Acer Nitro 5 AN515-53-55G9. This laptop has a 4-cell battery, with this guide you can replace the battery if it is damaged or not working.
Was du brauchst
Fix Kit
Dieses Kit enthält alle Ersatzteile und Werkzeuge, die für die Anleitung benötigt werden.

Ersatzteile

Werkzeuge


Mehr anzeigen …
-
-
Flip the laptop upside down so that the bottom is facing up.
-
Identify the RAM tray on the bottom of the laptop.
-
-
-
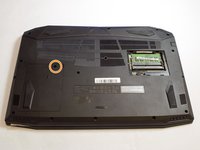
Use the Phillips #0 screwdriver to remove the 9mm screw in the bottom left corner of the RAM tray covering.
-
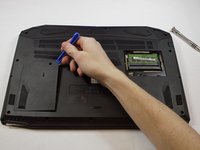
Remove the RAM tray cover by prying up with a spudger.
-
-
-
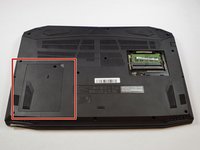
Identify the Hard Drive tray to the left side of the laptop.
-
Remove screw with a #0 Philips screwdriver.
-
Lift up the Slot covering using a spunger.
-
-
-
Use the Phillips #0 screwdriver to remove the 9mm screws holding the back cover in place.
-
Remove the screws from the hard drive and remove it from the device.
-
-
-
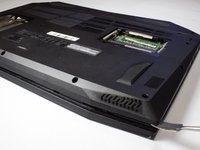
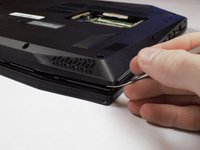
Carefully remove the back shell from the device working your way around all the edges.
-
-
-
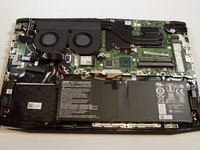
Removing the back shell of the computer and it will look like this.
-
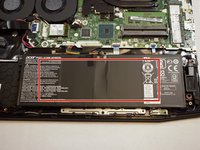
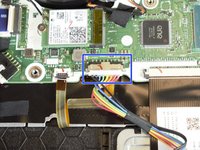
The battery for the device is located at the bottom middle of the laptop at this orientation.
-
-
-
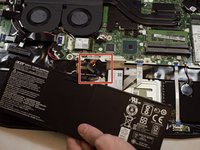
Locate the connector of the battery to the motherboard.
-
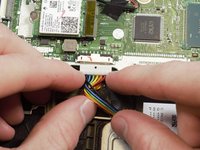
Using your fingers, slide out the connector.
-


To reassemble your device, follow these instructions in reverse order.
To reassemble your device, follow these instructions in reverse order.
Rückgängig: Ich habe diese Anleitung nicht absolviert.
12 weitere Personen haben diese Anleitung absolviert.
Team

Appalachian State University, Team S2-G2, Menagarishvili Spring 2019 Mitglied von Appalachian State University, Team S2-G2, Menagarishvili Spring 2019
APSU-MENAGARISHVILI-S19S2G2
3 Mitglieder
10 Anleitungen geschrieben
3 Kommentare
For future articles, you might consider adding a section describing how to “initialize” the replacement battery pack to maximize life.
Either that, or at least mention initialization plays a part in maximizing battery life and point to another article that provides reliable information.
Thanks for the article.