
Akai MPK25 LCD Replacement
Einleitung
Zu Schritt 1 der AnleitungUse this guide to replace a screen that is scratched, cracked, or broken.
Was du brauchst
Ersatzteile
Werkzeuge


Mehr anzeigen …
-
-
Using needle nose pliers, remove the washers from the four corner selector knobs.
-
-
-
Flip the device over. Using a Philips #2 screw driver, remove the fourteen 10.3 mm black screws holding the back panel in place.
-
-
-
-
Carefully flip the device to the front making sure you secure the face plate and the chassis together.
-
-
-
Rotate the device 180 degrees and carefully remove the face plate by slightly lifting the screen side towards you and then sliding the bottom out from under the keys.
-
-
-
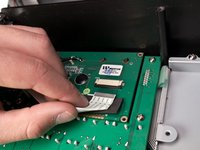
Using a Phillips #2 screwdriver, remove the one 9.8mm screw holding down the ground wire.
-
-
-
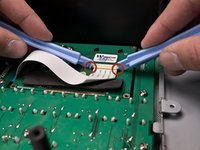
Using two plastic opening tools, slide the black locking mechanism on the ZIF connector towards you. This will remove the ribbon cable connecting the motherboard to the screen.
-


To reassemble the display, follow these instructions in reverse order.
To reassemble the display, follow these instructions in reverse order.
Rückgängig: Ich habe diese Anleitung nicht absolviert.
3 weitere Personen haben diese Anleitung absolviert.
Team

Cal Poly, Team 20-6, Maness Winter 2013 Mitglied von Cal Poly, Team 20-6, Maness Winter 2013
CPSU-MANESS-W13S20G6
5 Mitglieder
6 Anleitungen geschrieben