
Asus ROG GL551J RAM Replacement
Einleitung
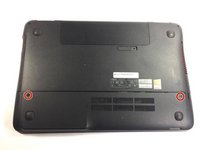
Zu Schritt 1 der AnleitungUse this guide to replace the RAM on your Asus ROG GL551J. Make sure that any new RAM has a DDR3 connection type to correctly fit into this device.
Was du brauchst

-
-
-
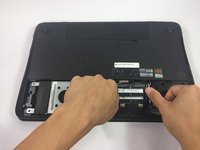
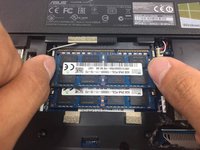
Place thumbs on the locking tabs of both sides of the RAM stick and push outwards to unlock.
-
-
-
RAM should pop up at about 45 degrees. Pull outwards with fingers on the side of the RAM to remove.
-


Congratulations, you now know how to replace the RAM sticks for your Asus ROG GL551J laptop, and this process can also apply to other similar laptops that you may acquire in the future.
Congratulations, you now know how to replace the RAM sticks for your Asus ROG GL551J laptop, and this process can also apply to other similar laptops that you may acquire in the future.
Rückgängig: Ich habe diese Anleitung nicht absolviert.
3 weitere Personen haben diese Anleitung absolviert.
Team

USF Tampa, Team 5-4, Lacy Spring 2017 Mitglied von USF Tampa, Team 5-4, Lacy Spring 2017
USFT-LACY-S17S5G4
4 Mitglieder
5 Anleitungen geschrieben