
Asus ROG Strix GL702VS Back Cover Replacement

Einleitung
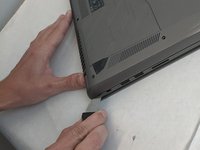
Zu Schritt 1 der AnleitungThis simple guide will be used in almost every step involved in repairing the computer. You will need to remove the bottom cover to access all of the components of the computer. This should be done in a contained well-lit setting since the small screws may be easy to lose in low light settings.
Was du brauchst


-
-
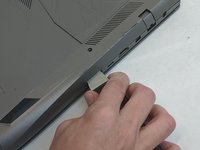
Remove the ten JIS #0 screws around the edge of the laptop.
-
The two bottom screws are slightly shorter
-
-


To reassemble your device, follow these instructions in reverse order.
To reassemble your device, follow these instructions in reverse order.
Rückgängig: Ich habe diese Anleitung nicht absolviert.
Eine weitere Person hat diese Anleitung absolviert.

Team

Embry-Riddle Aeronautical University, Team S8-G6, Salas Fall 2019 Mitglied von Embry-Riddle Aeronautical University, Team S8-G6, Salas Fall 2019
ERAU-SALAS-F19S8G6
4 Mitglieder
7 Anleitungen geschrieben