Zum Hauptinhalt wechseln
Blackstone Cascade Pro Fan Replacement

Blackstone Cascade Pro Fan Replacement

Mohamed Mallah

Mohamed Mallah und 2 weitere Mitwirkende

Zuletzt aktualisiert am January 10, 2025

15 - 20 Minuten
Mittel

I will demonstrate the process of replacing the fan of a Blackstone Cascade Pro Personal Fan. Over time when a fan is exposed to excessive use the fan can be damaged. I will show people how to restore their fans to working order.

I believe this guide is needed because a damaged fan can be a major problem. If it is damaged it can potentially cause the entire fan to break and replacing it can often be very expensive. Replacing the main fan can help environmental waste and save you money.

Was du brauchst

iFixit erhält eine Provision, wenn du über diese Links etwas kaufst.
  1. Blackstone Cascade Pro Fan Replacement, Fan: Schritt 1, Bild 1 von 3 Blackstone Cascade Pro Fan Replacement, Fan: Schritt 1, Bild 2 von 3 Blackstone Cascade Pro Fan Replacement, Fan: Schritt 1, Bild 3 von 3
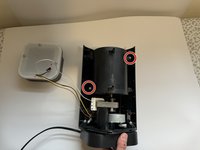
    • Remove the four screws surrounding the back of the Blackstone fan using a Phillips #00 screwdriver.

    • Remove the cover at the back of the fan.

  2. Blackstone Cascade Pro Fan Replacement: Schritt 2, Bild 1 von 2 Blackstone Cascade Pro Fan Replacement: Schritt 2, Bild 2 von 2
    • Remove the diamond cover at the top of the fan.

    • The diamond cover will be connected to a set of wires to the fan. Simply place the cover to the side for the rest of the repair.

  3. Blackstone Cascade Pro Fan Replacement: Schritt 3, Bild 1 von 3 Blackstone Cascade Pro Fan Replacement: Schritt 3, Bild 2 von 3 Blackstone Cascade Pro Fan Replacement: Schritt 3, Bild 3 von 3
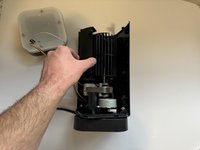
    • Remove the two screws that are holding the spherical cover shielding the main fan using a Phillips #00 screwdriver.

    • Remove the spherical cover surrounding the main fan.

  4. Blackstone Cascade Pro Fan Replacement: Schritt 4, Bild 1 von 2 Blackstone Cascade Pro Fan Replacement: Schritt 4, Bild 2 von 2
    • On the opposite side there will be a cover identical to the one removed in the previous step.

    • Twist the main fan to remove the cover on the opposite side.

  5. Blackstone Cascade Pro Fan Replacement: Schritt 5, Bild 1 von 3 Blackstone Cascade Pro Fan Replacement: Schritt 5, Bild 2 von 3 Blackstone Cascade Pro Fan Replacement: Schritt 5, Bild 3 von 3
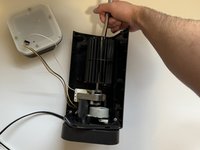
    • Using the socket wrench, and a size 10 shallow socket, remove the hexagon screw at the center of the main fan.

    • Pull out the main fan.

    • Depending on the age of your fan, it may require more strength to pull it out. Be careful to not use too much force.

Abschluss

To reassemble your device, follow these instructions in reverse order.

2 weitere Personen haben diese Anleitung absolviert.

Team

York University, Team P-1, O'Regan Winter 2024 Mitglied von York University, Team P-1, O'Regan Winter 2024

YORK-O'REGAN-W24SPG1

1 Mitglied

1 Anleitung geschrieben

0 Kommentare

Kommentar hinzufügen

Seitenaufrufe:

Letzte 24 Stunden: 1

Letzte 7 Tage: 4

Letzte 30 Tage: 8

Insgesamt: 296