
Bose SoundLink Mini Akkuabdeckung tauschen
Einleitung
Zu Schritt 1 der AnleitungDie Akkuabdeckung ist eine Gummiklappe über dem Akku am Boden des Lautsprechers. Sie lässt sich erst mit den Fingern entfernen, wenn vorher ein paar andere Schritte durchgeführt worden sind. In dieser Anleitung siehst du, wie du die Akkuabdeckung in deinem Bose SoundLink Mini austauschen kannst.
Was du brauchst
Ersatzteile

Werkzeuge


Mehr anzeigen …
-
-
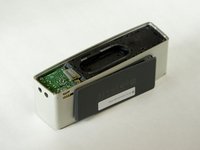
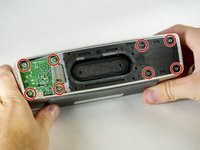
Löse die Batterieabdeckung aus Gummi ab und entferne die vier mit Kreisen bezeichneten 6 mm T8 Schrauben.
-
-
-
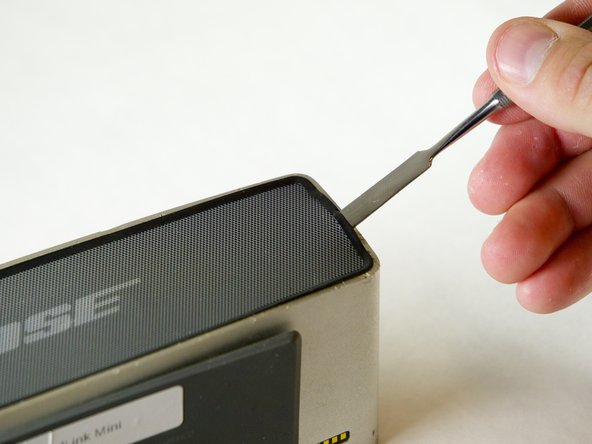
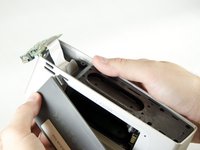
Setze einen Spatel zwischen der Gummikante am Gitter und dem Aluminiumgehäuse ein.
-
-
-
-
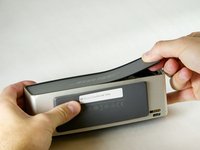
Das Gitter ist mit doppelseitigen Klebeband am Lautsprecher befestigt. Um es zu entfernen musst du es vorsichtig nach oben und gleichzeitig nach rechts ziehen.
-
-
-
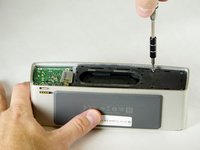
Entferne die vier 15 mm Torx T8-Schrauben auf der linken Seite und die vier 9,0 mm Torx T8-Schrauben auf der rechten Seite.
-
-
-
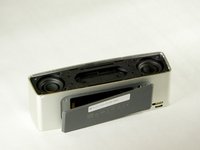
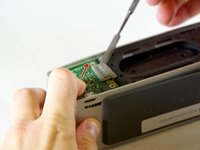
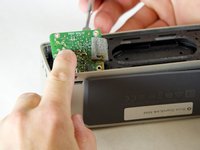
Schiebe die Platine mit dem Zeigefinger in die gezeigte Richtung und hebe sie gleichzeitig mit einem Nylon- oder Metallspudger zum Entfernen hoch.
-
-
-
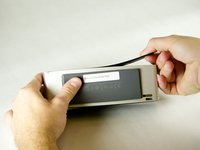
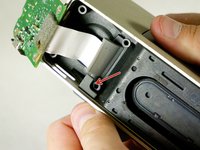
Ziehe vorsichtig an der Akkuabdeckung, bis die Gummilasche aus dem Aluminiumgehäuse herauskommt.
-


Um dein Gerät wieder zusammenbauen, folge den Schritten in umgekehrter Reihenfolge.
Um dein Gerät wieder zusammenbauen, folge den Schritten in umgekehrter Reihenfolge.
Rückgängig: Ich habe diese Anleitung nicht absolviert.
7 weitere Personen haben diese Anleitung absolviert.
Besonderer Dank geht an diese Übersetzer:innen:
100%
VauWeh hilft uns, die Welt in Ordnung zu bringen! Wie kann ich mithelfen?
Hier starten ›
Team

Cal Poly, Team 1-23, Maness Fall 2015 Mitglied von Cal Poly, Team 1-23, Maness Fall 2015
CPSU-MANESS-F15S1G23
4 Mitglieder
21 Anleitungen geschrieben
3 Kommentare
@rajpotus: I had the same problem. If the little rubber tab is not damaged (mine was fine), you should be able to follow these instructions to replace it. But I have these comments on the instructions:
1) You do NOT need to remove the front grill. I have no idea why they suggest you do that here.
2) I think the reason you remove the battery is to make sure the circuit board has zero power on it when you work on it — otherwise a touch of the screwdriver to an unlucky spot on the board might short/burn something out. But I don’t think there’s any mechanical reason to remove it.
3) Once you pop off the back grill cover, you should be able to slide the tab through the slot and coax it up (maybe with a tooth-pick and/or tweezers) on top of the circuit board, but it’s probably better to unscrew the circuit board (as directed here) which makes it easier to push the rubber tab through. Then slide the circuit board back under the tab and screw it back into place.