
Canon PowerShot A80 Back Cover Replacement
Einleitung
Zu Schritt 1 der AnleitungThis step-by-step guide demonstrates how to remove the back cover of the Canon PowerShot A80 camera. You may need to use this guide to access the internal components of the camera, as a prerequisite to another guide, or if the back cover breaks or cracks.
It's important to note where each screw is removed. If installed incorrectly, it may damage the camera.
TIPS:
- Use an ice cube tray or egg carton, place each screw in its own cup.
- Make notes on a piece of paper.
Before you begin this guide, turn off your camera and unplug it from the charger. It is also a good idea to remove the battery before you begin.
Was du brauchst
Werkzeuge


-
-
Open the door to the CompactFlash memory card slot by sliding it towards you and swinging it open.
-
Remove the memory card if it is still in the camera.
-
Use the Phillips #00 screwdriver to remove the single screw underneath the memory card slot door.
-
-
-
Remove the Phillips #00 screw located inside the top of the memory card compartment.
-
-
-
-
Open the battery compartment door at the bottom of the camera by sliding the latch to the right and then sliding the door down.
-
Remove the batteries from the compartment.
-
Remove the three Phillips #00 screws located inside the battery compartment.
-
-
-
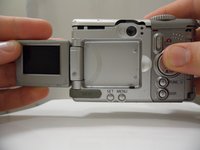
Remove the top lid of the camera.
-
The door to the memory card compartment will be freed and should be removable now.
-
-
-
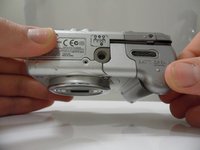
Remove the two Phillips #00 screws from the side of the camera.
-
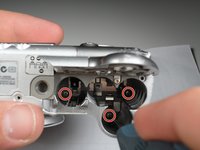
Open the small rubber door below this screw that covers the connectors.
-
-
-
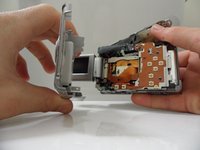
Open and pivot the LCD screen to its widest open position.
-
Remove the rear cover by pulling it straight away from the body of the camera.
-


To reassemble your device, follow these instructions in reverse order.
To reassemble your device, follow these instructions in reverse order.
Team

Cal Poly, Team 7-31, Regan Winter 2011 Mitglied von Cal Poly, Team 7-31, Regan Winter 2011
CPSU-REGAN-W11S7G31
6 Mitglieder
12 Anleitungen geschrieben