
Canon PowerShot A80 Front Cover Replacement
Einleitung
Zu Schritt 1 der AnleitungHave you dropped your Canon Powershot A80 once or twice over the years, and now the cover is a little loose or even coming off, making it hard to hold it steady? Have you thought about using tape (like me) to hold it on?
Great news—this guide is for you (and you won't have to use tape!)
Follow the instructions in this guide to help you remove and replace the front cover of your camera so you can have a better grip when taking photos and don’t have to worry about the cover falling off. You also might use this guide if you need to access the internal components of your camera if you are working on another repair.
Before you begin this repair, be sure that your camera is off and unplugged from the charger. For an additional safety measure, remove the battery before you begin too.
Was du brauchst
Werkzeuge


-
-
Open the door to the CompactFlash memory card slot by sliding it towards you and swinging it open.
-
Remove the memory card if it is still in the camera.
-
Use the Phillips #00 screwdriver to remove the single screw underneath the memory card slot door.
-
-
-
Remove the Phillips #00 screw located inside the top of the memory card compartment.
-
-
-
Open the battery compartment door at the bottom of the camera by sliding the latch to the right and then sliding the door down.
-
Remove the batteries from the compartment.
-
Remove the three Phillips #00 screws located inside the battery compartment.
-
-
-
-
Remove the top lid of the camera.
-
The door to the memory card compartment will be freed and should be removable now.
-
-
-
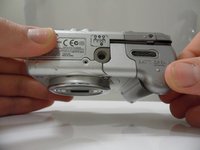
Remove the two Phillips #00 screws from the side of the camera.
-
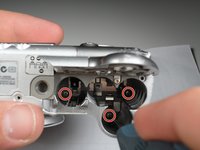
Open the small rubber door below this screw that covers the connectors.
-
-
-
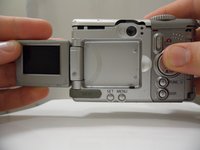
Open and pivot the LCD screen to its widest open position.
-
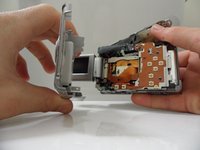
Remove the rear cover by pulling it straight away from the body of the camera.
-
-
-
Using a Phillips #00 screwdriver, remove the 3.3 mm long top screw located on the side of the camera. This screw holds the side panels and the front cover together.
-
-
-
Using the Phillips #00 screwdriver, unscrew the 2.4 mm long screw that holds on the front panel underneath the side panel.
-
-
-
Underneath the battery cover there is a 3.8 mm screw in the corner. Using the Phillips #00 screwdriver, remove this screw.
-


To reassemble your device, follow these instructions in reverse order.
To reassemble your device, follow these instructions in reverse order.
Team

Cal Poly, Team 7-31, Regan Winter 2011 Mitglied von Cal Poly, Team 7-31, Regan Winter 2011
CPSU-REGAN-W11S7G31
6 Mitglieder
12 Anleitungen geschrieben