Zum Hauptinhalt wechseln
Canon Powershot A3300 IS Motherboard Replacement

Canon Powershot A3300 IS Motherboard Replacement

Phillip Chen

Phillip Chen und 4 weitere Mitwirkende

Zuletzt aktualisiert am May 7, 2024

10 - 15 Minuten
Schwierig

This guide will show you how to replace the motherboard in your computer if it is broken or malfunctioning. In this guide you will be dealing with fragile parts, to avoid further damage handle all parts with care.

Was du brauchst

Werkzeuge

  1. Canon Powershot A3300 IS Motherboard Replacement, Back Cover: Schritt 1, Bild 1 von 3 Canon Powershot A3300 IS Motherboard Replacement, Back Cover: Schritt 1, Bild 2 von 3 Canon Powershot A3300 IS Motherboard Replacement, Back Cover: Schritt 1, Bild 3 von 3
    • Remove four 2.7 mm screws, two on each side, from the camera with a JIS 000 screwdriver.

    • Remove one 3.5 mm screw on the bottom of the camera with a JIS 000 screwdriver.

    • When removing the front and back housings, be careful to not break the tabs that hook into the top section of the chassis.

  2. Canon Powershot A3300 IS Motherboard Replacement: Schritt 2, Bild 1 von 2 Canon Powershot A3300 IS Motherboard Replacement: Schritt 2, Bild 2 von 2
    • Pull off the back cover.

  3. Canon Powershot A3300 IS Motherboard Replacement, Front Cover: Schritt 3, Bild 1 von 2 Canon Powershot A3300 IS Motherboard Replacement, Front Cover: Schritt 3, Bild 2 von 2
    • Pull the front cover off.

  4. Canon Powershot A3300 IS Motherboard Replacement, Motherboard: Schritt 4, Bild 1 von 2 Canon Powershot A3300 IS Motherboard Replacement, Motherboard: Schritt 4, Bild 2 von 2
    • Remove the black cover to expose the motherboard.

  5. Canon Powershot A3300 IS Motherboard Replacement: Schritt 5, Bild 1 von 2 Canon Powershot A3300 IS Motherboard Replacement: Schritt 5, Bild 2 von 2
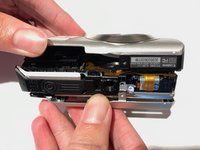
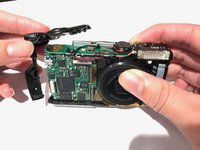
    • Remove the shutter button located at the top left of the camera.

    • This will expose the screws that need to be removed.

  6. Canon Powershot A3300 IS Motherboard Replacement: Schritt 6, Bild 1 von 1
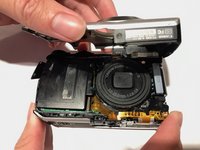
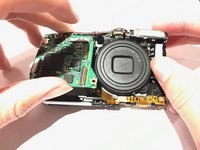
    • Using a JIS 000 screwdriver, remove the 1.2mm screw at the top left of the motherboard.

  7. Canon Powershot A3300 IS Motherboard Replacement: Schritt 7, Bild 1 von 1
    • Remove the 1.6mm screw at the top of the camera.

  8. Canon Powershot A3300 IS Motherboard Replacement: Schritt 8, Bild 1 von 1
    In diesem Schritt verwendetes Werkzeug:
    Tweezers
    $4.99
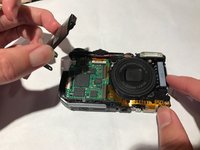
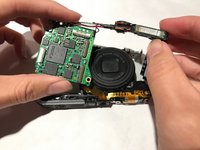
    • Use tweezers to pull out brown flat flexible wires from their connection.

    • Remember to gently wiggle the wires from the connection since they are very fragile connectors.

  9. Canon Powershot A3300 IS Motherboard Replacement: Schritt 9, Bild 1 von 1
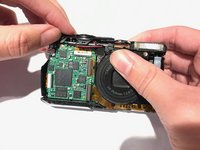
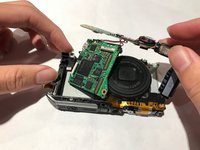
    • Remove the last 1.2mm screw to pull out the motherboard.

    • The motherboard should freely separate from the housing.

  10. Canon Powershot A3300 IS Motherboard Replacement: Schritt 10, Bild 1 von 3 Canon Powershot A3300 IS Motherboard Replacement: Schritt 10, Bild 2 von 3 Canon Powershot A3300 IS Motherboard Replacement: Schritt 10, Bild 3 von 3
    • Remove motherboard and replace with a new one.

Abschluss

To reassemble your device, follow these instructions in reverse order.

Phillip Chen

Mitglied seit: 10/17/17

440 Reputation

4 Anleitungen geschrieben

Team

UC Santa Barbara, Team S2-G7, Weedon Fall 2017 Mitglied von UC Santa Barbara, Team S2-G7, Weedon Fall 2017

UCSB-WEEDON-F17S2G7

4 Mitglieder

10 Anleitungen geschrieben

0 Kommentare

Kommentar hinzufügen

Seitenaufrufe:

Letzte 24 Stunden: 1

Letzte 7 Tage: 3

Letzte 30 Tage: 12

Insgesamt: 604