
Cleaning the Fan Blades
Einleitung
Zu Schritt 1 der AnleitungThis guide will disassemble the fan to clean the fan blades.
Was du brauchst
Werkzeuge


-
-
Use the Phillips #2 screwdriver to remove the four 6 mm screws by unscrewing counterclockwise.
-
-
-
-
Remove the Phillips 6 mm screw that holds the circuit board to the outer shell of the fan.
-
-
-
Remove the top cover containing the circuit board and the wires by pulling it away from the outer shell of the fan.
-
-
-
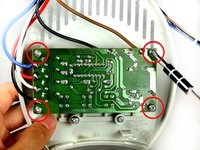
Remove the screws from the four corners of the circuit board.
-
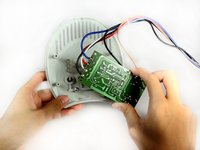
Remove the circuit board from the top cover.
-
-
-
Follow steps 1-4 to remove the front, back, and top covers of the fan to reach the fan blades.
-
Use a cloth to clean off dust clogged in between the fan blades.
-


To reassemble your device, follow these instructions in reverse order.
To reassemble your device, follow these instructions in reverse order.
Rückgängig: Ich habe diese Anleitung nicht absolviert.
Eine weitere Person hat diese Anleitung absolviert.
Team

Cal Poly, Team 15-46, Forte Fall 2012 Mitglied von Cal Poly, Team 15-46, Forte Fall 2012
CPSU-FORTE-F12S15G46
5 Mitglieder
6 Anleitungen geschrieben