Zum Hauptinhalt wechseln
Craftsman 9.0 HP 26 Inch Snow Blower Fuel Tank  Replacement

Craftsman 9.0 HP 26 Inch Snow Blower Fuel Tank Replacement

Megan Smith

Megan Smith und 4 weitere Mitwirkende

Zuletzt aktualisiert am December 6, 2022

15 Minuten
Mittel

Follow this guide to replace the fuel tank on your Craftsman 9.0 HP 26 Inch Snow Blower.

The Fuel tank only would need to be replaced on your Craftsman 9.0 HP 26 Inch Snow Blower if it is dented, cracked, or damaged.

When replacing the fuel tank, the hazardous material that you will be in contact with will be the fuel, gasoline.

Gasoline is a flammable liquid; ensure the gas tank is empty before working on the snow blower tank.

Was du brauchst

iFixit erhält eine Provision, wenn du über diese Links etwas kaufst.
  1. Craftsman 9.0 HP 26 Inch Snow Blower Fuel Tank  Replacement, Fuel Tank: Schritt 1, Bild 1 von 2 Craftsman 9.0 HP 26 Inch Snow Blower Fuel Tank  Replacement, Fuel Tank: Schritt 1, Bild 2 von 2
    • Remove the fuel line from the fuel tank with pliers.

  2. Craftsman 9.0 HP 26 Inch Snow Blower Fuel Tank  Replacement: Schritt 2, Bild 1 von 2 Craftsman 9.0 HP 26 Inch Snow Blower Fuel Tank  Replacement: Schritt 2, Bild 2 von 2
    • Take off the fuel cap and place a safe container under the fuel line.

    • Make sure to drain all of the fuel from the fuel tank into the container.

  3. Craftsman 9.0 HP 26 Inch Snow Blower Fuel Tank  Replacement: Schritt 3, Bild 1 von 2 Craftsman 9.0 HP 26 Inch Snow Blower Fuel Tank  Replacement: Schritt 3, Bild 2 von 2
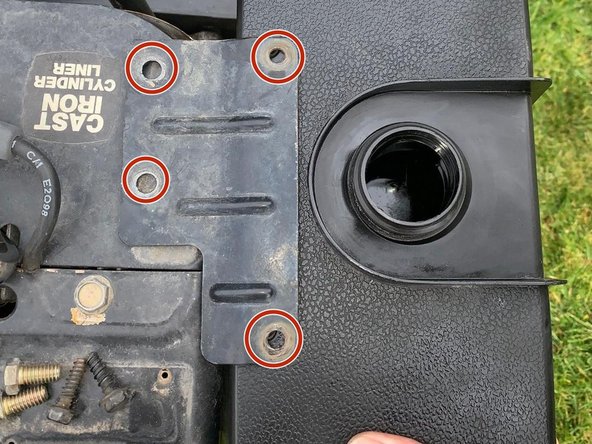
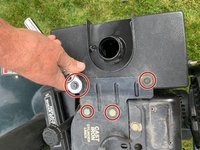
    • Remove the four support bolts on the top of the tank and motor with a crescent wrench or socket wrench.

  4. Craftsman 9.0 HP 26 Inch Snow Blower Fuel Tank  Replacement: Schritt 4, Bild 1 von 1
    • Lift the fuel tank off of the lower supporting brackets.

  5. Craftsman 9.0 HP 26 Inch Snow Blower Fuel Tank  Replacement: Schritt 5, Bild 1 von 1
    • Replace the cracked fuel tank and place the new one onto the lower supporting brackets.

  6. Craftsman 9.0 HP 26 Inch Snow Blower Fuel Tank  Replacement: Schritt 6, Bild 1 von 1
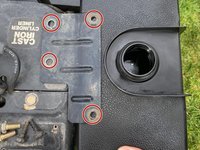
    • Screw in the top four supporting bracket bolts with a crescent wrench or socket wrench to hold the new fuel tank in place.

  7. Craftsman 9.0 HP 26 Inch Snow Blower Fuel Tank  Replacement: Schritt 7, Bild 1 von 1
    • Reconnect the fuel line and hose clamp.

  8. Craftsman 9.0 HP 26 Inch Snow Blower Fuel Tank  Replacement: Schritt 8, Bild 1 von 1
    • Fill the tank with fuel.

    • Check to make sure that the hose clamp is not leaking.

Abschluss

To reassemble your device, follow these instructions in reverse order.

Megan Smith

Mitglied seit: 10/07/19

169 Reputation

1 Anleitung geschrieben

0 Kommentare

Kommentar hinzufügen

Seitenaufrufe:

Letzte 24 Stunden: 0

Letzte 7 Tage: 4

Letzte 30 Tage: 12

Insgesamt: 2,245