Zum Hauptinhalt wechseln
Gemeinsam reparieren - Jetzt registrieren
Dell Inspiron 13 N3010 Display Assembly Replacement

Dell Inspiron 13 N3010 Display Assembly Replacement

Terrence15

Terrence15 und eine weitere beteiligte Person

Zuletzt aktualisiert am 14. Nov 2019

7 - 10 Minuten
Leicht
Anleitung eines Community-Mitglieds

In this guide, we will show you how to remove and replace the Display Assembly.

Was du brauchst

Werkzeuge

  1. Dell Inspiron 13 N3010 Display Assembly Replacement, Remove the Screws: Schritt 1, Bild 1 von 1
    • WARNING: Before working inside your computer, read the safety information that shipped with your computer. Follow the instructions in Before You Begin.

    • CAUTION: To avoid electrostatic discharge, ground yourself by using a wrist grounding strap or by periodically touching an unpainted metal surface (such as a connector on your computer).

    • Remove the two screws on the bottom of the computer that secure the display assembly to the computer base.

  2. Dell Inspiron 13 N3010 Display Assembly Replacement, Disconnecting the Display Cable: Schritt 2, Bild 1 von 1
    • Open the display as far as possible.

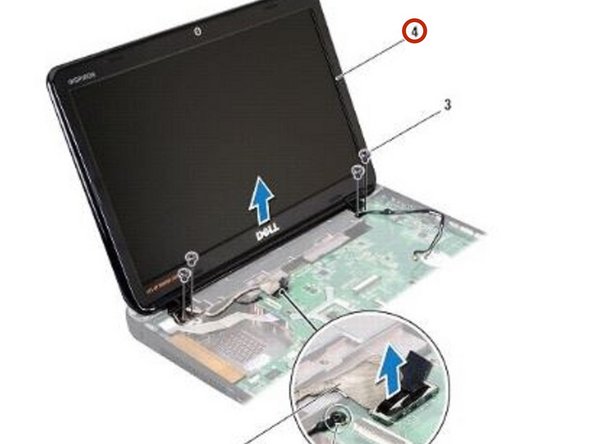
    • Pull the pull-tab to disconnect the display cable from the connector on the system board.

  3. Dell Inspiron 13 N3010 Display Assembly Replacement, Remove the Display Cable: Schritt 3, Bild 1 von 1
    • Remove the display cable grounding screw.

    • NOTE: Open the display at a 90-degree angle to the plane.

  4. Dell Inspiron 13 N3010 Display Assembly Replacement, Remove the Screws: Schritt 4, Bild 1 von 1
    • In sequential order (indicated on the display hinge), remove the four screws that secure the display assembly to the computer base.

  5. Dell Inspiron 13 N3010 Display Assembly Replacement, Lifting the Display Assembly: Schritt 5, Bild 1 von 1
    • Lift the display assembly off the computer.

  6. Dell Inspiron 13 N3010 Display Assembly Replacement, Placing the Display Assembly: Schritt 6, Bild 1 von 1
    • Place the NEW display assembly in position.

  7. Dell Inspiron 13 N3010 Display Assembly Replacement, Replace the Screws: Schritt 7, Bild 1 von 1
    • In sequential order (indicated on the display hinge), replace the four screws that secure the display assembly to the computer base.

  8. Dell Inspiron 13 N3010 Display Assembly Replacement, Connecting the Display Cable: Schritt 8, Bild 1 von 1
    • Connect the display cable to the connector on the system board.

  9. Dell Inspiron 13 N3010 Display Assembly Replacement, Replace the Display Cable: Schritt 9, Bild 1 von 1
    • Replace the display cable grounding screw.

  10. Dell Inspiron 13 N3010 Display Assembly Replacement, Replace the Screws: Schritt 10, Bild 1 von 1
    • Turn the computer over and replace the two screws that secure the display assembly to the computer base.

Abschluss

To reassemble your device, follow these instructions in reverse order.

Eine weitere Person hat diese Anleitung absolviert.

Rüste dich für deine nächste Reparatur

Alle in den Warenkorb legen

Terrence15

Mitglied seit: 12/18/17

79.795 Reputation

441 Anleitungen geschrieben

Team

RampUP America, Inc. Mitglied von RampUP America, Inc.

Community

43 Mitglieder

1.991 Anleitungen geschrieben

0 Kommentare zur Anleitung

Kommentar hinzufügen

Seitenaufrufe:

Letzte 24 Stunden: 0

Letzte 7 Tage: 2

Letzte 30 Tage: 14

Insgesamt: 444