Zum Hauptinhalt wechseln
Dell Inspiron 15-3531 Fan Replacement

Dell Inspiron 15-3531 Fan Replacement

Kody Dahlke

Kody Dahlke und 2 weitere Mitwirkende

Zuletzt aktualisiert am August 9, 2019

15 - 20 Minuten
Mittel

As laptop fans age, they have a chance to break and may need to be replaced. Make sure the motherboard ventilation fan is at room temperature and not near any hazardous materials that could destroy it during the removal process.

Was du brauchst

Werkzeuge

Mehr anzeigen …

  1. Dell Inspiron 15-3531 Fan Replacement, Battery: Schritt 1, Bild 1 von 3 Dell Inspiron 15-3531 Fan Replacement, Battery: Schritt 1, Bild 2 von 3 Dell Inspiron 15-3531 Fan Replacement, Battery: Schritt 1, Bild 3 von 3
    • Remove the battery to avoid electrical discharge while working with this system.

    • Flip the laptop over.

    • Slide the latches toward the edges to unlock the battery.

    • Lift the battery out of the laptop.

  2. Dell Inspiron 15-3531 Fan Replacement, Motherboard: Schritt 2, Bild 1 von 3 Dell Inspiron 15-3531 Fan Replacement, Motherboard: Schritt 2, Bild 2 von 3 Dell Inspiron 15-3531 Fan Replacement, Motherboard: Schritt 2, Bild 3 von 3
    • Loosen the two screws on the access panel using the PH1 head screwdriver.

    • Pry the access panel open with the spudger.

  3. Dell Inspiron 15-3531 Fan Replacement: Schritt 3, Bild 1 von 3 Dell Inspiron 15-3531 Fan Replacement: Schritt 3, Bild 2 von 3 Dell Inspiron 15-3531 Fan Replacement: Schritt 3, Bild 3 von 3
    • Remove the memory card by pulling apart the latches holding it in place.

  4. Dell Inspiron 15-3531 Fan Replacement: Schritt 4, Bild 1 von 1
    • Remove the nine 8.65mm screws holding the backplate to the laptop using the PH0 head screwdriver.

    • Remove the four 1.22 mm screws holding the backplate to the laptop using the PH0 head screwdriver.

  5. Dell Inspiron 15-3531 Fan Replacement: Schritt 5, Bild 1 von 3 Dell Inspiron 15-3531 Fan Replacement: Schritt 5, Bild 2 von 3 Dell Inspiron 15-3531 Fan Replacement: Schritt 5, Bild 3 von 3
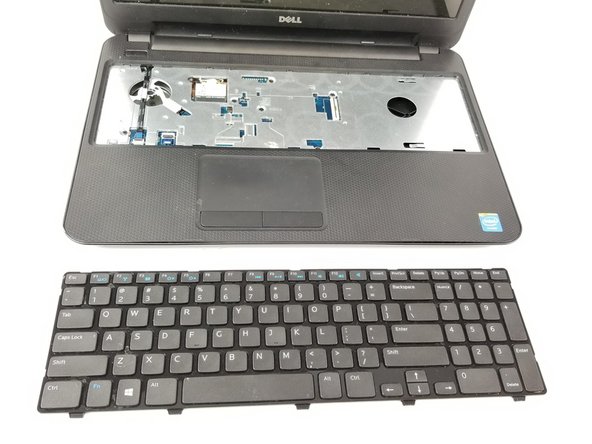
    • Depress (push in, not down) the five tabs at the top of the keyboard and the two on each side of the keyboard using a flat head screwdriver.

    • Pry the keyboard from the laptop using the spudger.

    • Be careful when lifting out the keyboard because there is a cable connecting it to the laptop.

  6. Dell Inspiron 15-3531 Fan Replacement: Schritt 6, Bild 1 von 3 Dell Inspiron 15-3531 Fan Replacement: Schritt 6, Bild 2 von 3 Dell Inspiron 15-3531 Fan Replacement: Schritt 6, Bild 3 von 3
    • Lift the latch holding down the cable using a flat head screwdriver.

    • Slide the cable out.

    • This will free the keyboard from the laptop.

  7. Dell Inspiron 15-3531 Fan Replacement: Schritt 7, Bild 1 von 3 Dell Inspiron 15-3531 Fan Replacement: Schritt 7, Bild 2 von 3 Dell Inspiron 15-3531 Fan Replacement: Schritt 7, Bild 3 von 3
    • Disengage both antenna (black and white) cables by lifting them up using the spudger.

    • Unscrew the one 8.65 mm screw holding the wireless card.

    • Remove the wireless card.

  8. Dell Inspiron 15-3531 Fan Replacement: Schritt 8, Bild 1 von 2 Dell Inspiron 15-3531 Fan Replacement: Schritt 8, Bild 2 von 2
    • Lift the locking tab with the spudger and pull the cable form the locking tab.

    • Repeat with the second locking tab.

  9. Dell Inspiron 15-3531 Fan Replacement: Schritt 9, Bild 1 von 1
    • Remove the four 8.65 mm screws underneath the keyboard plate.

    • Remove the three 1.22 mm small screws underneath the keyboard plate.

  10. Dell Inspiron 15-3531 Fan Replacement: Schritt 10, Bild 1 von 3 Dell Inspiron 15-3531 Fan Replacement: Schritt 10, Bild 2 von 3 Dell Inspiron 15-3531 Fan Replacement: Schritt 10, Bild 3 von 3
    • Separate the palmrest from the base of the laptop using the spudger to loosen the palmrest along the edges.

    • Make sure to remove all the screws, especially the inconspicuous 8.65 mm screw next to the hard drive.

  11. Dell Inspiron 15-3531 Fan Replacement: Schritt 11, Bild 1 von 3 Dell Inspiron 15-3531 Fan Replacement: Schritt 11, Bild 2 von 3 Dell Inspiron 15-3531 Fan Replacement: Schritt 11, Bild 3 von 3
    In diesem Schritt verwendetes Werkzeug:
    Tweezers
    $4.99
    • Remove the cables on the upper left side of the laptop using flat tweezers.

    • Remove the cable from the upper right hand corner.

  12. Dell Inspiron 15-3531 Fan Replacement: Schritt 12, Bild 1 von 2 Dell Inspiron 15-3531 Fan Replacement: Schritt 12, Bild 2 von 2
    • Remove the speaker cable.

    • Remove cable on the right-hand side.

  13. Dell Inspiron 15-3531 Fan Replacement: Schritt 13, Bild 1 von 1
    • Unscrew the one 8.65 mm screw holding the motherboard in place with a PH0 size head screwdriver.

    • Remove the motherboard.

  14. Dell Inspiron 15-3531 Fan Replacement, Fan: Schritt 14, Bild 1 von 2 Dell Inspiron 15-3531 Fan Replacement, Fan: Schritt 14, Bild 2 von 2
    • Turn over the motherboard.

    • Disconnect the fan power cable.

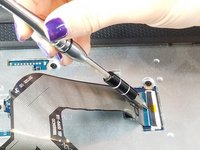
    • Remove the 8.65 mm screw holding the fan casing to the laptop frame using a PH0 head screwdriver.

Abschluss

To reassemble your device, follow these instructions in reverse order.

Eine weitere Person hat diese Anleitung absolviert.

Kody Dahlke

Mitglied seit: 02/15/18

742 Reputation

5 Anleitungen geschrieben

Team

USF Tampa, Team S1-G5, Leahy Spring 2018 Mitglied von USF Tampa, Team S1-G5, Leahy Spring 2018

USFT-LEAHY-S18S1G5

5 Mitglieder

5 Anleitungen geschrieben

0 Kommentare

Kommentar hinzufügen

Seitenaufrufe:

Letzte 24 Stunden: 0

Letzte 7 Tage: 11

Letzte 30 Tage: 20

Insgesamt: 828