Zum Hauptinhalt wechseln

Dell Inspiron 17-5748 Keyboard Replacement

Was du brauchst

  1. Dell Inspiron 17-5748 Keyboard Replacement, Battery: Schritt 1, Bild 1 von 1
    • Flip the laptop upside down.

    • Locate the battery lock latches.

  2. Dell Inspiron 17-5748 Keyboard Replacement: Schritt 2, Bild 1 von 1
    • Slide both lock latches to the unlocked position.

  3. Dell Inspiron 17-5748 Keyboard Replacement: Schritt 3, Bild 1 von 1
    • Lift the battery up and out of the laptop battery socket.

  4. Dell Inspiron 17-5748 Keyboard Replacement, Keyboard: Schritt 4, Bild 1 von 1
    • Open the laptop and locate the keyboard.

  5. Dell Inspiron 17-5748 Keyboard Replacement: Schritt 5, Bild 1 von 2 Dell Inspiron 17-5748 Keyboard Replacement: Schritt 5, Bild 2 von 2
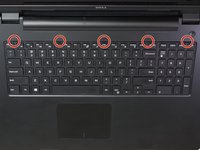
    • Locate the 5 keyboard tabs at the side of the keyboard closest to the screen.

    • Using a metal spudger, gently pry the keyboard tabs inwards until they loosened. You should hear a click.

  6. Dell Inspiron 17-5748 Keyboard Replacement: Schritt 6, Bild 1 von 2 Dell Inspiron 17-5748 Keyboard Replacement: Schritt 6, Bild 2 von 2
    • Do not remove the keyboard completely. The ribbon cable underneath, attaching it to the motherboard, must still be detached.

    • Lift the keyboard partially and flip it over.

  7. Dell Inspiron 17-5748 Keyboard Replacement: Schritt 7, Bild 1 von 2 Dell Inspiron 17-5748 Keyboard Replacement: Schritt 7, Bild 2 von 2
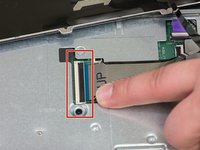
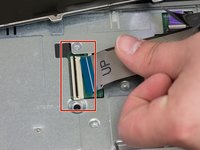
    • Detach the ribbon cable from the motherboard by tilting up the black clip, releasing the cable.

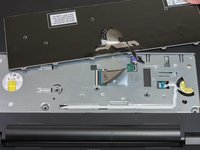
    • Gently detach the cable and the keyboard from the laptop.

Abschluss

To reassemble your device, follow these instructions in reverse order.

Team

Washington State, Team S2-G2, Lobnitz Spring 2018 Mitglied von Washington State, Team S2-G2, Lobnitz Spring 2018

WSU-LOBNITZ-S18S2G2

6 Mitglieder

4 Anleitungen geschrieben

0 Kommentare

Kommentar hinzufügen

Seitenaufrufe:

Letzte 24 Stunden: 0

Letzte 7 Tage: 0

Letzte 30 Tage: 3

Insgesamt: 632