
Dell Inspiron 9300 Keyboard Replacement
Einleitung
Zu Schritt 1 der AnleitungWe've all had a similar problem: The keyboard loses a key, something doesn't work with it, etc. While the Inspiron 9300 from Dell has aged, the durability and longevity of the device has still proven itself to old users and new users alike.
This quick guide will show you how to replace a faulty keyboard in the Dell Inspiron 9300.
Was du brauchst


-
-
Use the spudger to remove the top cover plate to expose the screws for the keyboard.
-
-
-
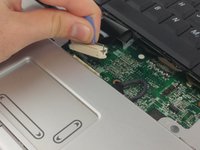
Gently pull up on the blue tab to disconnect the keyboard.
-
Pull the keyboard up and away to safely remove the keyboard.
-


To reassemble your device, follow these instructions in reverse order.
To reassemble your device, follow these instructions in reverse order.
Rückgängig: Ich habe diese Anleitung nicht absolviert.
Eine weitere Person hat diese Anleitung absolviert.
Team

USF Tampa, Team 16-6, Eyestone Fall 2016 Mitglied von USF Tampa, Team 16-6, Eyestone Fall 2016
USFT-EYESTONE-F16S16G6
5 Mitglieder
11 Anleitungen geschrieben