Zum Hauptinhalt wechseln

Dell Inspiron n5050 Upper Case Replacement

Was du brauchst

  1. Achtung: Die Schritte 1-3 stammen von einer Anleitung, die derzeit bearbeitet wird.

    Dell Inspiron n5050 Upper Case Replacement, Battery: Schritt 1, Bild 1 von 1
    • Flip your laptop over to view the bottom and locate the two locks.

  2. Dell Inspiron n5050 Upper Case Replacement: Schritt 2, Bild 1 von 1
    • Slide the two locks away from each other.

    • Sliding these locks will loosen the battery to allow removal.

  3. Dell Inspiron n5050 Upper Case Replacement: Schritt 3, Bild 1 von 2 Dell Inspiron n5050 Upper Case Replacement: Schritt 3, Bild 2 von 2
    • Pull battery out of the laptop.

    • Your laptop's battery should be completely removed.

  4. Dell Inspiron n5050 Upper Case Replacement, Keyboard: Schritt 4, Bild 1 von 2 Dell Inspiron n5050 Upper Case Replacement, Keyboard: Schritt 4, Bild 2 von 2
    • Flip the laptop right side up. Open the laptop.

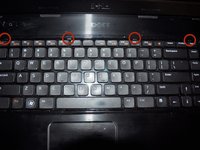
    • Gently press in the four retaining tabs along the top of the keyboard with a spudger, one at a time.

    • After the first tab is released, gently lift up on the keyboard so it doesn't lock again. Finish the other three tabs while gently lifting up on the keyboard. The keyboard will hinge up along the bottom.

  5. Dell Inspiron n5050 Upper Case Replacement: Schritt 5, Bild 1 von 3 Dell Inspiron n5050 Upper Case Replacement: Schritt 5, Bild 2 von 3 Dell Inspiron n5050 Upper Case Replacement: Schritt 5, Bild 3 von 3
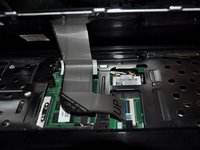
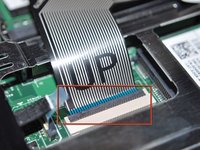
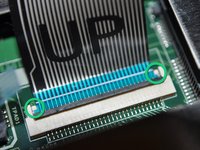
    • Gently flip the data cable latch away from the data cable with flat side of spudger.

    • Lift the cable up and out.

    • When reinstalling cable, there are two retainer wings on the sides of the cable that the cable that lock onto the bottom of the cable latch area. When these are in place the cable is properly inserted.

    • For removing the optical drive you don't need to disconnect the keyboard ribbon cable.

  6. Dell Inspiron n5050 Upper Case Replacement, Upper Case: Schritt 6, Bild 1 von 1
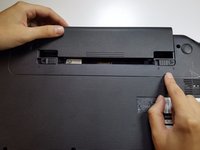
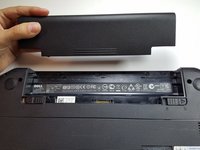
    • Close the lid, flip the laptop bottom side up with the battery at the top.

    • Remove the 11 screws holding the upper case to the lower case.

  7. Dell Inspiron n5050 Upper Case Replacement: Schritt 7, Bild 1 von 1
    • Flip the laptop over and open the lid.

    • Remove the two screws from the upper case.

  8. Dell Inspiron n5050 Upper Case Replacement: Schritt 8, Bild 1 von 3 Dell Inspiron n5050 Upper Case Replacement: Schritt 8, Bild 2 von 3 Dell Inspiron n5050 Upper Case Replacement: Schritt 8, Bild 3 von 3
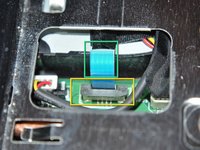
    • Gently unplug the power cable.

    • You lift up on the dark gray latch.

    • Pull the blue ribbon up.

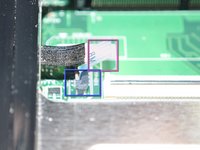
    • Gently unplug the touchpad cable.

    • Lift up on the dark gray latch.

    • Pull the blue ribbon up

  9. Dell Inspiron n5050 Upper Case Replacement: Schritt 9, Bild 1 von 1
    • Grab the metal frame of the upper case and gently pull it away from the lower case. Disconnect the cable that says MB before removing the palmrest.

    • Work your way around the perimeter of the upper case.

Abschluss

To reassemble your device, follow these instructions in reverse order.

10 weitere Nutzer:innen haben diese Anleitung absolviert.

Tyler

Mitglied seit: 06/19/12

4.920 Reputation

16 Anleitungen geschrieben

Team

TechForce Mitglied von TechForce

Business

2 Mitglieder

25 Anleitungen geschrieben

0 Kommentare

Kommentar hinzufügen

Seitenaufrufe:

Letzte 24 Stunden: 1

Letzte 7 Tage: 1

Letzte 30 Tage: 8

Insgesamt: 3,270