Zum Hauptinhalt wechseln
Fujifilm FinePix S4200 Viewfinder  Replacement

Fujifilm FinePix S4200 Viewfinder Replacement

Melissa Burciaga

Melissa Burciaga und 5 weitere Mitwirkende

Zuletzt aktualisiert am April 21, 2020

25 Minuten
Mittel
Fehlende grundständige Anleitungen

To replace the viewfinder you will need to perform the LCD prerequisite. The viewfinder should be replaced if your camera does not focus or your photos lack composition.

Was du brauchst

Werkzeuge

  1. Fujifilm FinePix S4200 Viewfinder  Replacement, LCD Screen: Schritt 1, Bild 1 von 1
    • Turn the camera off.

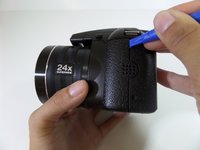
    • Turn the camera upside down so that the battery compartment is showing.

  2. Fujifilm FinePix S4200 Viewfinder  Replacement: Schritt 2, Bild 1 von 1
    • Remove the three 4 mm screws from the bottom of the camera with a Phillips #000 screwdriver.

  3. Fujifilm FinePix S4200 Viewfinder  Replacement: Schritt 3, Bild 1 von 1
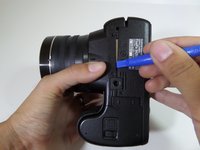
    • Rotate camera to the side where the speaker ports are located.

    • Remove the three 4 mm screws with a Phillips #000 screwdriver.

  4. Fujifilm FinePix S4200 Viewfinder  Replacement: Schritt 4, Bild 1 von 1
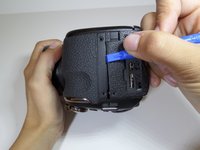
    • Turn the camera to the opposite side where the HDMI port is located.

    • Remove all five 4 mm screws with a Phillips #000 screwdriver.

  5. Fujifilm FinePix S4200 Viewfinder  Replacement: Schritt 5, Bild 1 von 3 Fujifilm FinePix S4200 Viewfinder  Replacement: Schritt 5, Bild 2 von 3 Fujifilm FinePix S4200 Viewfinder  Replacement: Schritt 5, Bild 3 von 3
    • Casing is fragile.

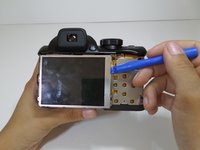
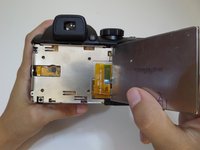
    • Utilize the plastic opening tool to pry in between the back casing of the camera from the front casing.

    • Continue this motion around the camera to create a wedge between the front and back casing of the camera.

  6. Fujifilm FinePix S4200 Viewfinder  Replacement: Schritt 6, Bild 1 von 1
    • Use force to pull apart the back casing from the camera.

  7. Fujifilm FinePix S4200 Viewfinder  Replacement: Schritt 7, Bild 1 von 1
    • Remove the two 4 mm screws that hold the motherboard and metal plate in place.

  8. Fujifilm FinePix S4200 Viewfinder  Replacement: Schritt 8, Bild 1 von 2 Fujifilm FinePix S4200 Viewfinder  Replacement: Schritt 8, Bild 2 von 2
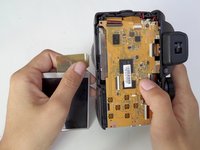
    • Utilize the plastic opening tool to gently lift the LCD screen away from the metal plate.

    • Flip over LCD screen so that the left side of the metal plate is visible.

  9. Fujifilm FinePix S4200 Viewfinder  Replacement: Schritt 9, Bild 1 von 1
    • Rotate the camera vertically so that it is easier to manage.

    • Use a Phillips #000 screwdriver to remove the two 4mm screws that are located on the metal plate under the LCD screen.

  10. Fujifilm FinePix S4200 Viewfinder  Replacement: Schritt 10, Bild 1 von 1
    • Detach the metal plate from the motherboard.

  11. Fujifilm FinePix S4200 Viewfinder  Replacement: Schritt 11, Bild 1 von 2 Fujifilm FinePix S4200 Viewfinder  Replacement: Schritt 11, Bild 2 von 2
    • The orange ribbon cable is fragile.

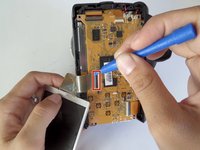
    • Pull back the small black latch connecting the orange ribbon cable to the motherboard.

    • Gently remove the LCD screen from the motherboard.

  12. Fujifilm FinePix S4200 Viewfinder  Replacement, Viewfinder: Schritt 12, Bild 1 von 2 Fujifilm FinePix S4200 Viewfinder  Replacement, Viewfinder: Schritt 12, Bild 2 von 2
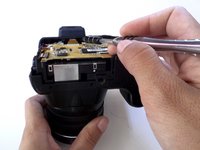
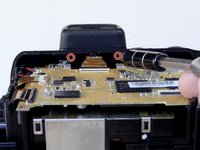
    • Remove the two 4 mm screws with a Phillips 000 screwdriver under the viewfinder.

  13. Fujifilm FinePix S4200 Viewfinder  Replacement: Schritt 13, Bild 1 von 1
    • Carefully pull off the plastic cover from the view finder.

  14. Fujifilm FinePix S4200 Viewfinder  Replacement: Schritt 14, Bild 1 von 1
    • Remove the two 3mm screws surrounding the viewfinder with a Phillips 000 screwdriver.

  15. Fujifilm FinePix S4200 Viewfinder  Replacement: Schritt 15, Bild 1 von 1
    • Orange ribbon is fragile.

    • Using the plastic opening tool, pull down the small black latch to remove the orange ribbon from the mother board.

  16. Fujifilm FinePix S4200 Viewfinder  Replacement: Schritt 16, Bild 1 von 1
    • Pull the viewfinder up to remove it from the body of the camera

Abschluss

To reassemble your device, follow these instructions in reverse order.

2 weitere Personen haben diese Anleitung absolviert.

Team

CSU Fullerton, Team 1-4, Bruce Fall 2015 Mitglied von CSU Fullerton, Team 1-4, Bruce Fall 2015

CSUF-BRUCE-F15S1G4

4 Mitglieder

7 Anleitungen geschrieben

0 Kommentare

Kommentar hinzufügen

Seitenaufrufe:

Letzte 24 Stunden: 0

Letzte 7 Tage: 8

Letzte 30 Tage: 11

Insgesamt: 949